

Table of Contents
Are you on the lookout for a nutritious snack that’s both delicious and easy to prepare? If so, let me introduce you to No Bake Protein Bars: 5 Reasons You’ll Love Them. These bars are more than just a quick source of energy; they’re a tasty treat that can fit seamlessly into your busy lifestyle. Imagine a snack that satisfies your sweet tooth without the guilt. This recipe stands out for its simplicity and the wholesome ingredients that come together quickly, without the need for an oven.
Have you ever found yourself hungry between meals with no healthy options in sight? That’s where these No Bake Protein Bars come in handy. Packed with protein, fiber, and healthy fats, they provide sustained energy to keep you going throughout your day. Plus, they can be customized to suit your personal taste. What could be better than a snack that’s both good for you and enjoyable to eat?
The beauty of No Bake Protein Bars: 5 Reasons You’ll Love Them lies in their versatility. Whether you’re meal prepping for a busy week ahead or making a special treat for your family, these bars deliver. They’re perfect for kids and adults alike, making them a family-friendly option that’ll please everyone. Why not try making them this weekend? Once you taste these homemade goodies, you’ll understand their appeal.
Key Benefits of No Bake Protein Bars: 5 Reasons You’ll Love Them
Why You’ll Love This Recipe
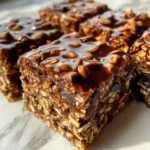
Delicious Flavor: A perfect blend of oats, peanut butter, and chocolate makes these bars extremely satisfying.
Quick and Easy: With minimal preparation and no baking required, you can whip these up in just a few minutes.
Customizable: Add your favorite nuts, seeds, or dried fruits to personalize the bars just the way you like.
Healthy Ingredients: Each element is nutritious, providing energy and supporting overall health.
Family-Friendly: The taste and texture appeal to both kids and adults, making them a hit at home.
Perfect for Meal Prep: Make a batch and have a healthy snack ready to go whenever you need it.
What Makes It Stand Out
No Bake Protein Bars: 5 Reasons You’ll Love Them is not just another recipe; it’s a meal prep must-have. This dish stands out due to its extraordinary combination of flavor and nutrition. Many bars on the market are filled with sugar and preservatives, but these homemade options ensure you know exactly what’s going into your snack.
The customization options are endless. You can try different nut butters or sweeteners based on your dietary needs or taste preferences. Planning for special occasions? These bars shine at picnics, lunch boxes, or post-workout snacks. Their versatility makes them fit in any lifestyle or setting, turning a simple snack into a gourmet treat!
Ingredients for No Bake Protein Bars: 5 Reasons You’ll Love Them
Complete Ingredient List with Measurements
2 cups rolled oats: A hearty base that adds fiber and texture.
1 cup protein powder: Choose your favorite protein, whether whey, casein, or plant-based.
1/2 cup peanut butter: Adds creaminess and a rich flavor profile; can be substituted with almond butter or sunflower seed butter.
1/4 cup honey: Acts as a binding agent and natural sweetener; maple syrup can be used for a vegan option.
1/2 cup dark chocolate chips: For indulgent flavor; opt for dairy-free chips to make it vegan.
Substitutes and Alternatives
If you have dietary restrictions or allergies, No Bake Protein Bars: 5 Reasons You’ll Love Them can easily be modified. For those avoiding gluten, ensure you use certified gluten-free oats. If you’re vegan, swap the honey for agave syrup or maple syrup.
Additionally, nut allergies can be accommodated by replacing peanut butter with sun butter or tahini. There are many ways to cater to different diets without sacrificing flavor. Explore these alternatives to make the recipe work for you and your loved ones.
How to Make No Bake Protein Bars: 5 Reasons You’ll Love Them – Step-by-Step Directions
Step 1 – Prepare Ingredients
Gather all your ingredients. Measure out 2 cups of rolled oats, 1 cup of your preferred protein powder, 1/2 cup of peanut butter, 1/4 cup of honey, and 1/2 cup of dark chocolate chips. It’s best to have everything ready before you begin mixing.
Step 2 – Mix Dry Ingredients
In a large bowl, combine the oats and protein powder. Stir these dry ingredients until they’re well blended. This helps ensure that the protein powder distributes evenly throughout the bars.
Step 3 – Add Wet Ingredients
Next, add the peanut butter and honey to the dry mixture. Use a spatula or wooden spoon to mix them together. The mixture will become thick and sticky, so be sure to combine everything well.
Step 4 – Fold in Chocolate Chips
Once you have a uniform mixture, fold in the dark chocolate chips. They will add a delightful sweetness to the bars and melt slightly in the mixture.
Step 5 – Prepare Your Baking Dish
Line an 8×8-inch baking dish with parchment paper. This will help you remove the bars easily after they set. Spread the mixture into the dish, pressing it down firmly with the back of a spatula.
Step 6 – Refrigerate
Place the baking dish in the fridge. Allow it to chill for at least an hour. This will help the bars firm up so that they can be cut easily.
Step 7 – Cut into Bars
After chilling, remove the dish from the refrigerator. Lift the mixture out using the parchment paper and place it on a cutting board. Use a sharp knife to cut them into squares or rectangles as desired.
Step 8 – Serve and Enjoy
Your No Bake Protein Bars: 5 Reasons You’ll Love Them are now ready to be enjoyed! They can be kept in an airtight container in the fridge for up to a week.
Serving Suggestions for No Bake Protein Bars: 5 Reasons You’ll Love Them
Best Occasions to Serve This Dish
No Bake Protein Bars: 5 Reasons You’ll Love Them are perfect for quick snacks after school or before workouts. They can double as a satisfying breakfast if you’re in a hurry.
Planning a picnic or outdoor event? These bars are portable and easy to share. They also make a great addition to lunch boxes, giving kids a healthy boost to keep them energized throughout the day.
What to Serve With It
Pair with fresh fruit for a balanced snack.
Serve alongside a protein shake for a post-workout boost.
Complement with yogurt for a wholesome breakfast.
Enjoy with a cup of tea or coffee for a midday treat.
How to Store No Bake Protein Bars: 5 Reasons You’ll Love Them Properly
Best Storage Practices
To keep your No Bake Protein Bars fresh, store them in an airtight container. They can be kept in the refrigerator for up to a week. If you want them to last longer, consider freezing them.
Label your container with the date so you know when they were made. This way, you can enjoy their freshness for longer.
Reheating and Freezing Tips
If you prefer your bars slightly softer, you can leave them at room temperature for a few minutes before enjoying. If frozen, let them thaw in the refrigerator overnight before eating.
To freeze, wrap each bar individually in plastic wrap or foil, and place them in a freezer-safe container. This offers convenience for those busy days when you need a quick snack.
Tips & Tricks for No Bake Protein Bars: 5 Reasons You’ll Love Them
Mistakes to Avoid
Not Measuring Ingredients: Accurate measurements ensure the right texture and consistency.
Skipping the Refrigeration: This step is crucial for setting the bars and ensuring they hold their shape.
Not Pressing Mixture Firmly: Make sure to pack the mixture tightly in the baking dish to prevent them from crumbling.
Using Warm Ingredients: Ensure the peanut butter is at room temperature for easier mixing.
Not Storing Properly: Avoid leaving them at room temperature for extended periods; this could cause them to spoil.
Extra Tips for Better Results
Try adding a pinch of salt to intensify the flavors. Also, consider mixing in superfoods, like chia seeds or flaxseeds, for extra nutrition. For a different flavor profile, experiment with different nut butters or add spices like cinnamon.
Presentation can elevate your No Bake Protein Bars. Drizzle melted chocolate over the top or sprinkle with shredded coconut for a tasty finishing touch.
Recipe Variations of No Bake Protein Bars: 5 Reasons You’ll Love Them
Creative Twists
Nutty Chocolate Chip: Mix in chopped nuts, like almonds or walnuts, for added crunch and a boost of healthy fats.
Fruit Infusion: Incorporate dried fruits like cranberries or apricots for a chewy texture and a burst of flavor.
Coconut Delight: Add unsweetened shredded coconut for a tropical twist.
Matcha Protein Bars: Use matcha powder for an antioxidant boost and a unique flavor.
Dietary Adjustments
For those who require a vegan option, simply substitute honey with maple syrup. Replace the chocolate chips with dairy-free varieties to keep the recipe completely animal-product-free.
If you’re avoiding gluten, be sure to use certified gluten-free oats. These small changes can make No Bake Protein Bars: 5 Reasons You’ll Love Them friendly for various dietary needs.
Conclusion about No Bake Protein Bars: 5 Reasons You’ll Love Them
In conclusion, No Bake Protein Bars: 5 Reasons You’ll Love Them are not just another snack; they are a delightful blend of convenience and taste. This recipe highlights the ease of preparation while providing numerous health benefits. They are perfect for busy individuals and families alike.
With the chance to customize ingredients, you can cater to dietary preferences while still creating a delicious treat. The ability to store and enjoy them at your own pace adds to their appeal. If you haven’t tried making these bars yet, now is the perfect time to start. You’ll wonder how you ever snacked without them!
FAQs about No Bake Protein Bars: 5 Reasons You’ll Love Them
Can I prepare it ahead of time?
Absolutely! These bars can be made a few days in advance and stored in the fridge for convenient snacking.
Can I freeze it?
Yes, freezing is a great option. You can keep them for up to three months if properly wrapped.
How long does it last?
Stored in the fridge, they will last for about a week, while frozen bars can last for months.
What are the best substitutions?
You can swap peanut butter for any nut or seed butter, honey for maple syrup, and use gluten-free oats if needed.
Is this recipe family-friendly?
Yes! The flavor and texture appeal to all ages, making it ideal for family snacks or school lunches.
Can I add protein to these bars?
Definitely! Using protein powder is a great way to increase the protein content without altering the flavor.
Is it possible to make these bars lower in sugar?
Yes, using sugar alternatives like stevia or erythritol can lower the sugar content significantly.
How do I customize the flavor?
Feel free to add spices, different nut butters, or toasted seeds to craft a flavor you love.
Can I make them chocolaty without chips?
Yes, you could mix cocoa powder into the base for a rich chocolate flavor without using chips.
What’s the best way to cut the bars?
Use a sharp knife and try to cut them while they are cold for cleaner edges.
No Bake Protein Bars
Ingrédients
Base Ingredients
- 2 cups rolled oats A hearty base that adds fiber and texture.
- 1 cup protein powder Choose your favorite protein, whether whey, casein, or plant-based.
- 1/2 cup peanut butter Can be substituted with almond butter or sunflower seed butter.
- 1/4 cup honey Acts as a binding agent; maple syrup can be used for a vegan option.
- 1/2 cup dark chocolate chips Opt for dairy-free chips to make it vegan.
Instructions
Preparation
- Gather all your ingredients. Measure out 2 cups of rolled oats, 1 cup of your preferred protein powder, 1/2 cup of peanut butter, 1/4 cup of honey, and 1/2 cup of dark chocolate chips.
- In a large bowl, combine the oats and protein powder. Stir these dry ingredients until well blended.
- Add the peanut butter and honey to the dry mixture. Mix well until combined.
- Fold in the dark chocolate chips.
- Line an 8×8-inch baking dish with parchment paper. Press the mixture firmly into the dish.
- Refrigerate for at least an hour to set.
- Cut into squares or rectangles as desired.
- Serve and enjoy!