

Table of Contents
Introduction to Pita Pizzas
Have you ever found yourself craving pizza but lacked the time or energy to whip up a traditional version? Enter Pita Pizzas – an easy, delightful twist on the classic dish that promises to satisfy without the fuss! Using pita bread as a base, these mini pizzas are not only quick to assemble but also customizable to suit every taste preference.
Imagine sinking your teeth into a crispy, cheesy delight topped exactly how you like it. No more waiting for delivery or spending hours in the kitchen; with Pita Pizzas, you can turn everyday ingredients into a fun, family-friendly meal in less than 30 minutes! You can easily bring your own creativity to the table, layering flavors and textures to create the ultimate personalized pizza experience.
Whether you want a simple cheese pizza or are in the mood for something more adventurous, Pita Pizzas have got you covered. They are perfect for busy weeknights, quick lunches, or delightful snacks. Perfect for kids and adults alike, these mini pizzas can be a fun activity to whip up with family or friends. It’s time to gather your favorite ingredients and let your taste buds embark on a flavorsome journey with Pita Pizzas!
Key Benefits of Pita Pizzas
Why You’ll Love This Recipe
- Quick to prepare: From prep to plate in 15 minutes.
- Customizable: Use your favorite toppings for endless flavors.
- Kid-friendly: Fun to make and even more fun to eat.
- Healthy options: Opt for whole grain pita and fresh veggies.
- Perfect for parties: A crowd-pleaser that can cater to various dietary needs.
What Makes It Stand Out
Pita Pizzas stand out due to their versatility—they’re a blank canvas waiting for your culinary imagination. You can mix and match ingredients easily, creating everything from classic Pepperoni to gourmet options. This adaptability not only makes them suitable for various occasions, like game nights or quick snacks, but also ensures that everyone can enjoy their perfect bite.
Additionally, Pita Pizzas are a fantastic way to use up pantry and fridge staples you may already have. Why let leftover veggies go to waste when you can top them on a pizza? The potential for creativity and minimal food waste is what makes Pita Pizzas a noteworthy recipe choice.
Ingredients for Pita Pizzas
Complete Ingredient List with Measurements
- Pita bread
- Tomato sauce
- Shredded mozzarella cheese
- Pepperoni slices
- Bell peppers (sliced)
- Olives (sliced)
- Dried oregano
- Olive oil
Substitutes and Alternatives
If you or someone you’re serving has dietary restrictions, there are plenty of substitutions you can use. For a gluten-free option, simply swap traditional pita bread for gluten-free pita or crust. Dairy-free cheese can be used in place of mozzarella for those avoiding dairy. You can also get creative with toppings—try grilled veggies instead of meats, or even fresh herbs for added flavor. Make sure to adjust cooking times slightly based on the alternative ingredients used for best results.
How to Make Pita Pizzas – Step-by-Step Directions
Step 1 – Prepare Ingredients
Start by gathering all your ingredients. Slice up any fresh veggies you plan to use, like bell peppers and olives. Preheat your oven to 400°F (200°C) to ensure it’s ready when you’re done prepping.
Step 2 – Cook the Base
Next, place your pita breads on a baking sheet. This will serve as the canvas for your toppings. Ensure they’re spaced evenly so they cook uniformly.
Step 3 – Spread the Sauce
Using a spoon, spread a generous layer of tomato sauce on each pita. Make sure to cover the surface evenly but leave a small border around the edge for a crispy crust.
Step 4 – Add Cheese
Now it’s time for the fun part! Sprinkle shredded mozzarella cheese over the sauce on each pita. The more cheese, the better, but remember that you want a balance with the toppings.
Step 5 – Layer on Toppings
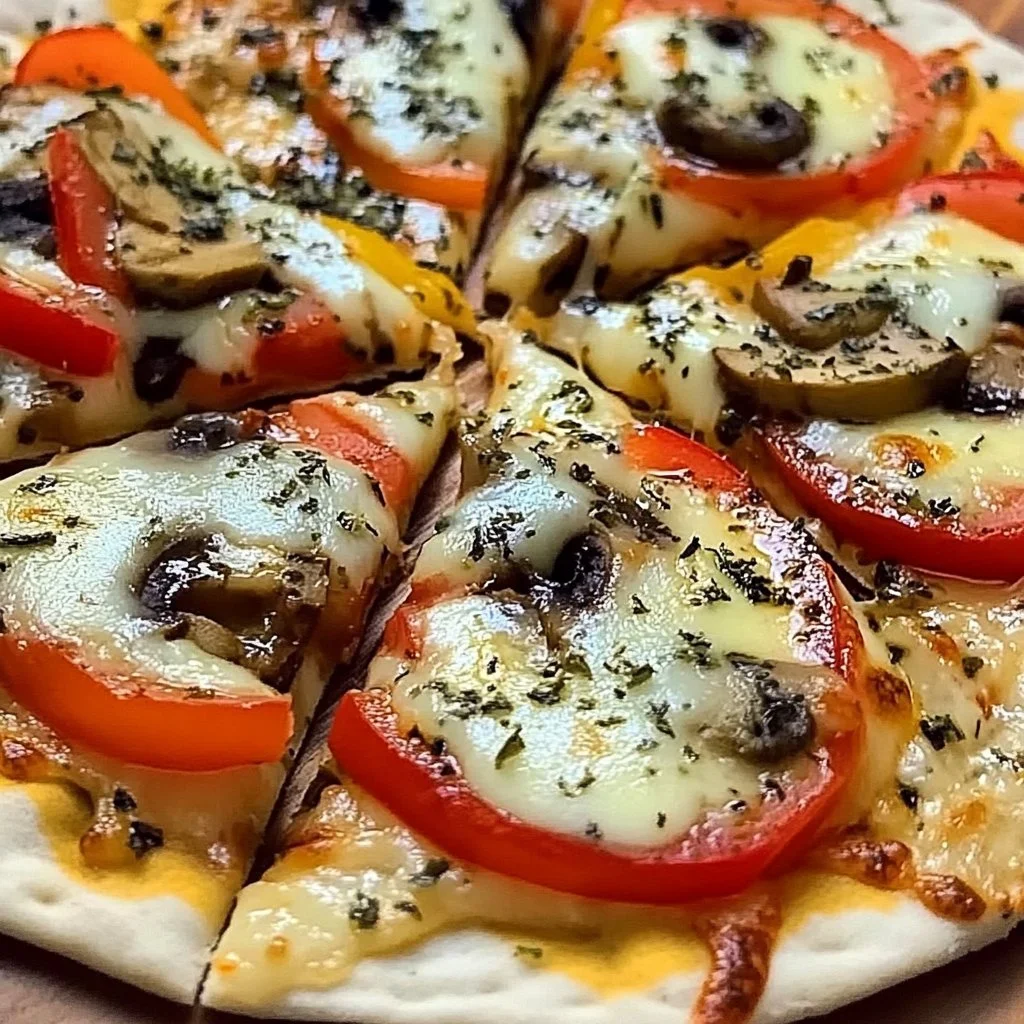
Add your choice of toppings. Place pepperoni slices evenly on top, followed by the bell peppers and olives. Feel free to mix in any other favorites like mushrooms or spinach!
Step 6 – Sprinkle Seasonings
Don’t forget the seasoning! Sprinkle dried oregano over the entire pizza. This will add that classic pizza flavor and elevate your Pita Pizzas to the next level.
Step 7 – Drizzle with Olive Oil
For an extra touch of flavor and a beautifully golden finish, drizzle a little olive oil over the top of each pizza. This will help everything brown nicely while baking.
Step 8 – Bake in the Oven
Place the baking sheet in the preheated oven and bake for about 10-12 minutes. Keep an eye on them—the key is to see the cheese melted and bubbling, alongside a lightly crispy edge on the pita.
Step 9 – Cool and Serve
Once baked, carefully remove the Pita Pizzas from the oven. Let them cool for a minute before cutting them into wedges. Serve warm and enjoy your homemade delicacies!
Serving Suggestions for Pita Pizzas
Best Occasions to Serve This Dish
Pita Pizzas are incredibly versatile and perfect for various occasions. They’re ideal for casual weeknight dinners, making it easy to please picky eaters. For game nights, these mini pizzas can be a crowd-pleaser that lets everyone top their pizzas just how they like. They also make a great addition to parties, providing a delicious and enjoyable finger food option.
What to Serve With It
Pita Pizzas pair wonderfully with a variety of sides. A simple green salad with a light vinaigrette balances out the meal nicely. You can also serve them with fresh veggie sticks and a dip like tzatziki for a crunchy side. For a true pizza night feel, a glass of sparkling water or a classic soda will delight!
How to Store Pita Pizzas Properly
Best Storage Practices
If you find yourself with leftovers, storing Pita Pizzas is straightforward. Simply let them cool completely before placing them in an airtight container in the fridge. They can typically last for about 3-4 days, but they’re best eaten fresh.
Reheating and Freezing Tips
To reheat, place the cold Pita Pizzas back in the oven at 350°F (175°C) for about 5-7 minutes until heated through and the cheese is melty again. If you want to freeze them, wrap each pizza tightly in plastic wrap or aluminum foil, then place them in a freezer-safe bag. They can be stored for up to 3 months. Thaw in the fridge overnight before reheating.
Tips & Tricks for Pita Pizzas
Mistakes to Avoid
1 – Skipping the Preheat: Not preheating the oven can lead to uneven cooking of your Pita Pizzas.
2 – Overloading on Toppings: Too many toppings can make the pita soggy—stick to a balanced amount.
3 – Not Watchful While Baking: Each oven is different, so keep an eye out to avoid burning.
4 – Ignoring the Sauce Amount: Over-saucing can lead to a messy pizza; use just enough to coat the base.
5 – Forgetting the Cooling Time: Allowing them to cool slightly helps when cutting into wedges.
Extra Tips for Better Results
For a crispier base, consider lightly toasting the pita bread before adding toppings. Experiment with different types of cheeses or sauces—barbecue sauce can give a fun twist! Don’t shy away from fresh ingredients; adding fresh basil or arugula right before serving adds brightness and flavor.
Recipe Variations of Pita Pizzas
Creative Twists
1 – Mediterranean Style: Top with feta cheese, spinach, and artichokes to create a fresh, Mediterranean-inspired pizza.
2 – BBQ Chicken: Use barbecue sauce as a base and top with shredded chicken, red onions, and cilantro for a delightful twist.
3 – Breakfast Pita Pizzas: Scramble some eggs, add cheese, and layer with bacon to create a delicious breakfast option.
Dietary Adjustments
For a vegan option, simply replace cheese with a plant-based alternative and load up on fresh vegetables. Gluten-free eaters can substitute regular pita bread for a gluten-free version, ensuring everyone can join in the fun.
Conclusion about Pita Pizzas
In conclusion, Pita Pizzas are not just a meal; they become a canvas for culinary creativity. This easy recipe allows for personalized toppings, making it a delightful addition to any kitchen. Whether for a fun family night, a quick lunch, or an indulgent snack, these homemade pizzas are sure to impress. They bring families together to create their own delicious meals and make cleanup a breeze. Once you try Pita Pizzas, you’ll understand why they’re a favorite for busy nights and special gatherings alike. So, don’t hesitate to gather your ingredients and get started on this simple yet satisfying recipe!
FAQs about Pita Pizzas
Can I make Pita Pizzas in advance?
Yes, you can assemble Pita Pizzas in advance and store them in the fridge until you’re ready to bake.
What can I use instead of tomato sauce?
You can substitute tomato sauce with pesto, barbecue sauce, or even a white sauce like Alfredo for a different flavor profile.
Can I freeze Pita Pizza?
Absolutely! Just make sure to cool them down, wrap them well, and store them in the freezer for up to 3 months.
What side dishes pair well with Pita Pizza?
Fresh salads, veggie sticks with dip, or potato wedges make great side dishes to enjoy with Pita Pizza.
How long do leftovers last in the fridge?
Leftover Pita Pizza can be stored in an airtight container in the fridge for 3-4 days.
What’s the best way to reheat Pita Pizza?
Reheat Pita Pizza in the oven at 350°F (175°C) for 5-7 minutes until warmed through and the cheese is melted.
Are there vegan options for Pita Pizzas?
Yes! Simply replace the mozzarella cheese with vegan cheese and use vegetable toppings.
Can I use whole wheat pita bread?
Whole wheat pita bread is a fantastic healthier option and will work perfectly for Pita Pizzas.
What toppings are best for kids?
Kid-friendly toppings include pepperoni, cheese, bell peppers, and olives. They can even help build their own!
Is there a gluten-free version of Pita Pizzas?
Yes, you can easily use gluten-free pita bread to accommodate anyone with gluten sensitivities.

Pita Pizzas
Ingrédients
Base Ingredients
- 4 pieces Pita bread
- 1 cup Tomato sauce
- 2 cups Shredded mozzarella cheese
Toppings
- 10 slices Pepperoni slices
- 1 cup Bell peppers (sliced)
- 0.5 cup Olives (sliced)
Seasonings & Oil
- 1 teaspoon Dried oregano
- 2 tablespoons Olive oil
Instructions
Preparation
- Start by gathering all your ingredients. Slice up any fresh veggies like bell peppers and olives. Preheat your oven to 400°F (200°C).
Baking Procedure
- Place the pita breads on a baking sheet, ensuring they’re spaced evenly.
- Spread a generous layer of tomato sauce on each pita, leaving a small border for a crispy crust.
- Sprinkle shredded mozzarella cheese over the sauce on each pita.
- Layer on your choice of toppings like pepperoni, bell peppers, and olives.
- Sprinkle dried oregano over the entire pizza.
- Drizzle olive oil over the top of each pizza.
- Bake in the preheated oven for about 10-12 minutes until the cheese is melted and bubbly.
- Carefully remove from the oven, let cool for a minute, then cut into wedges to serve.