

Table of Contents
Introduction to Pineapple Jam
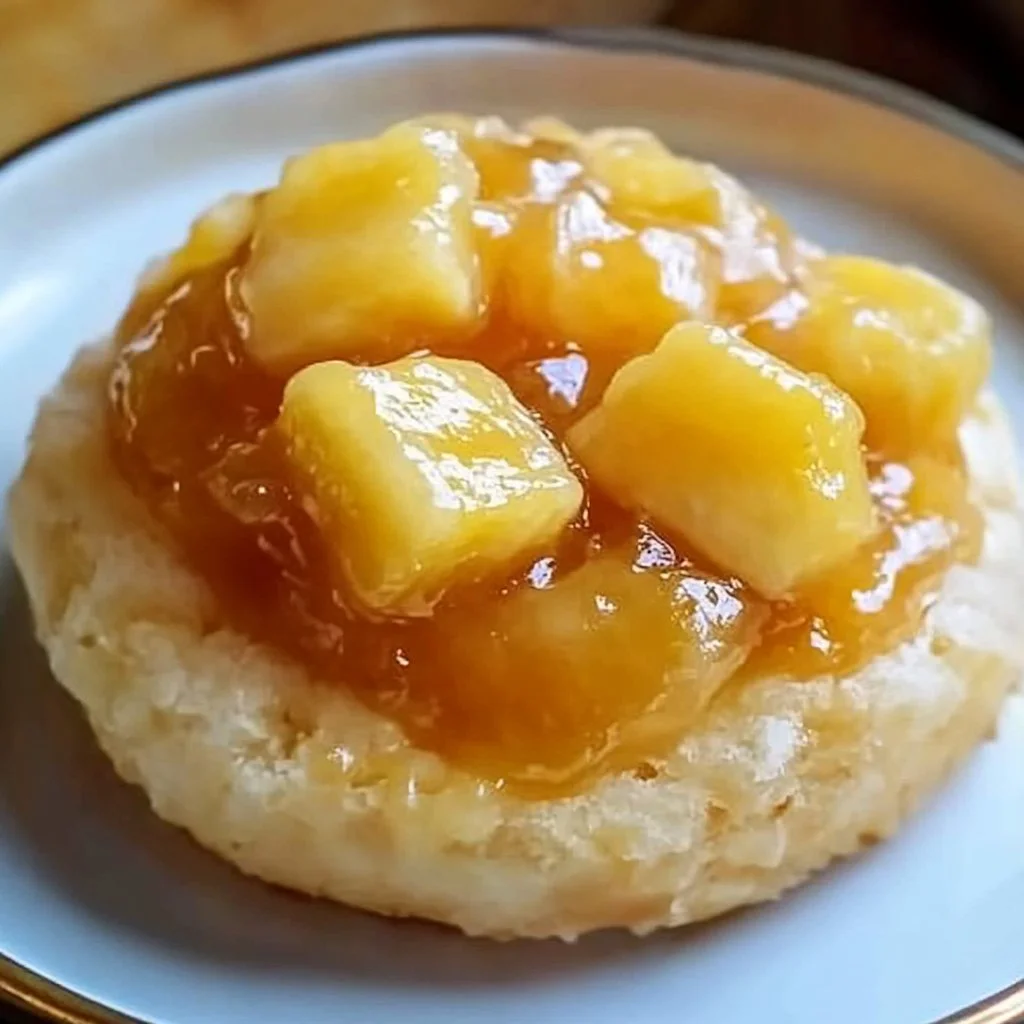
Have you ever wondered how a simple fruit can transform into a delightful spread that lifts the spirit of your breakfast or dessert? Pineapple Jam is more than just a recipe; it’s an experience that combines the sweet and tangy flavor of fresh pineapples with the comforting touch of homemade preserves. Made from ripe, juicy pineapples, tangy lemon juice, and a little sugar, this jam is perfect for those who appreciate natural flavors.
What makes this recipe truly special is its simplicity and versatility. If you’re looking for a taste of summer any time of year, Pineapple Jam captures the essence of the tropics in a jar. The process of making jam is not only rewarding, but it also allows you to enjoy the tantalizing scent of cooking pineapples wafting through your kitchen. Imagine spreading this velvety goodness over warm toast or mixing it into yogurt.
Pineapple Jam stands out from other fruit jams because of its bright, tropical flavor and the unique texture that comes from using fresh ingredients. You might be surprised to find out how easy it is to whip up a batch, making it the perfect addition to your homemade preserves repertoire. You don’t need any fancy equipment or expertise; just follow the steps, and you’ll be rewarded with delicious jars of Pineapple Jam, ready to be enjoyed by family and friends.
Key Benefits of Pineapple Jam
Why You’ll Love This Recipe
- It has a vibrant, tropical flavor that brightens any meal.
- Simple and easy to make, requiring minimal cooking skills.
- Versatile enough to be enjoyed on toast, pancakes, or as a dessert topping.
- Contains natural ingredients without preservatives or artificial additives.
- Perfect for gifting or preserving summer’s flavors for those cold winter months.
What Makes It Stand Out
What really makes Pineapple Jam exceptional is its freshness. Unlike store-bought options filled with artificial flavors, this homemade version is bursting with the genuine taste of ripe pineapples. You can easily customize the sweetness by adjusting the sugar to fit your taste preference. Additionally, this jam can be made in small or large batches, making it suitable for any occasion, whether it’s a family breakfast or a holiday celebration.
Your Pineapple Jam can also act as a base for various culinary adventures. Want a tropical twist in your marinade? This jam serves as a fantastic ingredient. Add it to savory dishes, and you’ll experience a delightful contrast that works especially well with pork or chicken.
Ingredients for Pineapple Jam
Complete Ingredient List with Measurements
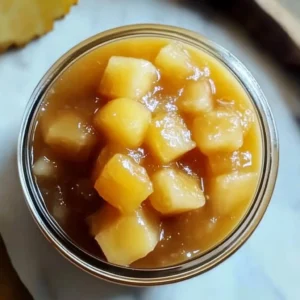
- 1 fresh pineapple, cut into small pieces
- 1 to 1.5 cups of granulated sugar (adjust to taste)
- 2 tablespoons of lemon juice (freshly squeezed is best)
- 1 package of pectin (follow the package instructions for quantities)
- 1 cup of water
Substitutes and Alternatives
If you need substitutions for Pineapple Jam, there are a few easy options. For those who prefer a natural sweetener, you can swap granulated sugar with honey or maple syrup, though you’ll need to experiment a bit with measurements. For dietary restrictions, using low-sugar pectin can help in making a low-sugar version of the jam while still giving it a great texture.
If you have a citrus allergy or want to avoid lemon, consider using lime juice or even vinegar for a tangy kick. Variations like adding a touch of ginger or cinnamon can also offer a unique twist to your Pineapple Jam.
How to Make Pineapple Jam – Step-by-Step Directions
Step 1 – Prepare Ingredients
Start by carefully cutting the fresh pineapple into small, uniform pieces. This ensures even cooking and maximum flavor infusion into your Pineapple Jam.
Step 2 – Cook the Base
In a large pot, combine the pineapple pieces, sugar, lemon juice, and water. Stir together well before placing the pot over medium heat. Allow it to cook, stirring frequently until the sugar completely dissolves and the pineapple releases its juices, creating a sweet and fragrant mixture.
Step 3 – Bring to a Boil
Once the sugar has dissolved, increase the heat slightly and bring the mixture to a gentle boil. Continue boiling while stirring occasionally. It’s important to monitor the heat to prevent sticking or burning on the bottom of the pot.
Step 4 – Add Pectin
After reaching a steady boil, refer to the package instructions for your chosen pectin to know exactly when to add it to the mixture. Stir in the pectin thoroughly, ensuring it dissolves completely without any lumps.
Step 5 – Cook Until Thickened
Keep cooking the mixture over medium heat and stir frequently. Watch for the jam to start thickening, which usually takes about 10-15 minutes. To test the thickness, place a dollop on a cold plate and let it cool to see if it sets to your liking.
Step 6 – Test for Doneness
Once you feel the jam has thickened satisfactorily, perform a simple test. Place a spoonful on a chilled plate to see how it gels. If it holds its shape after cooling, it’s ready for the jars.
Step 7 – Jar the Jam
Carefully pour the hot pineapple jam into sterilized jars while it’s still warm. Leave a bit of space at the top of each jar, then seal them tightly with sterilized lids.
Step 8 – Cool Down
Allow the filled jars to stand at room temperature until they cool completely. You’ll hear the satisfying ‘pop’ of the lids sealing as they cool, which means your Pineapple Jam is properly preserved.
Serving Suggestions for Pineapple Jam
Best Occasions to Serve This Dish
Pineapple Jam is incredibly versatile and can brighten up countless occasions. Serve it at brunch alongside pancakes, waffles, or freshly baked bread for a tropical escape. It’s also perfect for summer barbecues, adding a fun twist as a topping for grilled meats.
During the holiday season, give these brightly colored jars as gifts. They make thoughtful presents that convey warmth and affection. Whether it’s for a birthday, housewarming, or holiday gathering, homemade Pineapple Jam will surely delight anyone lucky enough to receive it.
What to Serve With It
Pair your Pineapple Jam with a variety of dishes to elevate your meals and snacks. Spread it on toasted bagels for breakfast, mix it into yogurt for a refreshing treat, or serve it alongside soft cheeses as part of a cheese board. You could even use it as a filling in pastries, or mix it in smoothies for added sweetness and flavor.
How to Store Pineapple Jam Properly
Best Storage Practices
To ensure the longevity of your Pineapple Jam, it’s crucial to store it correctly. Once the jam has cooled and been sealed in jars, keep it in the refrigerator for up to 3 weeks. For longer preservation, consider canning methods which may extend the shelf life for up to 1 year when stored in a dark, cool place.
You can also freeze Pineapple Jam in airtight containers for up to 6 months. Just be sure to leave some headspace in the containers, as the jam will expand when frozen.
Reheating and Freezing Tips
If you ever find yourself with leftover Pineapple Jam that needs reheating, simply microwave small portions for a few seconds or warm it gently in a saucepan over low heat until it reaches the desired consistency. For thawing frozen jam, it’s best to place it in the refrigerator overnight before use to allow it to defrost naturally without losing its texture.
Tips & Tricks for Pineapple Jam
Mistakes to Avoid
1 – Not measuring ingredients accurately can lead to a runny or overly sweet jam. Make sure to stick to the recipe ratios for best results.
2 – Skipping sterilization of jars can compromise your jam’s safety. Always ensure jars are properly cleaned and sterilized.
3 – Overcooking the mixture could result in a sticky, hard jam. Keep an eye on it while it cooks for the best texture.
4 – Forgetting to test for thickness before canning might leave you with a jam that’s more like pineapple syrup. Always check for the right consistency.
5 – Avoid using under-ripe pineapples, as they yield a less flavorful jam. Choose fully ripe, juicy pineapples for optimal taste.
Extra Tips for Better Results
To enhance the flavor of your Pineapple Jam, consider adding a hint of fresh ginger or a dash of ground nutmeg for an added kick. For a touch of elegance, you might even try infusing some vanilla bean into the mixture as it cooks. Always taste your mixture as you go along to create the perfect balance of flavors.
Recipe Variations of Pineapple Jam
Creative Twists
1 – Tropical Medley: Combine diced pineapples with other fruits like mango and kiwi to create a multi-fruit jam that offers a burst of tropical flavor.
2 – Spicy Pineapple Jam: Add a pinch of cayenne pepper or finely chopped jalapeños to give your jam a zesty kick, perfect for enhancing meats or cheese platters.
3 – Alcohol-Infused Jam: Consider incorporating a splash of rum or coconut liqueur to create an island-inspired version that pairs well with summer dishes.
Dietary Adjustments
For those following a vegan diet, you can substitute granulated sugar with coconut sugar or another plant-based sweetener. Additionally, ensure that the pectin used is vegan-friendly, as some types contain gelatin. For gluten-free options, simply ensure that your pectin brand does not contain any gluten-derived ingredients.
Conclusion about Pineapple Jam
In conclusion, making Pineapple Jam is an enjoyable and fulfilling experience that allows you to capture the essence of fresh pineapples in a jar. The delightful flavor, natural ingredients, and versatility make it an ideal addition to various meals and occasions. Whether enjoyed on its own or as part of other dishes, Pineaple Jam has the power to brighten any taste bud and create joyful moments. So grab your fresh pineapples and get cooking! You’ll be amazed at how easy it is to indulge in this sweet, tropical treat.
FAQs about Pineapple Jam
Can I make Pineaple Jam with frozen pineapples?
Yes, frozen pineapples can be used, but ensure they’re thawed and drained of excess moisture for the best results.
How long does Pineaple Jam last?
When stored in the refrigerator, Pineaple Jam can last up to 3 weeks; if properly canned, it can last for a year in a cool, dark place.
Can I reduce the sugar in Pineaple Jam?
You can reduce the sugar amount, but it may alter the jam’s texture and sweetness. Consider using a low-sugar pectin for adjustments.
Is it possible to can Pineaple Jam?
Yes, this recipe is perfect for canning. Ensure that jars are sterilized and sealed properly to preserve the jam for long-term storage.
What happens if my jam doesn’t set?
If your jam doesn’t set, it may need more cooking time or possibly more pectin added. You can always re-cook it with additional pectin.
Can I add other fruits to my Pineaple Jam?
Absolutely! You can mix in other fruits like mango or berries to create a deliciously unique spread.
Is homemade Pineapple Jam healthy?
Homemade Pineapple Jam can be healthier than store-bought options as it contains no preservatives or artificial additives.
How can I use Pineapple Jam besides on toast?
You can use Pineapple Jam in yogurt, as a topping for desserts, a filling for pastries, or even as a glaze for meats.
Can I freeze leftover Pineapple Jam?
Yes, Pineapple Jam can be frozen in airtight containers for up to six months. Just be sure to leave room for expansion.
Do I need to peel the pineapple before making jam?
Yes, it’s vital to peel the pineapple, as the skin is tough and inedible. Only the fruit flesh should be used for the jam.
Pineapple Jam
Ingrédients
Base Ingredients
- 1 whole fresh pineapple, cut into small pieces Ensure the pineapple is ripe for best flavor.
- 1 to 1.5 cups granulated sugar Adjust according to taste.
- 2 tablespoons lemon juice Freshly squeezed is best.
- 1 package pectin Follow the package instructions for quantities.
- 1 cup water
Instructions
Preparation
- Start by carefully cutting the fresh pineapple into small, uniform pieces.
Cooking the Base
- In a large pot, combine the pineapple pieces, sugar, lemon juice, and water. Stir together well.
Cooking
- Place the pot over medium heat and cook, stirring frequently until the sugar dissolves and the pineapple releases its juices.
- Increase the heat slightly and bring the mixture to a gentle boil, monitoring to prevent sticking.
Adding Pectin
- After reaching a boil, add the pectin according to the package instructions, stirring thoroughly.
Testing Thickness
- Cook over medium heat while stirring frequently until the mixture thickens (about 10-15 minutes), testing for doneness on a chilled plate.
Jarring the Jam
- Pour the hot jam into sterilized jars while warm, leaving some space at the top, and seal tightly.
- Allow the jars to cool at room temperature.