

Table of Contents
Introduction to Oreo Rocky Road Slice
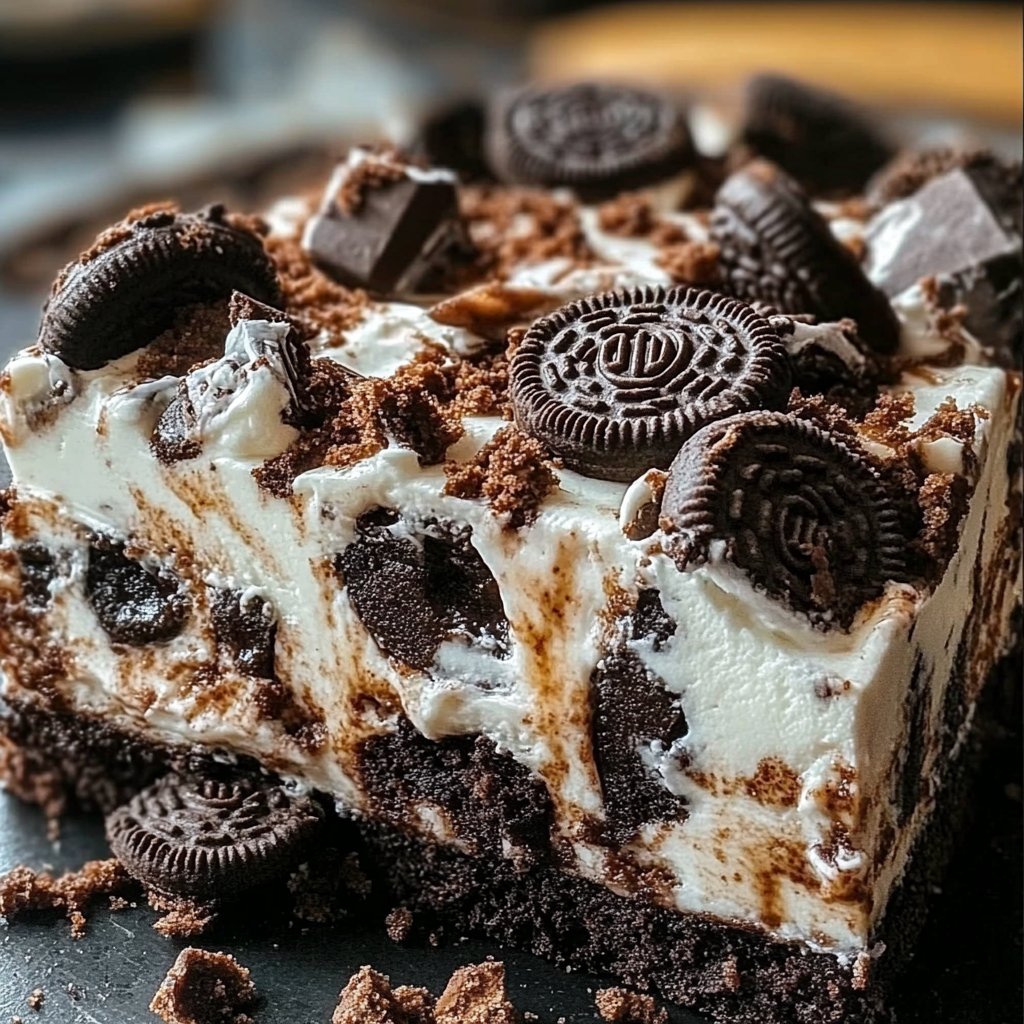
Indulge your sweet tooth with this delightful Oreo Rocky Road Slice that’s sure to impress family and friends. Imagine a rich base made from crushed Oreos, topped with a smooth, creamy layer of melted white chocolate and dotted with mini marshmallows. This mouthwatering treat combines textures and flavors that create an unforgettable dessert experience. Whether you’re hosting a gathering, celebrating a birthday, or simply craving something sweet, this recipe is perfect for any occasion.
What sets the Oreo Rocky Road Slice apart is its unique combination of flavors and ease of preparation. You can whip it up in no time, requiring minimal ingredients yet delivering maximum satisfaction. Plus, the beautiful visual appeal of the layers makes it a show-stopping dessert that you can proudly serve. Are you ready to explore how to make this irresistible treat that pleases both kids and adults alike?
Not only is this recipe simple, but it also allows for customization to suit your taste. Whether you prefer dark chocolate or a mix of different toppings, you can easily put your spin on the Oreo Rocky Road Slice. No matter how you choose to make it, this slice is a guaranteed crowd-pleaser.
Key Benefits of Oreo Rocky Road Slice
Why You’ll Love This Recipe
- Simple Preparation: Quick and easy, requiring no baking skills.
- Flavor Explosion: The blend of creamy white chocolate, crunchy Oreo, and fluffy marshmallows is heaven.
- Versatility: Perfect for any occasion, be it parties, celebrations, or just a sweet craving.
- Visually Appealing: Layers of white chocolate and marshmallows create an eye-catching dessert.
- Make-Ahead Friendly: Prepares well in advance; just chill it before serving.
- Always a Hit: Widely loved, whether you’re catering to kids or adults.
What Makes It Stand Out
One standout feature of Oreo Rocky Road Slice is its combination of familiar ingredients that come together to create something extraordinary. While traditional rocky road usually features nuts and dark chocolate, this recipe utilizes Oreos and white chocolate, which can be a delightful twist for many palates.
Additionally, the slice can be customized in various ways, be it through different chocolate types (dark, milk, or even flavored chocolates) or by adding bits of your favorite nuts or fruits. Make it your own with affordable and easily accessible ingredients, making the Oreo Rocky Road Slice an approachable yet impressive dessert.
Ingredients for Oreo Rocky Road Slice
Complete Ingredient List with Measurements
- 200g Oreo Cookies
- 40g Unsalted Butter (Melted)
- 600g White Chocolate (Roughly Chopped)
- 240g Oreo Cookies (Roughly Chopped)
- 60g Mini White Marshmallows
Substitutes and Alternatives
If you’re allergic to gluten, you can easily swap the regular Oreos for gluten-free varieties available in stores. If you prefer dairy-free options, look for dairy-free white chocolate. Those with nut allergies should ensure any additional toppings or mix-ins (if used) are nut-free. By making these substitutions, the Oreo Rocky Road Slice can suit many dietary needs while still delivering incredible flavor.
How to Make Oreo Rocky Road Slice – Step-by-Step Directions
Step 1 – Prepare Ingredients
Start by gathering all your ingredients. Ensure your workspace is clean and that you have your necessary tools ready, including a food processor, bowls, and an 8-inch square pan lined with parchment paper.
Step 2 – Cook the Base
Blitz 200g of Oreo cookies in a food processor until they become a fine crumb. Add the melted butter to this mixture and blitz again until well combined.
Step 3 – Press the Base
Once the Oreo and butter mixture is ready, pour it into your prepared pan. Use the back of a spoon or your hands to evenly press the mixture down, ensuring that the base is compact and even.
Step 4 – Prepare the Rocky Road Mix
In a large bowl, add 200g of the roughly chopped Oreos and 60g of mini white marshmallows. Set this bowl aside as you focus on melting the white chocolate.
Step 5 – Melt the White Chocolate
In a microwave-safe bowl, microwave the 600g of roughly chopped white chocolate. Do this in 30-second bursts, stirring in between to ensure that the chocolate melts evenly and doesn’t burn.
Step 6 – Combine Ingredients
Once the white chocolate is fully melted, pour it over the Oreo and marshmallow mixture. Stir well to coat all the pieces thoroughly in chocolate.
Step 7 – Assemble the Slice
Pour the mixed rocky road ingredients over your Oreo base in the pan. Use a spoon or spatula to evenly spread the mixture, ensuring an even layer.
Step 8 – Garnish
Sprinkle the remaining 240g of roughly chopped Oreos over the top of the rocky road layer. This adds an extra crunch and visual appeal.
Step 9 – Chill to Set
Place the pan in the refrigerator for about an hour or until the chocolate has set firmly.
Step 10 – Cut and Serve
Once set, cut the Oreo Rocky Road Slice into 16 even squares. Serve chilled or at room temperature for maximum enjoyment.
Serving Suggestions for Oreo Rocky Road Slice
Best Occasions to Serve This Dish
This slice is suitable for various occasions, from casual family gatherings to birthday celebrations. Its appeal lies in its versatility; it can be served as a light dessert after a meal or as a standalone treat during tea time.
It’s also a fantastic choice for potlucks or bake sales, where you want to showcase a delightful treat that everyone will enjoy. The eye-catching presentation of the Oreos and marshmallows makes it a winner for holiday events as well, bringing a festive spirit to every gathering.
What to Serve With It
Pair your Oreo Rocky Road Slice with a scoop of vanilla ice cream, a drizzle of chocolate or caramel sauce, or even fresh berries for added contrast. Serve alongside a hot beverage like coffee or hot chocolate for a cozy experience that enhances the flavors of the slice.
How to Store Oreo Rocky Road Slice Properly
Best Storage Practices
To keep your Oreo Rocky Road Slice fresh, store it in an airtight container in the refrigerator. This will help to maintain its texture and prevent it from absorbing any other odors from your fridge.
If you plan on keeping it for more than a few days, consider freezing individual slices wrapped in plastic wrap, followed by aluminum foil to prevent freezer burn.
Reheating and Freezing Tips
For thawing, simply remove the slice from the freezer and let it sit in the refrigerator for a few hours or at room temperature for about 30-60 minutes. There is usually no need to reheat this particular dessert, as it is best served chilled or at room temperature.
Tips & Tricks for Oreo Rocky Road Slice
Mistakes to Avoid
- Overprocessing Oreos: Ensure that you don’t turn Oreos into a paste; a fine crumb texture is ideal.
- Not Melting Chocolate Properly: Always melt chocolate in small increments to prevent burning.
- Skipping Refrigeration: Don’t skip the cooling step; it ensures that the layers set properly.
- Adding Too Many Toppings: Too many mix-ins can throw off the balance and stickiness of the slice.
- Imprecise Measurements: Use a kitchen scale for accurate proportions; it ensures consistency.
Extra Tips for Better Results
To enhance the flavor of the Oreo Rocky Road Slice, consider adding a pinch of sea salt on top after it sets. This contrast highlights the sweetness beautifully. If you enjoy textures, consider adding chopped nuts or dried fruit for a chewier consistency.
Recipe Variations of Oreo Rocky Road Slice
Creative Twists
- Nutty Surprise: Incorporate crushed nuts, like almonds or walnuts, to add extra crunch and richness.
- Chocolate Lovers: Use a mix of dark, milk, and white chocolate to appeal to different preferences.
- Add a Twist: Stir in a bit of peanut butter or Nutella into the melted chocolate for a nutty flavor boost.
Dietary Adjustments
For a vegan version, substitute regular white chocolate with dairy-free chocolate and use vegan Oreos. In case you’re aiming for a gluten-free option, as mentioned earlier, gluten-free Oreos can be used, making it a viable dessert for a broader audience.
Conclusion about Oreo Rocky Road Slice
The Oreo Rocky Road Slice is a quintessential dessert that blends simplicity and indulgence into one easy-to-make treat. Perfect for family gatherings, birthdays, or just a casual afternoon snack, this recipe is guaranteed to satisfy your sweet cravings. With minimal effort, you can create something that looks stunning and tastes even better. The best part? It’s adaptable! Whether you enjoy experimenting with different flavors or sticking to the classic recipe, you can’t go wrong with this slice. So grab your ingredients and get ready to create an irresistible dessert that everyone will love!
FAQs about Oreo Rocky Road Slice
Can I make Oreo Rocky Road Slice ahead of time?
Yes, you can prepare and refrigerate the slice a day or two in advance.
How should I store leftovers?
Store leftovers in an airtight container in the refrigerator for up to one week.
Can I freeze Oreo Rocky Road Slice?
Absolutely! Wrap individual slices in plastic wrap and freeze for up to three months.
What can I use instead of white chocolate?
You can use milk or dark chocolate as a substitute for a different flavor.
Can I use regular marshmallows instead of mini marshmallows?
Yes, regular marshmallows can be chopped to achieve a similar effect.
Is this Oreo Rocky Road Slice gluten-free?
You can make it gluten-free by using gluten-free Oreo cookies.
How do I know when the slice is set?
The slice is set when the chocolate hardens and the top feels firm to the touch.
Can I add fruits to the rocky road?
Yes! Dried fruits like cherries or raisins can add a nice twist.
Is this dessert good for kids?
Definitely! Its sweet flavors and fun textures make it appealing to kids.
How long does it take to prepare?
Preparing the Oreo Rocky Road Slice takes about 30 minutes, plus chilling time.

Oreo Rocky Road Slice
Ingrédients
Base Ingredients
- 200 g Oreo Cookies Crushed for the base
- 40 g Unsalted Butter Melted
Rocky Road Mix
- 600 g White Chocolate Roughly chopped for melting
- 240 g Oreo Cookies Roughly chopped
- 60 g Mini White Marshmallows
Instructions
Preparation
- Gather all your ingredients and ensure your workspace is clean.
- Blitz 200g of Oreo cookies in a food processor until they become a fine crumb.
- Add the melted butter to the crushed Oreos and blitz again until well combined.
- Pour the Oreo and butter mixture into an 8-inch square pan lined with parchment paper, and press down evenly.
Mixing Rock Road
- In a large bowl, mix 240g of roughly chopped Oreos and 60g of mini white marshmallows.
- In a microwave-safe bowl, melt 600g of roughly chopped white chocolate in 30-second bursts, stirring in between.
- Once melted, pour the white chocolate over the Oreo and marshmallow mixture and stir well.
- Spread the rocky road mixture evenly over the Oreo base in the pan.
Chilling and Serving
- Sprinkle the remaining 240g of chopped Oreos on top for garnish.
- Chill in the refrigerator for about an hour or until set.
- Cut into 16 squares and serve chilled or at room temperature.