
Table of Contents
Introduction to Nanaimo Bars
Have you ever craved a dessert that not only looks enticing but also delivers a burst of flavor with every bite? The answer lies in the decadent universe of Nanaimo Bars. This no-bake treat originated from Nanaimo, British Columbia, and has captured hearts (and taste buds) everywhere with its delightful layers. These bars offer a delightful combination of textures and flavors that are truly special.
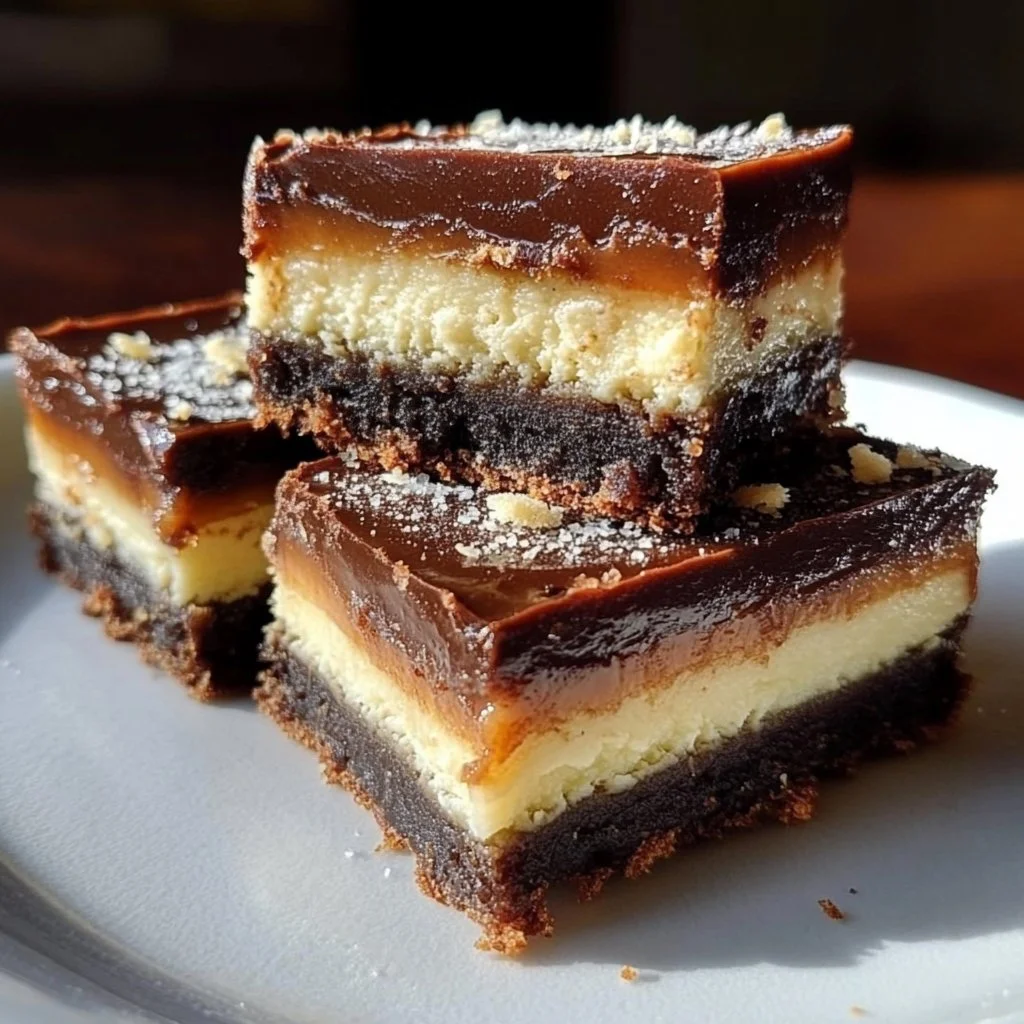
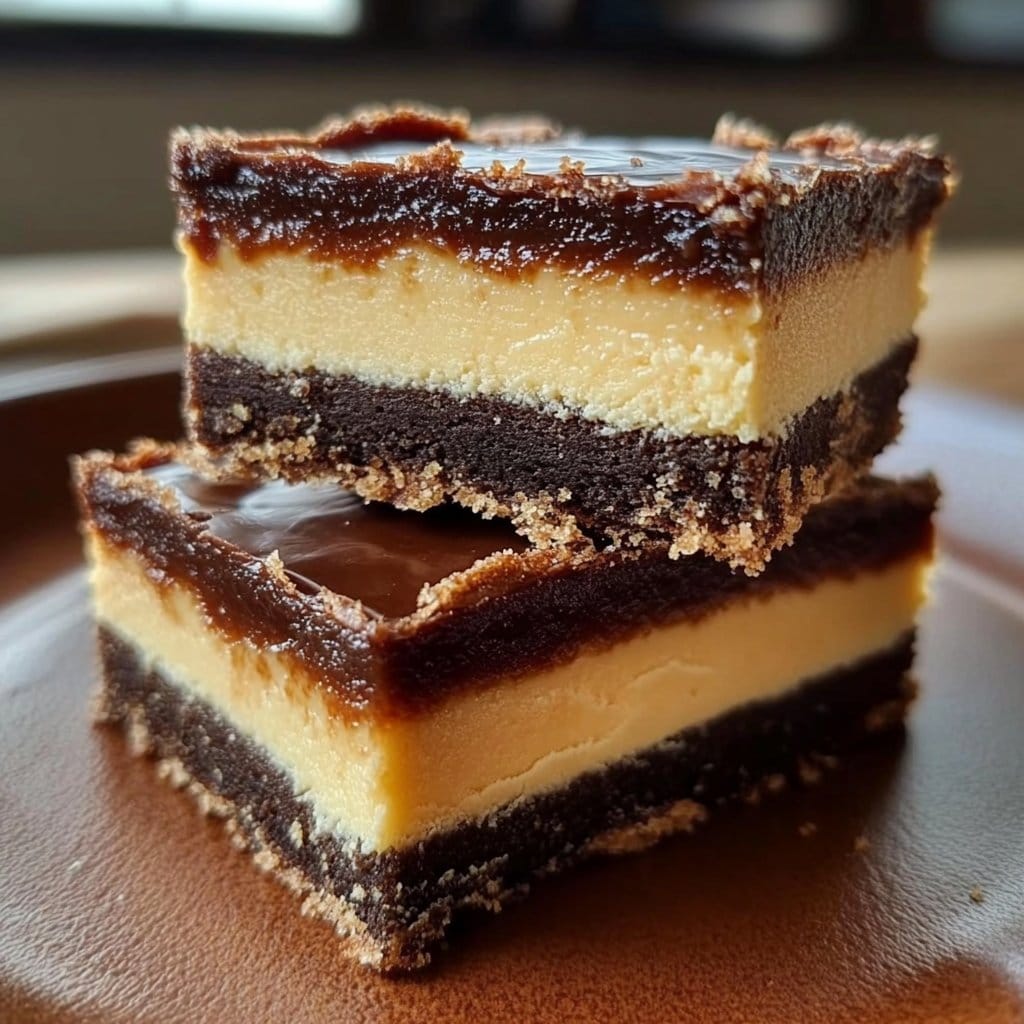
Imagine a rich, buttery base that crumbles gently against your palate, followed by a creamy, vanilla custard layer, and topped off by a smooth chocolate ganache. Each bite is a harmonious blend of sweet and rich, making Nanaimo Bars an irresistible choice for anyone with a sweet tooth. The simplicity of the recipe is part of its charm, as it requires no baking, which means you can whip it up in a hurry—perfect for unexpected guests or a cozy night in.
Beyond their deliciousness, Nanaimo Bars carry an air of nostalgia for many. Perhaps you first enjoyed them at a family gathering or came across the recipe in a cherished cookbook from your childhood. This dessert invites you to reminisce while you indulge. Its unique and vibrant character set it apart from other desserts, making it a favorite for all occasions—from birthdays to holiday celebrations.
Whether you’re an experienced baker or someone just starting their culinary journey, Nanaimo Bars are a great way to impress friends and family. You can customize these bars however you like, perhaps adding a hint of espresso or a sprinkle of nuts to create your signature version. Let’s dive into what makes this recipe so beloved and how to make your own delicious Nanaimo Bars at home.
Key Benefits of Nanaimo Bars
Why You’ll Love This Recipe
- No baking required: Enjoy a quick and hassle-free preparation.
- Rich flavor: Delight in the combination of chocolate, custard, and coconut.
- Versatile: Customize with added toppings or flavors to suit your palate.
- Loved by all: Perfect for gatherings, parties, or just a sweet snack.
- Can be made ahead: Store easily for a last-minute treat.
- Kid-friendly: A fun dessert that can involve the little ones in the kitchen.
What Makes It Stand Out
Nanaimo Bars are not just another dessert; they are a celebration on a plate. The contrasting layers make for an exciting tasting experience that captures the essence of indulgence. When you cut into a freshly made bar, you’ll find a vibrant mix of colors and textures—golden graham crumbs, pale custard, and rich chocolate—each layer inviting you to take another bite.
Customization is a key feature of Nanaimo Bars. They can be adapted to fit various dietary needs and personal preferences. Whether you prefer a classic version or one with an extra kick, exploring the endless variations allows each cook to leave their mark on this iconic treat. It’s not just a dessert; it’s an opportunity for creativity in the kitchen!
Ingredients for Nanaimo Bars
Complete Ingredient List with Measurements
- 1/2 cup unsalted butter, softened
- 1/3 cup granulated sugar
- 1 cup graham cracker crumbs
- 2/3 cup unsweetened shredded coconut
- 1/2 cup cocoa powder
- 1/2 cup powdered sugar
- 2 tablespoons vanilla custard powder (or instant vanilla pudding mix)
- 2 tablespoons milk
- 4 oz semi-sweet chocolate, chopped
- 2 tablespoons unsalted butter
Substitutes and Alternatives
If you’re looking to make Nanaimo Bars but have dietary restrictions, don’t worry! Here are some possible substitutions:
- Butter: Consider using coconut oil or vegan butter for a dairy-free version.
- Granulated and powdered sugar: Depending on your needs, you can swap these for coconut sugar or other sweeteners that suit your dietary preference.
- Custard powder: If you can’t find custard powder, instant vanilla pudding mix works just as well. For a gluten-free recipe, ensure you choose a gluten-free brand.
These easy alternatives allow everyone to enjoy the delightful experience of Nanaimo Bars.
How to Make Nanaimo Bars – Step-by-Step Directions
Step 1 – Prepare Ingredients
Start by gathering all your ingredients. Make sure your butter is softened to room temperature for easy mixing. Measure out your graham cracker crumbs and coconut, ensuring precision for the best results.
Step 2 – Cook the Base
In a medium bowl, combine the softened butter and granulated sugar. Using a mixer, beat until the mixture is smooth and creamy. Once done, stir in the graham cracker crumbs, shredded coconut, and cocoa powder until everything is well combined.
Step 3 – Press into Pan
Grease an 8-inch square baking dish or line it with parchment paper for easy removal. Press the mixture firmly into the bottom of the prepared pan, ensuring an even layer. This acts as the base for your Nanaimo Bars.
Step 4 – Make the Custard Layer
In a separate bowl, combine the powdered sugar, custard powder, remaining butter, and milk. Mix until you obtain a smooth and creamy consistency. Spread this luscious custard layer evenly over the graham cracker base.
Step 5 – Prepare the Chocolate Topping
In a small saucepan, melt the chopped semi-sweet chocolate and butter over low heat. Stir constantly until the chocolate is fully melted and smooth. Pour this mixture over the custard layer and spread it out evenly.
Step 6 – Chill
Cover the pan with plastic wrap and refrigerate for at least 2 hours, or until the bars are firm. Patience is key here as chilling allows the layers to set perfectly.
Step 7 – Cut Into Squares
Once chilled and firm, remove the bars from the pan using the parchment paper (if included). Place them on a cutting board and use a sharp knife to cut into squares.
Step 8 – Serve and Enjoy
Your homemade Nanaimo Bars are ready to serve! Arrange them on a platter for a beautiful presentation, and watch as they disappear in no time.
Serving Suggestions for Nanaimo Bars
Best Occasions to Serve This Dish
Nanaimo Bars are perfect for any occasion! They shine at celebrations like birthdays, potlucks, and holiday parties. Their visually appealing layers make them an eye-catching dessert that guests will adore. But they are equally delightful for everyday enjoyment. Whether you’re needing a sweet treat after dinner or a pick-me-up with your afternoon coffee, these bars won’t disappoint.
What to Serve With It
Consider pairing Nanaimo Bars with a variety of beverages. A warm cup of coffee, tea, or a glass of milk complements the rich flavors beautifully. For a special touch, serve them with fresh berries or a scoop of vanilla ice cream for an elevated dessert experience.
How to Store Nanaimo Bars Properly
Best Storage Practices
To maintain the freshness of your Nanaimo Bars, keep them stored in an airtight container in the refrigerator. This will help preserve their texture and flavor for up to a week. A cool storage environment is essential in keeping the layers from becoming too soft.
Reheating and Freezing Tips
While Nanaimo Bars are best served cold, if you want to freeze leftovers, wrap individual bars in plastic wrap and then place them in a freezer-safe container. They can be frozen for up to three months. When you’re ready to enjoy them, let them thaw in the refrigerator overnight for the best texture before serving.
Tips & Tricks for Nanaimo Bars
Mistakes to Avoid
1 – Not softening the butter properly? Ensure your butter is at room temperature; this makes mixing easier and results in a smoother base.
2 – Overmixing the layers? Combine each layer just until combined to keep the textures distinct.
3 – Skipping the refrigeration? Allow enough time for the bars to chill; otherwise, they may not hold their shape when cut.
4 – Cutting bars too soon? Give the bars adequate time to firm up. Patience pays off!
5 – Not lining the pan? Using parchment paper makes for easier removal and clean-up.
Extra Tips for Better Results
For a more vibrant flavor, consider adding a hint of espresso powder to the chocolate layer or a touch of lemon zest to the custard for some zing. Topping the bars with toasted coconut adds an extra crunch, enhancing the overall texture.
Recipe Variations of Nanaimo Bars
Creative Twists
1 – Peanut Butter Nanaimo Bars: Mix peanut butter into the chocolate layer for a nutty flavor that complements the richness of the bars.
2 – Mint Chocolate Nanaimo Bars: Incorporate fresh mint or peppermint extract into the chocolate layer for a refreshing twist.
3 – Fruit-Infused Bars: Add dried fruit like cranberries or raisins to the base for a chewy texture and burst of flavor.
Dietary Adjustments
For a vegan version, substitute butter with coconut oil or plant-based butter. Use nut milk as a dairy alternative. To make the bars gluten-free, replace graham cracker crumbs with gluten-free alternatives or crushed oats.
Conclusion about Nanaimo Bars
In conclusion, Nanaimo Bars are an indulgent treat that combines rich flavors, easy preparation, and a fun, layered presentation. This dessert not only satisfies a sweet tooth but also brings joy to gatherings, celebrations, and cozy nights at home. Whether you enjoy them as-is or get creative with custom flavors, their unique attributes are sure to make them a favorite in your dessert repertoire. So go ahead, try this delightful recipe and experience why Nanaimo Bars have become a beloved treat that stands the test of time.
FAQs about Nanaimo Bars
Can I make Nanaimo Bar ahead of time?
Yes, Nanaimo Bar can be made a day or two in advance. Just keep them stored in the refrigerator until you’re ready to serve.
How long do Nanaimo Bar last?
They can be stored in the refrigerator for up to one week. Ensure they’re in an airtight container to maintain freshness.
Can I freeze Nanaimo Bars?
Absolutely! Wrap them individually in plastic wrap and place them in a freezer-safe container. They can be frozen for up to three months.
What can I use instead of custard powder?
Instant vanilla pudding mix is a perfect substitute for custard powder and will work just as well in the recipe.
What’s the best way to cut Nanaimo Bars?
Using a sharp knife, wipe it clean between cuts for neat squares. Ensure the bars are adequately chilled to make slicing easier.
Can I add nuts to my Nanaimo Bars?
Certainly! Chopped nuts can be mixed into the base or sprinkled on top for added flavor and crunch.
How do I prevent the bars from becoming too soft?
Ensure the layers are well-chilled before serving and that you store them in the refrigerator to maintain structure.
What should I serve with Nanaimo Bars?
They pair wonderfully with coffee, tea, or milk. Fresh berries or ice cream can elevate the dessert even further.
Nanaimo Bars
Ingrédients
For the Base
- 1/2 cup unsalted butter, softened Make sure the butter is at room temperature.
- 1/3 cup granulated sugar
- 1 cup graham cracker crumbs
- 2/3 cup unsweetened shredded coconut
- 1/2 cup cocoa powder
For the Custard Layer
- 1/2 cup powdered sugar
- 2 tablespoons vanilla custard powder (or instant vanilla pudding mix)
- 2 tablespoons milk
- 2 tablespoons unsalted butter Remaining butter for the custard layer.
For the Chocolate Topping
- 4 oz semi-sweet chocolate, chopped Use good quality chocolate for the best flavor.
- 2 tablespoons unsalted butter For melting with the chocolate.
Instructions
Preparation
- Gather all your ingredients and ensure the butter is softened.
- In a medium bowl, combine the softened butter and granulated sugar. Beat until smooth and creamy.
- Stir in the graham cracker crumbs, shredded coconut, and cocoa powder until well combined.
Assembly
- Grease an 8-inch square baking dish or line it with parchment paper.
- Press the mixture firmly into the bottom of the prepared pan to form the base.
- In a separate bowl, mix the powdered sugar, custard powder, remaining butter, and milk until creamy.
- Spread the custard mixture evenly over the graham cracker base.
- Melt the chopped chocolate and butter in a small saucepan over low heat until fully melted and smooth.
- Pour the chocolate mixture over the custard layer and spread it out evenly.
- Cover and refrigerate for at least 2 hours until firm.
- Cut into squares and serve.