

Table of Contents
Introduction to Homemade Valentine’s Day Candies
Valentine’s Day is the perfect occasion to show love and appreciation, and what better way to do that than with delicious homemade treats? Enter the Homemade Valentine’s Day Candies—a recipe that’s not only delightful but also wonderfully simple. Imagine offering a sweet, handcrafted gift that carries the essence of your feelings. These candies are ideal for couples, friends, or family, providing a thoughtful touch that store-bought treats just can’t match.
What makes these Homemade Valentine’s Day Candies stand out is their richness and creaminess, thanks to the combination of heavy cream and butter blended with luscious chocolate. This harmonious mix creates a melt-in-your-mouth experience that’s hard to resist. By making your own candies, you get total control over the ingredients. You can adapt the flavors or add optional toppings to personalize each bite.
Are you worried about the difficulty of creating homemade candies? Fear not! The truth is, this recipe is easy to follow, making it perfect even for novice cooks. With just a few simple steps, you can impress your loved ones with these indulgent sweets. How often do you get the chance to express your love through the art of candy making? The answer is—right now.
Key Benefits of Homemade Valentine’s Day Candies
Why You’ll Love This Recipe
- Flavorful: Rich chocolate combined with smooth cream creates a delicious treat.
- Easy to Make: Straightforward steps ensure that even beginners can succeed.
- Versatile: Customize each batch with various toppings and flavors.
- Perfect for Gifting: Makes an ideal gift for friends and family alike.
- Fun to Create: Engage in a creative activity that can involve kids or friends.
- Memorable Experience: Crafting these candies can become a cherished tradition.
What Makes It Stand Out
These Homemade Valentine’s Day Candies are not just a sweet indulgence; they embody the personal touch of handmade gifts. The ability to customize flavors and toppings according to preferences makes this recipe unique to each occasion. Whether it’s for a romantic partner, a close friend, or someone special in your life, these candies can be tailored to reflect your relationship. This versatility makes them suitable for various occasions, from Valentine’s Day to birthdays or anniversaries.
Imagine the delight on a loved one’s face as they receive these beautifully crafted sweets, knowing that they were made with love and effort. The presentation becomes an art form, too—dusting them with powdered sugar or rolling them in colorful sprinkles adds an exquisite touch. Each candy becomes not just a dessert but a heartfelt expression.
Ingredients for Homemade Valentine’s Day Candies
Complete Ingredient List with Measurements
- 1 cup heavy cream
- 2 cups chocolate chips (milk or dark)
- 1/2 cup butter
- 1 teaspoon vanilla extract
- Powdered sugar (for dusting)
- Optional toppings (nuts, sprinkles, etc.)
Substitutes and Alternatives
When making Homemade Valentine’s Day Candies, it’s essential to cater to dietary restrictions. For those with lactose intolerance, consider using coconut cream or almond milk combined with dairy-free butter. If you’re looking for a lower-sugar option, sugar-free chocolate chips can be a great substitute without losing much flavor.
In case someone you’re serving has nut allergies, skip the nuts in the toppings and explore textures like shredded coconut or crisped rice instead.
How to Make Homemade Valentine’s Day Candies – Step-by-Step Directions
Step 1 – Prepare Ingredients
Start by gathering all your ingredients. Measure out the heavy cream, chocolate chips, butter, and vanilla extract to streamline the cooking process. This organization will make your time in the kitchen more efficient and enjoyable.
Step 2 – Cook the Base
In a medium saucepan, combine the heavy cream and butter. Heat over medium heat until the mixture is just simmering, stirring occasionally. This should take about 4-5 minutes. Be careful not to let it boil, as that can affect the texture.
Step 3 – Add Chocolate
Once the cream and butter are well mixed and warmed, remove the saucepan from the heat. Add the chocolate chips and vanilla extract to the mixture. Stir continuously until the chocolate is fully melted and the mixture is smooth and glossy. This step usually takes about 2-3 minutes.
Step 4 – Prepare the Baking Dish
While the chocolate mixture cools slightly, prepare your baking dish. Grease the dish lightly with cooking spray or line it with parchment paper. This will prevent the candies from sticking, making them easier to remove once set.
Step 5 – Pour the Mixture
Carefully pour the melted chocolate mixture into the prepared baking dish. Spread it evenly with a spatula, ensuring it fills the corners of the dish. Let it cool at room temperature for about 10 minutes before moving it to the refrigerator.
Step 6 – Refrigerate
Refrigerate the mixture for 2-3 hours until it is firm to the touch. During this time, the candies will set, allowing for easier cutting or molding later.
Step 7 – Cut or Mold the Candies
Once the mixture has fully set, remove it from the refrigerator. Use a sharp knife to cut it into squares or rectangles, or use a melon baller to scoop out small rounded pieces. The texture should be soft but firm enough to hold their shape.
Step 8 – Dust with Powdered Sugar
Place the cut pieces in a bowl or on a plate and dust them generously with powdered sugar. This not only adds flavor but also gives them a beautiful finish.
Step 9 – Add Optional Toppings
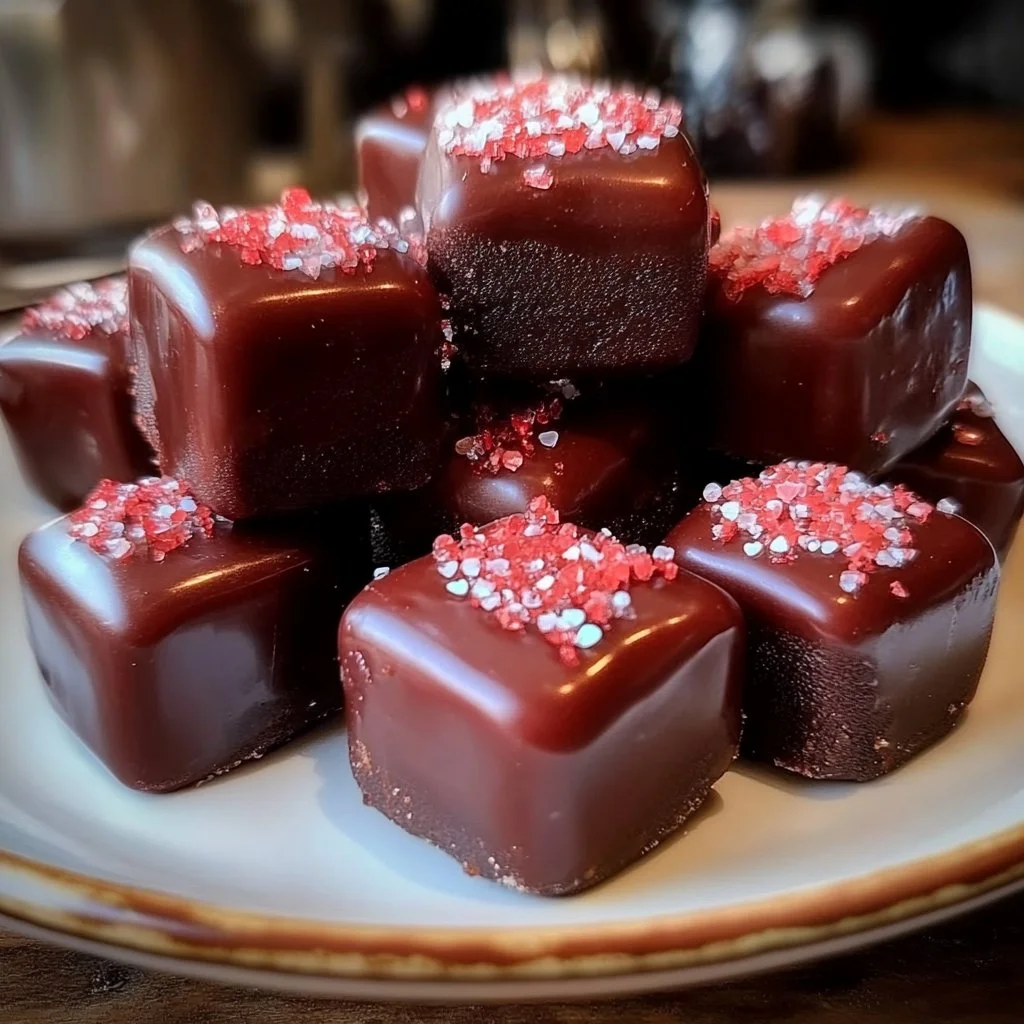
If desired, roll the candies in optional toppings like chopped nuts, sprinkles, or shredded coconut. This gives each piece a unique flair and enhances the visual appeal.
Step 10 – Enjoy and Share!
Your Homemade Valentine’s Day Candies are now ready to be enjoyed! Arrange them in a lovely box or on a decorative plate and share them with your loved ones. Enjoy the smiles and delight that come with each bite!
Serving Suggestions for Homemade Valentine’s Day Candies
Best Occasions to Serve This Dish
Homemade Valentine’s Day Candies shine brightest on romantic occasions like Valentine’s Day and anniversaries. However, they also work beautifully for birthdays, bridal showers, and as holiday treats. Any gathering where love and friendship are in the air is a perfect excuse to indulge in these sweet creations. Their handmade quality elevates the charm of celebrating special moments.
What to Serve With It
Pair these candies with a warm cup of coffee, hot chocolate, or even a glass of dessert wine for a delightful experience. You can also serve them alongside a variety of flavored teas, which can enhance the overall flavor profile, offering a mixed tasting adventure. For a more festive display, consider including fresh strawberries or a fruit platter as a complementary side.
How to Store Homemade Valentine’s Day Candies Properly
Best Storage Practices
To keep your Homemade Valentine’s Day Candies fresh, store them in an airtight container. Place a piece of parchment paper between each layer to prevent sticking. Keep them in the refrigerator, where they will stay fresh for up to two weeks. If you want them to last longer, consider freezing them.
Reheating and Freezing Tips
If you have leftover candies and want to freeze them for later enjoyment, place them in an airtight freezer bag or container. Be sure to label and date them. When ready to enjoy, let the candies thaw in the refrigerator overnight. Reheating is not necessary, as they can be eaten straight from the fridge or at room temperature.
Tips & Tricks for Homemade Valentine’s Day Candies
Mistakes to Avoid
1 – Overheating the Cream: Heating the heavy cream too much can cause it to boil, leading to an undesirable texture. Just reach a gentle simmer.
2 – Not Using Enough Chocolate: Always stick to the specified amount of chocolate chips. Reducing this may not yield a rich flavor.
3 – Skipping the Cooling Step: Allow the mixture to cool before refrigerating to prevent condensation and water from forming on top of your candies.
4 – Using a Non-Stick Pan: Using something that isn’t non-stick might cause the mixture to stick and harden on the bottom, making it harder to clean.
5 – Not Letting it Set Long Enough: Ensure that you leave the candies in the fridge for the full 2-3 hours to achieve a firm texture.
Extra Tips for Better Results
- Customize flavors by swapping vanilla extract for mint or orange essence.
- Experiment with different toppings; try crushed cookies for a crunchy bite.
- Serve your candies in decorative boxes to turn them into unique gifts.
- Make a double batch; homemade candies are sure to be a hit!
Recipe Variations of Homemade Valentine’s Day Candies
Creative Twists
1 – Nutty Surprise: Fold in finely chopped nuts like pecans or hazelnuts into the chocolate mixture before pouring it into the baking dish. This adds a delightful crunch.
2 – Flavor Infusions: Enhance the flavor of the chocolates by adding a tablespoon of espresso powder or a few drops of almond extract to the mixture for an exotic twist.
3 – Decadent Drizzle: After cutting the candies, drizzle them with melted white chocolate for a striking contrast and a touch of elegance on top.
Dietary Adjustments
For those following a dairy-free or vegan lifestyle, you can substitute coconut cream and dairy-free chocolate for a rich flavor without the dairy. Ensure that your butter replacement is also dairy-free. Other substitutions like gluten-free graham cracker crumbs may add a different texture while still maintaining a lovely crunch.
Conclusion about Homemade Valentine’s Day Candies
Homemade Valentine’s Day Candies are not just a sweet treat; they represent the love and effort put into creating something special for those we cherish. With a simple recipe that allows for endless customization, these candies are the perfect way to celebrate meaningful relationships in our lives. Whether you’re gearing up for Valentine’s Day or just want to surprise a loved one with a thoughtful gift, this recipe offers a delicious solution that anyone can master. Each bite is a reminder that homemade gifts create heartfelt connections, making every occasion even more memorable. So gather your ingredients, unleash your creativity, and bring joy to someone special with your very own Homemade Valentine’s Day Candies.
FAQs about Homemade Valentine’s Day Candies
How long can I store Homemade Valentine’s Day Candies?
You can store these candies in the refrigerator for up to two weeks without losing much flavor or texture.
Can I freeze Homemade Valentine’s Day Candies?
Yes, you can freeze the candies for longer storage. Use an airtight container, and they’ll keep well for about three months.
What might I substitute if I don’t have chocolate chips?
Chopped chocolate bars or even cocoa powder mixed with some additional cream can work as substitutes when necessary.
Can I use alternative sweeteners in this recipe?
While traditional sugar is preferred, you may consider using sugar substitutes, ensuring they are suitable for melting and incorporating into a candy mixture.
What is the best way to reheat leftover candies?
Simply allow them to come to room temperature, or place them in the refrigerator overnight if frozen. Reheating is not generally required.
Can I make these candies in advance for a party?
Absolutely! You can prepare these candies days in advance, store them properly, and have a charming treat ready for your guests.
What’s the best way to present Homemade Valentine’s Day Candies?
Arranging them in a decorative box or tin lined with beautiful paper creates an appealing presentation and makes for wonderful gifts too.
Can I add other ingredients, like peanut butter?
Yes! You can incorporate peanut butter in the chocolate mixture for a rich and nutty flavor that will delight peanut butter lovers.

Homemade Valentine’s Day Candies
Ingrédients
Candy Base Ingredients
- 1 cup heavy cream
- 2 cups chocolate chips (milk or dark) Use sugar-free chocolate chips for a lower-sugar option.
- 1/2 cup butter For dairy-free version, use dairy-free butter.
- 1 teaspoon vanilla extract Can be swapped for mint or orange essence.
- Powdered sugar (for dusting) For decorative finish.
- Optional toppings (nuts, sprinkles, etc.) Customize with your choice of toppings.
Instructions
Preparation
- Gather all your ingredients and measure out the heavy cream, chocolate chips, butter, and vanilla extract.
Cooking
- In a medium saucepan, combine the heavy cream and butter. Heat over medium heat until just simmering (4-5 minutes), stirring occasionally.
- Remove from heat and add chocolate chips and vanilla extract. Stir continuously until fully melted and smooth.
Setting the Candies
- Prepare a baking dish by greasing it lightly or lining it with parchment paper.
- Pour the chocolate mixture into the dish, spreading it evenly. Allow it to cool at room temperature for about 10 minutes.
- Refrigerate for 2-3 hours until firm.
- Once set, cut into squares or use a melon baller for rounded pieces.
- Dust with powdered sugar and add any optional toppings.
Serving
- Arrange in a decorative box or plate and share with loved ones.