
Table of Contents
Introduction about Grilled Cheese Burrito
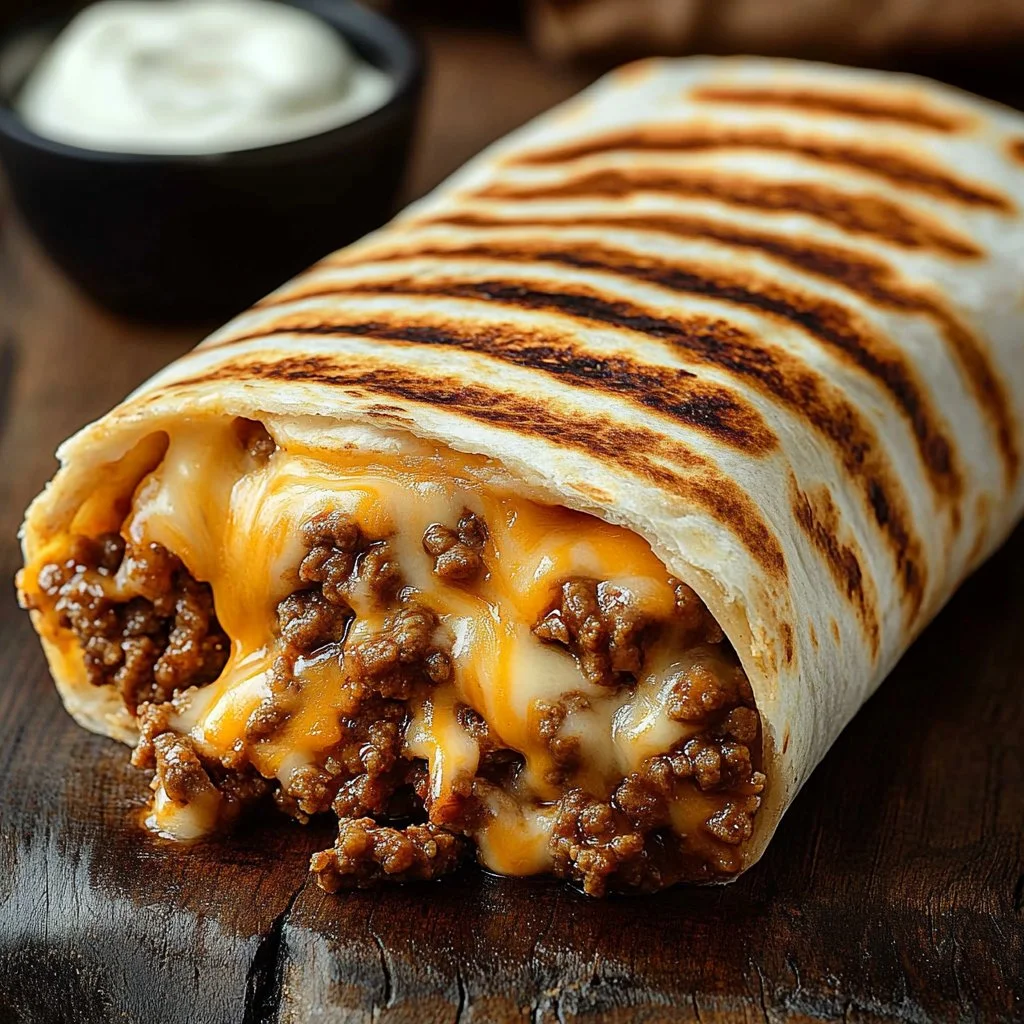
Have you ever craved the gooey goodness of a grilled cheese sandwich, but also wanted the hearty satisfaction of a burrito? Well, look no further! The Grilled Cheese Burrito is your dream meal come true, combining the best of both worlds. Picture this: a warm, cheesy burrito filled with flavorful seasoned beef and fluffy rice, all enveloped in a crispy, grilled tortilla. Doesn’t that sound delightful?
This recipe is not just about taste; it’s about ease and comfort. Whether you’re busy with a packed schedule or looking to impress family and friends, the Grilled Cheese Burrito fits the bill. With minimal prep and cooking time, it’s perfect for weeknight dinners, game day gatherings, or even a cozy solo meal. Plus, you can personalize it however you like, making it a fun and versatile dish to whip up.
Let’s dive in and explore how to create this cheesy, hearty delight that your taste buds will thank you for!
Key Benefits of Grilled Cheese Burrito
Why you’ll love this recipe
- Flavor-packed: The combination of seasoned ground beef, rich nacho cheese, and spices makes every bite a flavor explosion.
- Easy to prepare: With simple ingredients and straightforward steps, you’ll have this dish ready in no time.
- Crowd-pleaser: Perfect for family dinners or gatherings; everyone will love it!
- Customizable: You can adjust ingredients based on personal preference or dietary needs.
- Comfort food: It wraps warmth and satisfaction into one delicious package.
What makes it stand out
What truly sets the Grilled Cheese Burrito apart is its unique blend of flavors and textures. While traditional burritos usually focus solely on savory fillings, adding the melted cheese crust elevates it to a whole new level. Not only do you get the classic burrito filling, but that crunchy, cheesy exterior adds a delightful contrast to the soft interiors.
Seasonal use also plays a role; think about adding fresh vegetables in the summer or hearty beans in the fall to fit the season. Whatever your creativity leads you to, you can easily transform this dish into something special for any occasion!
Ingredients for Grilled Cheese Burrito
Complete ingredient list with measurements
- 1 lb ground beef
- 1 packet taco seasoning (or homemade blend)
- 1 cup cooked white rice
- 1/2 cup sour cream
- 1/2 cup nacho cheese sauce
- 1/4 cup chipotle sauce
- 1 cup shredded cheddar cheese
- 1 cup shredded mozzarella
- 4 large flour tortillas
- Butter or oil for grilling
Substitutes and alternatives
Don’t worry if you have dietary restrictions or preferences; there are many ways to swap ingredients while still keeping the essence of the Grilled Cheese Burrito intact:
- Ground beef: Use ground turkey, chicken, or even a plant-based meat alternative for a healthier or vegetarian option.
- Rice: Switch to brown rice, quinoa, or cauliflower rice for a different texture or dietary need.
- Cheese sauce: Make your own cheese sauce with vegan cheese for a dairy-free version or use nutritional yeast for added flavor.
- Tortillas: Opt for whole wheat, gluten-free tortillas, or lettuce wraps for a low-carb alternative.
How to Make Grilled Cheese Burrito – Step-by-Step Directions
Step 1 – Prep your workspace and ingredients
Before diving into cooking, ensure your kitchen is tidy and all your ingredients are within reach. Measure out each component so you can easily grab them as you go. Pre-cooking your rice can save time; if you need a step-by-step on that, now’s a good time to do it!
Step 2 – Cook the beef
In a large skillet over medium heat, brown your ground beef. Make sure to stir occasionally to break it up into crumbles. This should take around 8–10 minutes. Once the beef is no longer pink, drain any excess grease.
Step 3 – Season the beef
After draining, add your taco seasoning and 1/4 cup of water into the pan. Stir everything together and let it simmer for about 5 minutes. This ensures that every piece of beef is coated with that bold taco flavor.
Step 4 – Warm the tortillas
Next, it’s time to warm up your tortillas. You can do this in a dry skillet over low heat for about 30 seconds on each side or wrap them in a damp paper towel and microwave for about 15 seconds. This will help them become pliable and easier to roll.
Step 5 – Assemble the burrito
Now for the fun part! Take a warmed tortilla and lay it flat on your workspace. Start layering your ingredients: first, add a generous scoop of rice, followed by seasoned beef, a drizzle of nacho cheese sauce, chipotle sauce, and a dollop of sour cream. Finally, sprinkle shredded cheddar and mozzarella on top.
Step 6 – Roll it up
Carefully fold in the sides of the tortilla, then roll it up from the bottom to the top, enclosing all those delicious fillings. Be gentle but firm to ensure it doesn’t fall apart.
Step 7 – Grill the burrito
Heat a clean skillet over medium heat and add a bit of butter or oil. Sprinkle about 2 tablespoons of shredded cheese onto the skillet where you’ll place the burrito. This will create a crispy cheese crust as it cooks. Place the rolled burrito seam-side down in the skillet.
Step 8 – Cook until golden
Grill the burrito for about 3–4 minutes on one side or until the cheese is melted, and the tortilla has turned a golden brown. Flip it over carefully and repeat for the other side. You want both sides to have that perfect crispy texture.
Step 9 – Let it rest
Once done, remove the burrito from the pan and let it rest for a minute. This helps everything settle and makes it easier to slice.
Step 10 – Slice and serve
Carefully cut your burrito in half and serve it with extra sour cream, chipotle sauce, or your favorite salsa on the side. Enjoy every cheesy, meaty bite!
Serving Suggestions for Grilled Cheese Burrito
Best occasions to serve this dish
The Grilled Cheese Burrito is incredibly versatile! Here are some perfect occasions to serve it:
- Family dinners: Perfect for a filling weekday meal that pleases both kids and adults.
- Game days: A fantastic finger food option that your friends will love while cheering on their favorite teams.
- Meal prep: A great choice for batch cooking; ready just for you to heat up during busy weeks.
- Casual gatherings: Easy to make for friends coming over or for a fun taco night.
What to serve with it
Pair this scrumptious dish with some complementary sides or toppings:
- Salsa: Fresh tomato salsa, pineapple salsa, or mango salsa
- Guacamole: A creamy addition that brings extra flavor
- Beans: Refried beans or black beans on the side elevate the meal
- Salad: A light green salad to balance the hearty burrito
- Drinks: Pair it with chilled soda, margaritas, or iced tea
Storing Grilled Cheese Burrito Properly
Best storage practices
To keep your Grilled Cheese Burrito fresh, store it properly:
- Fridge: Store any leftovers in an airtight container for up to 3 days.
- Freezer: For longer storage, wrap burritos tightly in plastic wrap and then foil. They can last up to 3 months.
Reheating and freezing tips
Reheating your burritos is easy:
- Fridge leftovers: Microwave for about 1–2 minutes or heat in a skillet until warm.
- Frozen burritos: Thaw in the refrigerator overnight before reheating, or microwave directly from the freezer with additional time.
- Avoid sogginess: If reheating, skip the microwave if you want to keep the crispy texture—opt for a skillet instead.
Tips & Tricks for Grilled Cheese Burrito
Mistakes to avoid
Here are common pitfalls to watch for:
- Overstuffing: While it’s tempting to add more filling, this can cause your burrito to burst open while grilling.
- Not warming tortillas: A cold tortilla is harder to roll; always warm them for flexibility.
- Skipping the cheese coating: The crispy cheese crust is part of what makes this dish delightful; don’t forget it!
Extra tips for better results
- Use quality tortillas: Fresh, soft tortillas will enhance the overall taste and texture.
- Experiment with spices: Add a pinch of cayenne or smoked paprika to the beef for extra flavor.
- Garnish creatively: Top your burritos with fresh herbs, jalapeños, or additional cheese right before serving for flair.
Recipe Variations of Grilled Cheese Burrito
Creative twists
Mix things up with these creative ideas:
- Add veggies: Toss in sautéed bell peppers, onions, or spinach for extra nutrition.
- Spicy version: Include sliced jalapeños, hot sauce, or use spicy taco seasoning.
- Breakfast burrito: Change the beef for scrambled eggs, potatoes, and breakfast cheese, perfect for brunch!
Dietary adjustments
Make the Grilled Cheese Burrito fit other dietary needs easily:
- Gluten-free: Use corn tortillas or gluten-free wraps.
- Dairy-free: Substitute with vegan cheese and sauces.
- Vegan: Swap beef with lentils, chickpeas, or crumbled tofu.
Conclusion about Grilled Cheese Burrito
In summary, the Grilled Cheese Burrito is not just a dish; it’s an experience! With its perfect blend of flavors and textures, this meal is all about ease and satisfaction. Whether you’re cooking for yourself or a group, it promises smiles all around. So why not give it a try today? I’m sure you’ll fall in love with its simplicity and deliciousness. And once you do, feel free to share your experience or any variations you create!
FAQs about Grilled Cheese Burrito
What if it doesn’t turn out right?
No need to worry! If it breaks apart, consider it a deconstructed burrito. Just serve it in a bowl and call it a burrito bowl; it’s delicious no matter the presentation!
Can I prepare it ahead of time?
Absolutely! You can prep the filling and store it in the fridge for a few days. Just assemble and grill the burritos right before you plan to serve them.
What are the best ingredient substitutions?
Great question! You can substitute ground beef for turkey or lentils. Use quinoa instead of rice or any dairy alternative for the cheese.
How long can it be stored?
In the fridge, your burritos will last up to 3 days. In the freezer, they’re good for about 3 months when tightly wrapped.
Can I use store-bought dough or crust?
Sure! You could use premade tortillas or wraps to save time instead of making your own, but the flavor might vary.
Is this recipe kid-friendly or family-appropriate?
Definitely! The Grilled Cheese Burrito is loved by kids and adults alike. It’s customizable, so everyone can make theirs just the way they like it.
Can I make this recipe allergen-free?
Yes! With simple ingredient swaps I mentioned, you can easily tailor the recipe to be gluten-free, dairy-free, and vegan while maintaining its deliciousness.

Grilled Cheese Burrito
Ingrédients
For the filling
- 1 lb ground beef
- 1 packet taco seasoning (or homemade blend)
- 1 cup cooked white rice
- 1/2 cup sour cream
- 1/2 cup nacho cheese sauce
- 1/4 cup chipotle sauce
- 1 cup shredded cheddar cheese
- 1 cup shredded mozzarella
- 4 large flour tortillas Can substitute with whole wheat or gluten-free tortillas.
- Butter or oil to taste for grilling
Instructions
Preparation
- Prep your workspace and ingredients by measuring out each component.
- Cook your rice in advance if needed.
Cooking
- In a large skillet over medium heat, brown the ground beef for 8-10 minutes, stirring occasionally to break it up.
- Drain any excess grease from the beef.
- Add the taco seasoning and 1/4 cup of water to the beef and let it simmer for about 5 minutes.
- Warm the tortillas in a dry skillet or microwave to make them easier to roll.
- Assemble the burrito by layering rice, seasoned beef, nacho cheese sauce, chipotle sauce, sour cream, and shredded cheeses in the tortilla.
- Roll the burrito tightly and grill it in a skillet with butter or oil, adding cheese for a crispy crust.
- Cook each side for 3-4 minutes or until golden brown and crispy.
Serving
- Let the burrito rest for a minute, then slice and serve with extra condiments as desired.