

Table of Contents
When the holiday season rolls around, there’s something magical about baking. Among the various delights you can whip up, Christmas Pinwheel Cookies stand out as a festive favorite. With their vibrant colors and simple, delicious flavors, these cookies are sure to bring joy to your kitchen and your gatherings. Have you ever wondered how to make a treat that’s not only tasty but also beautifully eye-catching? Let’s dive into the world of Christmas Pinwheel Cookies!
These cookies are not just any ordinary dessert. They are visually stunning and delicious, combining the warm flavors of butter, sugar, and vanilla with the magical holiday spirit. The gentle sweetness, balanced with the light crunch, makes them irresistible. Plus, they’re wonderfully easy to prepare, even for those who may not consider themselves expert bakers.
Key Benefits of Christmas Pinwheel Cookies
Why you’ll love this recipe
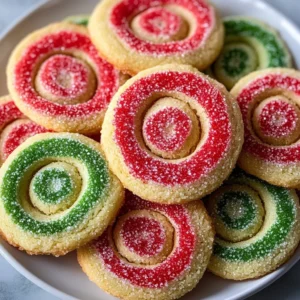
- Eye-Catching Design: The beautiful red and green swirls are perfect for holiday presentations.
- Easy to Make: With just a few simple steps, you can achieve professional-looking cookies at home.
- Customizable Flavors: Feel free to play with colors and flavors to make them your own.
- Perfect for Parties: Great for holiday gatherings and events, they’re sure to impress your guests.
- Fun for All Ages: Baking these cookies is a delightful activity for families and friends to share.
What makes it stand out
What truly makes Christmas Pinwheel Cookies special is their unique appearance. They’re not just cookies; they’re little works of art that inspire creativity. The contrasting colors of the dough, enhanced by festive food coloring, draw everyone’s eyes and make them an instant talking point at any party.
These cookies embody the spirit of Christmas, evoking joy and warmth with every bite. The simple ingredients and approachable process mean that anyone can create this stunning treat, making them a staple in holiday celebrations. Plus, they’re incredibly versatile—whether you’re looking for a classic flavor or a contemporary twist, these cookies can easily adapt to fit your festive needs.
Ingredients for Christmas Pinwheel Cookies
Complete ingredient list with measurements
- 2 ½ cups all-purpose flour
- 1 cup unsalted butter, softened
- 1 cup granulated sugar
- 1 large egg
- 1 teaspoon vanilla extract
- ½ teaspoon almond extract
- ½ teaspoon salt
- Food coloring (red and green)
- Sprinkles (optional)
Substitutes and alternatives
- Butter: Can be replaced with margarine or a vegan butter alternative for a dairy-free version.
- Sugar: Use coconut sugar or a sugar substitute if preferred.
- Egg: For egg-free cookies, try using applesauce (¼ cup) or a flaxseed egg (1 tablespoon ground flaxseed mixed with 2.5 tablespoons water).
- Flour: A gluten-free flour blend can work in place of all-purpose flour for those with gluten intolerance.
How to Make Christmas Pinwheel Cookies – Step-by-Step Directions
Step 1: Cream Butter and Sugar
Begin by placing the softened butter and granulated sugar into a large bowl. Using an electric mixer, beat them together on medium speed until the mixture is light and fluffy, which should take about 2-3 minutes. This step is crucial as it helps incorporate air, making your cookies light and tender.
Step 2: Mix in the Egg and Extracts
Next, crack in your large egg, followed by the vanilla extract and almond extract. Beat the mixture on low speed to combine. The extracts will add a lovely flavor profile to your cookies, enhancing their overall taste.
Step 3: Blend the Dry Ingredients
In a separate bowl, whisk together the all-purpose flour and salt. Gradually add this dry mixture to your wet ingredients, mixing on low speed until just combined. You should notice the dough starting to form—be careful not to overmix, as this can lead to tough cookies!
Step 4: Divide the Dough
Once your dough is formed, divide it into two equal halves. This is where the fun begins! Take one half and place it in a clean bowl. Set aside the other half for now.
Step 5: Color the Dough
Choose your food coloring—red for one half and green for the other. Start with a few drops and knead them into the dough until you achieve the desired color. Don’t be afraid to get your hands a little messy! Once colored, form each half into a disk and wrap them in plastic wrap.
Step 6: Chill the Dough
Place both dough disks in the refrigerator and let them chill for at least 2 hours. This chilling process firm up the dough, making it easier to roll out later and ensuring that your cookies hold their shape while baking.
Step 7: Roll Out the Dough
After chilling, it’s time to roll out your colored doughs. Lay down a sheet of parchment paper on your work surface. Take the first dough (say, the red) and roll it out into a rectangle about ¼ inch thick. Repeat this process for the green dough, ensuring both pieces are of similar size.
Step 8: Layer and Roll
Now, this is where the magic happens. Carefully, place the red rectangle on top of the green one. Starting from one edge, roll the two layers together tightly. Once rolled into a log shape, use the parchment paper to help you shape it evenly.
Step 9: Chill Again
Wrap the rolled dough in plastic wrap and refrigerate once more for at least 1 hour. This final chilling will help ensure that the cookie slices maintain their pinwheel shape when cut.
Step 10: Preheat and Slice
Preheat your oven to 350°F (175°C). Once heated, remove the chilled dough from the fridge. With a sharp knife, slice the log into thin rounds, about ¼ inch thick. Place these slices on a baking sheet lined with parchment paper, leaving some space between each cookie.
Step 11: Bake the Cookies
Place the baking sheet in the preheated oven and bake the cookies for about 8-10 minutes, or until the edges are lightly golden. The smell of baking cookies will surely fill your kitchen with delightful aromas!
Step 12: Cool and Serve
Once baked, let the cookies cool on the baking sheet for a few moments before transferring them to a wire rack. If desired, feel free to sprinkle festive toppings on the cookies while they’re still warm. Let them cool fully before serving to enjoy the best flavor and texture.
Serving Suggestions for Christmas Pinwheel Cookies
Best occasions to serve this dish
Christmas Pinwheel Cookies are ideal for various festive occasions. Whether it’s a family gathering, an office potluck, or a holiday party with friends, these cookies shine in any setting. Their colorful appearance makes them perfect for cookie exchanges or as a sweet gift to neighbors.
What to serve with it
- Hot cocoa
- Eggnog
- Coffee
- Milk
- Ice cream
- Whipped cream
Storing Christmas Pinwheel Cookies Properly
Best storage practices
To keep your Christmas Pinwheel Cookies fresh, store them in an airtight container at room temperature. This will prevent them from getting stale. They can last up to a week, depending on humidity levels in your environment.
Reheating and freezing tips
If you want to enjoy your cookies at a later date, consider freezing them. Arrange the cookies in a single layer on a baking sheet and flash freeze them for a couple of hours. Once frozen, transfer them to a freezer-safe bag and store for up to three months. To enjoy, thaw at room temperature or warm in a preheated oven for a few minutes to regain that freshly-baked taste.
Tips & Tricks for Christmas Pinwheel Cookies
Mistakes to avoid
- Overmixing the dough: This can lead to tough cookies, so mix just until combined.
- Not chilling the dough enough: Skipping the chilling process can cause cookies to spread during baking.
- Cutting too thick: Ensure that each slice is uniform in thickness to ensure even baking.
Extra tips for better results
- Use fresh ingredients: Fresh baking powder and extracts can elevate the flavor.
- Experiment with flavors: Try adding spices like nutmeg or cinnamon for an extra holiday twist.
- Make it a family affair: Involve kids in decorating with sprinkles and shaping the dough!
Recipe Variations of Christmas Pinwheel Cookies
Creative twists
Transform your Christmas Pinwheel Cookies by adding nuts, like finely chopped pecans or almonds, or incorporating cocoa powder into one of the layers for a chocolate twist. You can also use seasonal spices like pumpkin pie spice to infuse a holiday flavor.
Dietary adjustments
For those with dietary restrictions, it’s easy to make these cookies vegan by replacing butter with coconut oil and the egg with applesauce. For gluten-free options, use a high-quality gluten-free flour blend to ensure the best results without losing the delicious taste.
Conclusion about Christmas Pinwheel Cookies
In summary, Christmas Pinwheel Cookies are a fun, festive treat that anyone can make. With their colorful swirls and delightful flavor, they capture the essence of holiday baking. Their versatility allows for endless customization, making them perfect for any gathering. So why not give this recipe a try? You’ll be amazed at how easy and enjoyable it is to craft these beautiful cookies, bringing smiles to your family and friends.
FAQs about Christmas Pinwheel Cookies
What if it doesn’t turn out right?
If your cookies don’t turn out as expected, check for common issues like overmixing the dough or not following the chilling times properly. Each of these can impact the final product.
Can I prepare it ahead of time?
Absolutely! You can prepare the dough and refrigerate it for up to 3 days before baking, or freeze the shaped log for later use.
What are the best ingredient substitutions?
Common swaps include using flaxseed for eggs, coconut oil for butter, and gluten-free flour for all-purpose flour. Each alternative retains the basic structure and taste of the cookies.
How long can it be stored?
Stored correctly in an airtight container, your Christmas Pinwheel Cookies can last up to one week at room temperature. For longer storage, consider freezing them.
Can I use store-bought dough or crust?
While store-bought dough may save time, the charm of Christmas Pinwheel Cookies comes from the homemade dough that you create. However, you could use store-bought options with the same coloring techniques.
Is this recipe kid-friendly?
Yes! This is a great recipe for involving kids. They can help with coloring the dough and creating patterns, making it a fun family activity.
Can I make it allergen-free?
Definitely! You can customize this recipe using alternatives suitable for allergies, such as gluten-free flour, vegan butter, or egg substitutes like applesauce or flaxseed.
Christmas Pinwheel Cookies are a delightful addition to your holiday tradition, providing sweetness and color to your festivities. Enjoy baking, sharing, and indulging in these beautiful cookies!
Christmas Pinwheel Cookies
Equipment
- plaques de cuisson
- Papier sulfurisé
- Rouleau à pâtisserie
- Film alimentaire
- couteau tranchant
Ingrédients
Dough (pâte)
- 226 g beurre doux à température ambiante
- 135 g sucre en poudre
- 1 œuf gros, température ambiante
- 1 c. à café extrait de vanille
- ½ c. à café sel
- 300 g farine tout usage
Colorations & décoration
- colorant alimentaire rouge (gel) quelques gouttes
- colorant alimentaire vert (gel) quelques gouttes
- sucre décoratif / vermicelles / paillettes comestibles pour enrober les bords (optionnel)
Instructions
- Crèmez le beurre avec le sucre jusqu’à ce que le mélange soit léger et moelleux.
- Incorporez l’œuf et l’extrait de vanille, mélangez bien.
- Ajoutez le sel et la farine, mélangez doucement jusqu’à ce que la pâte soit homogène.
- Divisez la pâte en trois parts égales.
- Ne colorez qu’une part en rouge (avec le colorant gel) et une part en vert. Laissez une part nature.
- Formez chaque portion en disque, enveloppez-les dans du film alimentaire, puis réfrigérez pendant ~45 minutes jusqu’à ce qu’elles soient fermes.
- Sur du papier sulfurisé, étalez chaque pâte en rectangle d’épaisseur uniforme (≈ 3-4 mm).
- Empilez les trois rectangles (par exemple : vert en bas, nature, puis rouge sur le dessus).
- Roulez le tout sur le côté long pour former un rouleau serré (spirale).
- Optionnel : badigeonnez légèrement l’extérieur du rouleau avec sirop léger ou eau, puis roulez dans les décors (sucre, paillettes).
- Enveloppez le rouleau dans du film alimentaire et réfrigérez de nouveau au moins 45 minutes (ou jusqu’à ce qu’il soit bien ferme).
- Préchauffez le four à 175 °C (350 °F).
- Tranchez le rouleau en tranches d’environ 5 mm d’épaisseur avec un couteau tranchant.
- Disposez les biscuits sur des plaques tapissées de papier sulfurisé, en les espaçant légèrement.
- Enfournez 12 à 15 minutes, jusqu’à ce que les bords soient dorés et que le centre soit pris.
- Laissez refroidir quelques minutes sur la plaque, puis transférez sur une grille pour refroidissement complet.