
Table of Contents
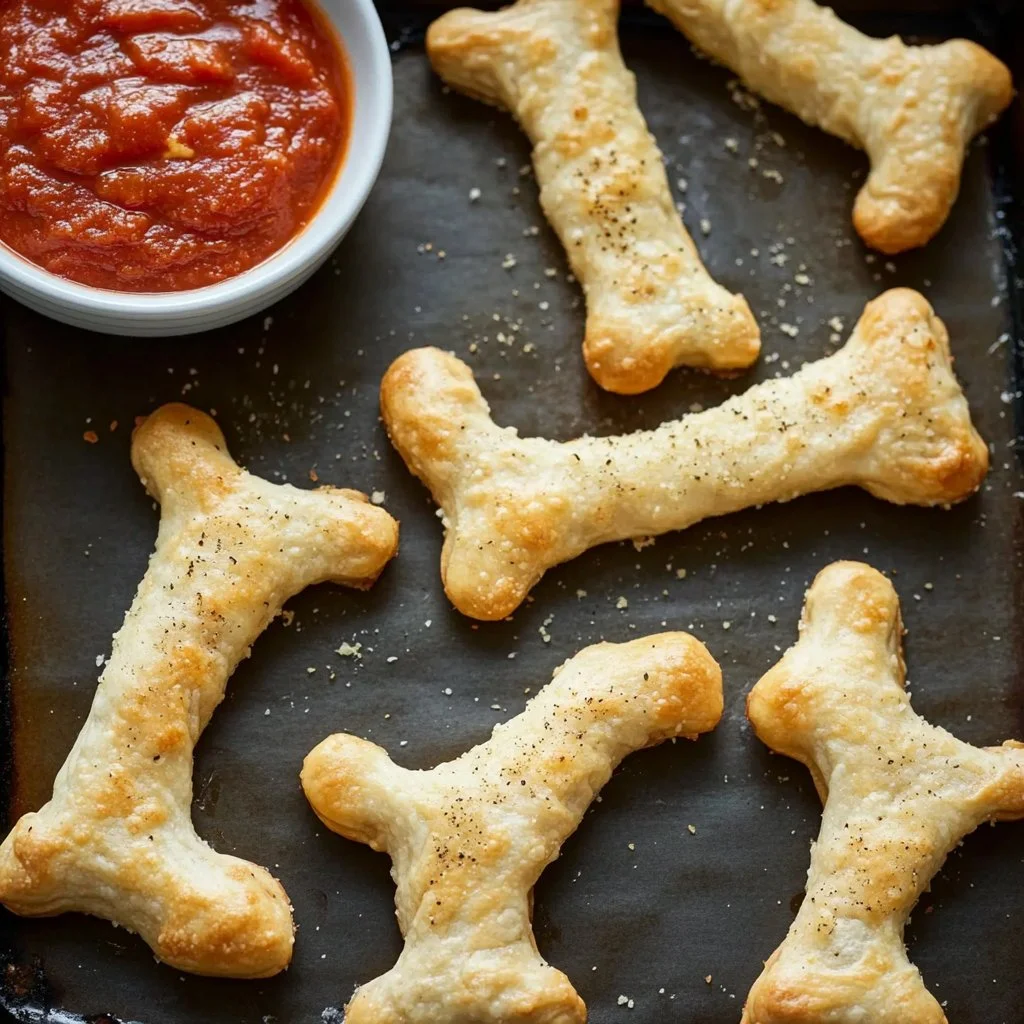
Are you looking for a fun and delicious snack that will impress your friends and family this Halloween? Meet the Cheesy Halloween Breadstick Bones! These whimsical, cheesy snacks are shaped like bones and are perfect for all your spooky celebrations. Imagine dipping these delightful breadsticks into marinara sauce while sharing ghost stories or enjoying a Halloween-themed movie night.
Why settle for ordinary snacks when you can create something special and festive? These cheesy delights are not only easy to make but also packed with flavor. With just a few simple ingredients, you can whip up a batch of these monstrous treats that will have everyone howling with delight.
So, roll up your sleeves, grab your pizza dough, and get ready to make some Cheesy Halloween Breadstick Bones that will surely become a favorite at your haunted gatherings!
Key Benefits of Cheesy Halloween Breadstick Bones
Why You’ll Love This Recipe
- Fun Presentation: Shaped like bones, these snacks are visually appealing and perfect for Halloween.
- Delicious Flavor: The combination of Parmesan and mozzarella makes for a creamy, cheesy bite in every breadstick.
- Quick to Prepare: With just a handful of ingredients and minimal prep time, you can have these ready in no time.
- Kid-Friendly: Kids will love the fun shape and cheesy goodness, making them great for family gatherings.
- Versatile Snack: Perfect for parties, movie nights, or even as a side dish to your favorite pasta.
- Easy to Customize: You can alter the toppings or add spices to fit your taste.
What Makes It Stand Out
What sets Cheesy Halloween Breadstick Bones apart is not just their spooky appearance, but their delightful taste that combines cheesy goodness with a playful design. These breadsticks are a festive addition to any Halloween table. They also make a fantastic snack for kids after school or a fun dish to serve at a themed party.
With endless customization options, you can easily tweak the recipe by adding your favorite herbs or spices to create your signature spooky flavor. This recipe is a perfect opportunity to experiment while keeping the preparation simple and stress-free.
Ingredients for Cheesy Halloween Breadstick Bones
Complete Ingredient List with Measurements
To create your Cheesy Halloween Breadstick Bones, gather the following ingredients:
- All-Purpose Flour (for dusting)
- 1 Pound Pizza Dough
- 2 Tablespoons Unsalted Butter (melted)
- ½ Cup Grated Parmesan Cheese
- 1 Cup Shredded Mozzarella Cheese
- Marinara Sauce (for dipping)
Substitutes and Alternatives
If you’re looking to accommodate dietary restrictions or personal preferences, here are some great alternatives:
- Pizza Dough: You can use gluten-free pizza dough for a gluten-free option.
- Cheese: Substitute with dairy-free cheese for a vegan-friendly alternative, or try different flavors like cheddar or provolone.
- Butter: Use olive oil or a dairy-free butter substitute for a healthier or vegan option.
- Marinara Sauce: Experiment with pesto, garlic butter, or your favorite dipping sauce.
How to Make Cheesy Halloween Breadstick Bones – Step-by-Step Directions
Follow these simple steps to create your Cheesy Halloween Breadstick Bones:
Step 1: Prep Your Workspace and Ingredients
Make sure your kitchen is ready for some fun!
- Clear a countertop area for the dough and gather all your ingredients.
- Preheat your oven to 375°F and prepare two baking sheets by lining them with parchment paper to avoid sticking.
Step 2: Shape the Dough
Now it’s time to get hands-on with the pizza dough!
- Divide your pizza dough into 10 equal portions.
- Roll each portion into a rope about 8 inches long.
- Make the ends slightly thicker than the middle to create that spooky “bone” effect.
Step 3: Place the Shaped Dough on Baking Sheets
Once your breadstick shapes are ready:
- Place them on the prepared baking sheets, ensuring there’s space between each breadstick so they don’t touch.
Step 4: Snip the Ends
Let’s add some character to our bones!
- Using kitchen scissors, make two small cuts (about 1 inch deep) at both ends of each dough rope.
- Gently pull and stretch these cut pieces to form the bone ends, adding to their whimsical appearance.
Step 5: Brush with Butter
Enhance the flavor before baking:
- Brush melted butter generously over each breadstick using a pastry brush.
- Be sure to cover all sides to help them turn golden.
Step 6: Add Parmesan Cheese
Time to make these bones extra tasty!
- Sprinkle grated Parmesan cheese evenly over the top of each butter-coated breadstick.
Step 7: Bake the Dough
Now it’s time for the oven magic!
- Place the baking sheets in the preheated oven and bake for about 15 minutes until the breadsticks begin to turn golden.
Step 8: Add Mozzarella Cheese
We’re almost there!
- After 15 minutes, take the breadsticks out of the oven and sprinkle the shredded mozzarella cheese evenly on each one.
- Return them to the oven and bake for an additional 5 to 7 minutes until the mozzarella is melted and bubbling.
Step 9: Serve and Enjoy
Once they’re out of the oven:
- Serve your Cheesy Halloween Breadstick Bones warm alongside a bowl of marinara sauce for dipping.
- Enjoy your spooky, cheesy snack with friends and family!
Serving Suggestions for Cheesy Halloween Breadstick Bones
Best Occasions to Serve This Dish
These delightful breadsticks are versatile and perfect for various events:
- Halloween Parties: They’ll be an instant hit at your spooky gatherings!
- Movie Nights: Serve them up with your favorite horror films for a fun, themed experience.
- After School Snack: Kids will love these as a fun and cheesy treat.
- Game Day: Perfect for munching while cheering on your favorite sport!
What to Serve with It
Pair your Cheesy Halloween Breadstick Bones with these delicious options:
- Marinara Sauce: A classic dipping sauce that complements the cheesy breadsticks perfectly.
- Garlic Butter: Drizzle some garlic-infused olive oil or butter for a flavorful dip.
- Fresh Vegetables: Serve with cut veggies for a crunchy contrast.
- Wine or Cider: Pair with a glass of pumpkin spice cider or your favorite wine for the adults.
Storing Cheesy Halloween Breadstick Bones Properly
Best Storage Practices
To keep your cheesy treats fresh, follow these storage tips:
- Refrigerator: Store any leftover breadsticks in an airtight container in the fridge for up to 3 days.
- Freezer: For longer storage, you can freeze them in a sealed plastic bag or container for up to 2 months.
Reheating and Freezing Tips
When you’re ready to enjoy your leftovers:
- Reheat in Oven: Reheat in the oven at 350°F for about 10-15 minutes for best results.
- Avoid Microwaving: Microwaving can make them soggy, so stick to the oven for reheating.
Tips & Tricks for Cheesy Halloween Breadstick Bones
Mistakes to Avoid
Here are some common pitfalls to watch out for:
- Over-Baking: Keep an eye on the breadsticks as baking times may vary depending on your oven.
- Thick Dough: Make sure to roll the dough thin enough for even cooking.
- Not Dusting: Be sure to dust the work surface to prevent sticking while shaping the dough.
Extra Tips for Better Results
- Experiment with Flavors: Feel free to add garlic powder or Italian herbs to the butter for an extra flavor boost.
- Use Fresh Ingredients: Fresh cheese and dough will enhance the overall flavor of your breadsticks.
- Serve Immediately: These breadsticks are best enjoyed fresh out of the oven while still warm and cheesy.
Recipe Variations of Cheesy Halloween Breadstick Bones
Creative Twists
Once you’ve mastered the classic, try these fun variations:
- Cheese Medley: Mix different cheeses, like cheddar and feta, for a unique flavor.
- Herb Infusion: Add fresh herbs like rosemary or thyme to the dough for an aromatic touch.
- Spicy Addition: Sprinkle some red pepper flakes or jalapeños for a spicy kick.
Dietary Adjustments
Make these Cheesy Halloween Breadstick Bones fit various dietary needs:
- Gluten-Free: Use a gluten-free pizza dough.
- Dairy-Free: Opt for dairy-free cheese and butter alternatives to cater to lactose intolerance.
- Vegan: Replace all dairy ingredients with plant-based options to create fully vegan breadsticks.
Conclusion
In summary, Cheesy Halloween Breadstick Bones are a delightful and playful treat that is easy to make and absolutely delicious. With their spooky shape and cheesy goodness, they are sure to become a favorite among your friends and family. Whether you serve these at a Halloween party or as a cozy snack during a movie night, they are a simple and effective way to celebrate the season.
Don’t hesitate to try these fantastic breadsticks and make some fun memories in the kitchen. If you do, let us know how they turn out! Enjoy making these Cheesy Halloween Breadstick Bones, and happy Halloween snacking!
FAQs about Cheesy Halloween Breadstick Bones
What if it doesn’t turn out right?
Don’t worry! Baking can be tricky sometimes. If they don’t puff up as expected, check the dough for freshness next time, and ensure you’re measuring ingredients accurately.
Can I prepare it ahead of time?
Absolutely! You can shape the breadsticks in advance and store them covered in the fridge before baking. Just add a few extra minutes to the baking time if they’re chilled.
What are the best ingredient substitutions?
You can swap out the pizza dough for gluten-free options or use vegan cheese for a dairy-free alternative. Olive oil can replace butter for a healthier option too!
How long can it be stored?
You can keep your Cheesy Halloween Breadstick Bones in the refrigerator for about 3 days. If frozen, they can last for up to 2 months.
Can I use store-bought dough or crust?
Yes! Store-bought pizza dough is a great time-saver, and you can whip these up even faster.
Is this recipe kid-friendly or family-appropriate?
Definitely! Kids love the fun shape and cheesy flavor, making these a perfect snack or appetizer for family gatherings.
Can I make this recipe allergen-free?
Yes! With the right substitutes, such as gluten-free dough and dairy-free cheese, you can easily cater to most dietary restrictions.

Cheesy Halloween Breadstick Bones
Ingrédients
Main Ingredients
- 1 pound Pizza Dough Can use gluten-free pizza dough for a gluten-free option.
- 2 tablespoons Unsalted Butter (melted) Can substitute with olive oil for a healthier option.
- ½ cup Grated Parmesan Cheese
- 1 cup Shredded Mozzarella Cheese
- Marinara Sauce for dipping Alternatives include pesto or garlic butter.
Dusting Ingredient
- 1 All-Purpose Flour For dusting the surface.
Instructions
Preparation
- Clear a countertop area for the dough and gather all your ingredients.
- Preheat your oven to 375°F and prepare two baking sheets lined with parchment paper.
Shaping the Dough
- Divide the pizza dough into 10 equal portions.
- Roll each portion into a rope about 8 inches long, making the ends slightly thicker than the middle.
Preparing the Baking Sheets
- Place the shaped dough on the prepared baking sheets with space between each breadstick.
Adding Character
- Use kitchen scissors to make two small cuts at both ends of each dough rope.
- Gently pull and stretch these cut pieces to form the bone ends.
Flavor Enhancement
- Brush melted butter over each breadstick using a pastry brush.
- Sprinkle grated Parmesan cheese evenly over the top.
Baking
- Bake in the preheated oven for about 15 minutes or until golden.
- Sprinkle shredded mozzarella cheese on top and bake for an additional 5-7 minutes until melted.
Serving
- Serve warm alongside marinara sauce for dipping.