

Table of Contents
Are you ready to indulge in a delectable treat that’s easy to make and impossible to resist? Welcome to the world of No-Bake Cookies and Cream Cheesecake Balls! If you love the creamy, dreamy flavors of cheesecake combined with the yummy crunch of cookies, you’re in for a delightful surprise.
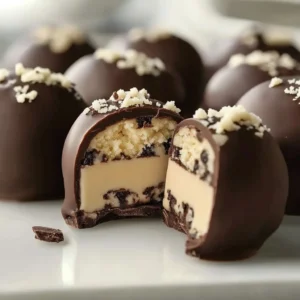
Imagine biting into a rich, creamy ball of cheesecake, perfectly blended with the nostalgic taste of cookies—what could be better? This recipe is as simple as it is scrumptious, making it a perfect choice for family gatherings, parties, or just a cozy night in. Who doesn’t love a dessert that requires no baking?
So, why not roll up your sleeves and dive into this delightful recipe? You’ll impress loved ones and satisfy your sweet tooth with these irresistible, no-bake cheesecake balls that are both rich and refreshing!
Key Benefits of No-Bake Cookies and Cream Cheesecake Balls
Why You’ll Love This Recipe
- Super Simple: With just a few ingredients and no oven required, making these cheesecake balls is a breeze.
- Delicious Flavor: The combination of cream cheese and chocolate cookies creates a rich, decadent taste that everyone will adore.
- Quick to Prepare: From start to finish, you can have these treats ready in no time—perfect for last-minute gatherings!
- Family-Friendly: Kids will love helping roll the balls and decorating them with cookie crumbs.
- Customizable: Easily adjust the recipe to fit your dietary needs or flavor preferences.
- Make-Ahead Convenience: These cheesecake balls can be prepared in advance, making them an excellent choice for busy schedules.
What Makes It Stand Out
These No-Bake Cookies and Cream Cheesecake Balls are more than just a simple dessert; they’re a delicious canvas for creativity. You can customize the flavors with various types of cookies, add different chocolate dips, or even incorporate seasonal ingredients like pumpkin spice for fall festivities.
Their versatility makes them suitable for year-round celebrations, whether you’re hosting a summer BBQ or a winter holiday party. You can easily adjust the toppings or add personal touches, making them unique to every occasion.
Ingredients for No-Bake Cookies and Cream Cheesecake Balls
Complete Ingredient List with Measurements
To create these delightful cheesecake balls, gather the following ingredients:
- 8 oz (225g) full-fat cream cheese, softened
- 1 cup (120g) powdered sugar
- 1 tsp (5ml) vanilla extract
- 20 chocolate sandwich cookies (Oreos or similar, about 200g), crushed (reserve some for rolling/topping)
- 1 cup (175g) white chocolate chips (optional, for dipping)
- 1 cup (175g) semi-sweet chocolate chips (optional, for dipping)
- Pinch of salt (optional)
Substitutes and Alternatives
No worries if you have dietary restrictions! Here are some common swaps:
- Gluten-Free: Use gluten-free chocolate cookies.
- Dairy-Free: Substitute cream cheese with dairy-free cream cheese and use dairy-free chocolate chips.
- Vegan: Switch to a vegan cream cheese alternative and ensure the chocolate chips are dairy-free.
- Reduced Sugar: Use sugar substitutes like erythritol or Swerve to make it lower in sugar.
How to Make No-Bake Cookies and Cream Cheesecake Balls – Step-by-Step Directions
Now that you’ve got your ingredients ready, it’s time to bring your No-Bake Cookies and Cream Cheesecake Balls to life! Just follow these easy steps:
Step 1 – Prep Your Workspace and Ingredients
Before you dive into making these treats, make sure your workspace is clean and organized. Gather all your ingredients so that you have everything within reach.
Step 2 – Soften Your Cream Cheese
Ensure your cream cheese is nicely softened. Let it sit at room temperature for about 30 minutes. This is a crucial step for a smooth, creamy filling.
Step 3 – Crush the Cookies
Next, we need to crush the chocolate sandwich cookies. You can use a food processor for a fine crumb or place the cookies in a zip-top bag and smash them with a rolling pin. You’ll want about 1 ½ cups of crumbs for the filling and rolling.
Step 4 – Create the Cheesecake Filling
In a medium mixing bowl, combine the softened cream cheese, powdered sugar, vanilla extract, and a pinch of salt. Beat everything together until it’s smooth and creamy—this will take just a couple of minutes.
Step 5 – Add the Crushed Cookies
Fold most of the crushed cookies into the cream cheese mixture. Save some crumbs for garnishing later. If your mixture feels too soft, chill it in the refrigerator for about 10 minutes until it’s easier to handle.
Step 6 – Roll into Balls
Line a cookie sheet with parchment paper. Use a small cookie scoop or tablespoon to portion out the mixture (about 1 tablespoon each). Then roll each portion into balls with your hands. If they’re sticky, it’s perfectly fine to chill them for another 5 minutes.
Step 7 – Firm Up the Balls
Place the rolled cheesecake balls onto the lined tray and refrigerate them for about 10-15 minutes until they firm up. This will make handling the chocolate coating easier.
Step 8 – Melt the Chocolate
In a microwave-safe bowl, melt the white or semi-sweet chocolate chips in 20-second intervals, stirring until smooth. Be cautious not to overheat them.
Step 9 – Dip the Cheesecake Balls
Using a fork, dip each chilled cheesecake ball into the melted chocolate. Allow any excess chocolate to drip off before returning the balls to the tray. This is where you can sprinkle them with the reserved cookie crumbs or colorful sprinkles right before the chocolate sets.
Step 10 – Chill Until Set
Finally, place your decorated cheesecake balls in the fridge for about 10 minutes or until the chocolate has fully set.
Serving Suggestions for No-Bake Cookies and Cream Cheesecake Balls
Best Occasions to Serve This Dish
These delightful cheesecake balls are perfect for various occasions, such as:
- Birthday parties
- Family gatherings
- Holiday celebrations
- Potlucks
- Movie nights
What to Serve With It
To complement these cheesecake balls, consider pairing with:
- A glass of cold milk
- Coffee or espresso
- Hot chocolate
- Whipped cream
- Fresh fruits (like strawberries or raspberries)
Storing No-Bake Cookies and Cream Cheesecake Balls Properly
Best Storage Practices
These cheesecake balls can be stored easily:
- Refrigerator: Keep them in an airtight container for up to one week.
- Freezer: They freeze well for up to three months. Just place them in a single layer in a freezer-safe container.
Reheating and Freezing Tips
To enjoy them after freezing:
- Thawing: Move the cheesecake balls to the fridge a few hours before you plan to serve them.
- Avoid Reheating: It’s best enjoyed chilled and should not be reheated, as this can ruin the texture.
Tips & Tricks for No-Bake Cookies and Cream Cheesecake Balls
Mistakes to Avoid
Here are some common pitfalls to watch out for:
- Not Softening Cream Cheese: Skipping this step can lead to a lumpy filling.
- Overheating Chocolate: Melting chocolate in too long can lead to a burnt taste; always melt in short intervals.
- Too Sticky: If the mixture is too sticky, chilling it can make rolling easier.
Extra Tips for Better Results
- Crushing Cookies: Ensure you crush the cookies finely to evenly distribute the flavors.
- Chilling: Chill the balls longer if they’re too soft—you want them firm enough to hold their shape.
- Experiment: Don’t hesitate to add different flavors or mix-ins—the sky’s the limit!
Recipe Variations of No-Bake Cookies and Cream Cheesecake Balls
Creative Twists
Feel free to add your favorite flavors or ingredients:
- Peanut Butter: Mix in some peanut butter for a nutty twist.
- Mint Chocolate: Add a few drops of peppermint extract for a refreshing touch.
- Seasonal Additions: Incorporate ingredients like pumpkin spice for fall or crushed peppermint candy for winter festivities.
Dietary Adjustments
Want to adapt the recipe? Here’s how:
- Gluten-Free: Use gluten-free cookies.
- Dairy-Free/Vegan: Choose dairy-free cream cheese and chocolate.
- Low-Sugar: Use sugar alternatives or low-carb options.
Conclusion about No-Bake Cookies and Cream Cheesecake Balls
To wrap it all up, No-Bake Cookies and Cream Cheesecake Balls are a delightful evening treat, easy to make, and perfect for any occasion. Their creamy texture and rich flavor will satisfy everyone, and there’s no need to worry about baking!
So, gather your ingredients, follow the steps, and experience this irresistible treat for yourself. Don’t forget to share your thoughts or any variations you try. Happy indulging!
FAQs about No-Bake Cookies and Cream Cheesecake Balls
What if it doesn’t turn out right?
If your cheesecake balls don’t hold their shape, make sure your cream cheese was softened enough, and chill the mixture longer before rolling.
Can I prepare it ahead of time?
Absolutely! You can prepare these cheesecake balls a day or two in advance; just keep them in the fridge or freezer.
What are the best ingredient substitutions?
You can swap cream cheese for dairy-free alternatives and use any crushed cookie that suits your dietary preferences!
How long can it be stored?
These cheesecake balls can last in the fridge for about a week and in the freezer for up to three months.
Can I use store-bought dough or crust?
This recipe mainly uses a filling; however, if you want to get creative, you might experiment with a cookie crust instead.
Is this recipe kid-friendly or family-appropriate?
Definitely! Kids will love the taste and have fun helping to roll and dip the cheesecake balls.
Can I make this recipe allergen-free?
Yes! Use gluten-free cookies and dairy-free cream cheese to accommodate those with dietary restrictions.
Enjoy making your No-Bake Cookies and Cream Cheesecake Balls, and don’t hesitate to share your delicious results!
No-Bake Cookies and Cream Cheesecake Balls
Equipment
- Robot culinaire ou mixeur
- Grand bol
- Spatule
- Plaque et papier sulfurisé
- Réfrigérateur ou congélateur
Ingrédients
Base
- 18 biscuits Oreo ou équivalent cookies and cream
- 150 g fromage à la crème (type Philadelphia) ramolli
- 1 cuillère à soupe sucre glace optionnel, selon le goût
Enrobage
- 150 g chocolat blanc de couverture fondu
- 2 biscuits Oreo émiettés pour la décoration
Instructions
- Réduire les biscuits Oreo en miettes fines à l’aide d’un robot culinaire.
- Dans un bol, mélanger les miettes avec le fromage à la crème ramolli (et le sucre glace si utilisé) jusqu’à obtenir une pâte homogène.
- Former des boules d’environ 2–3 cm de diamètre à l’aide d’une cuillère ou des mains propres.
- Placer les boules sur une plaque recouverte de papier sulfurisé et réfrigérer pendant 30 minutes pour les raffermir.
- Faire fondre le chocolat blanc au bain-marie ou au micro-ondes (par tranches de 20 secondes). Tremper chaque boule dans le chocolat fondu à l’aide d’une fourchette.
- Déposer à nouveau sur la plaque et saupoudrer immédiatement de miettes d’Oreo avant que le chocolat ne durcisse.
- Réfrigérer au moins 15 minutes avant de servir pour que le chocolat se fige.