
Table of Contents
Introduction to Chocolate Hazelnut Cake Filling
Have you ever craved a dessert that is both rich and comforting, yet sophisticated enough to impress your guests? Look no further than Chocolate Hazelnut Cake Filling. This delectable creation combines the deep, luscious flavors of chocolate with the delightful crunch of hazelnuts, creating a taste sensation that is nothing short of extraordinary. Whether you’re baking a cake, preparing pastries, or simply in need of a decadent spread, this filling is the answer to your sweet cravings.
What makes Chocolate Hazelnut Cake Filling truly special? For one, it resonates with chocolate lovers who appreciate the layered textures and flavors. The combination of melted chocolate, creamy butter, and heavy cream not only creates a smooth consistency but also infuses a level of indulgence that can elevate any dessert. And let’s not forget those toasted hazelnuts—each bite brings a nutty crunch, adding complexity to your treats.
You might wonder if such a delicious filling is complicated to make. The beauty of Chocolate Hazelnut Cake Filling lies in its simplicity. With just a handful of ingredients and a straightforward process, even novice bakers can achieve astonishing results. Plus, the versatility of this filling means you can use it in various desserts or even as a decadent dip for fruits or cookies.
Home bakers often seek out recipes that deliver satisfaction without demanding hours in the kitchen. This easy-to-follow recipe for Chocolate Hazelnut Cake Filling checks all the boxes. It’s not just about creating something beautiful; it’s about crafting an experience and indulging your taste buds. So let’s dive into the details of how you can create this luxurious filling from the comfort of your kitchen.
Key Benefits of Chocolate Hazelnut Cake Filling
Why You’ll Love This Recipe
- Rich chocolate flavor complemented by toasted hazelnuts.
- Quick and easy to prepare with minimal equipment.
- Versatile for use in cakes, pastries, or even as a spread.
- Perfect for both casual gatherings and special occasions.
- Smooth, creamy texture that is irresistibly spreadable.
- Can be customized with additional flavors like vanilla or sea salt.
What Makes It Stand Out
Chocolate Hazelnut Cake Filling has a unique twist that sets it apart from standard chocolate fillings. The toasted hazelnuts not only contribute a distinct flavor but also enhance the filling’s texture, creating a satisfying crunch that perfectly contrasts the creamy chocolate base. Furthermore, the ease of making this filling ensures that anyone, regardless of baking experience, can whip it up and impress their friends and family.
This filling is also incredibly versatile. Beyond being a cake filling, it can be spread on toast or used as a dip for fruit. It suits various occasions—be it a birthday cake, a holiday dessert, or an afternoon treat. By adjusting the consistency, you can also turn it into a frosting for cupcakes or a ganache for drizzling over desserts, making it a fantastic all-rounder in your baking repertoire.
Ingredients for Chocolate Hazelnut Cake Filling
Complete Ingredient List with Measurements
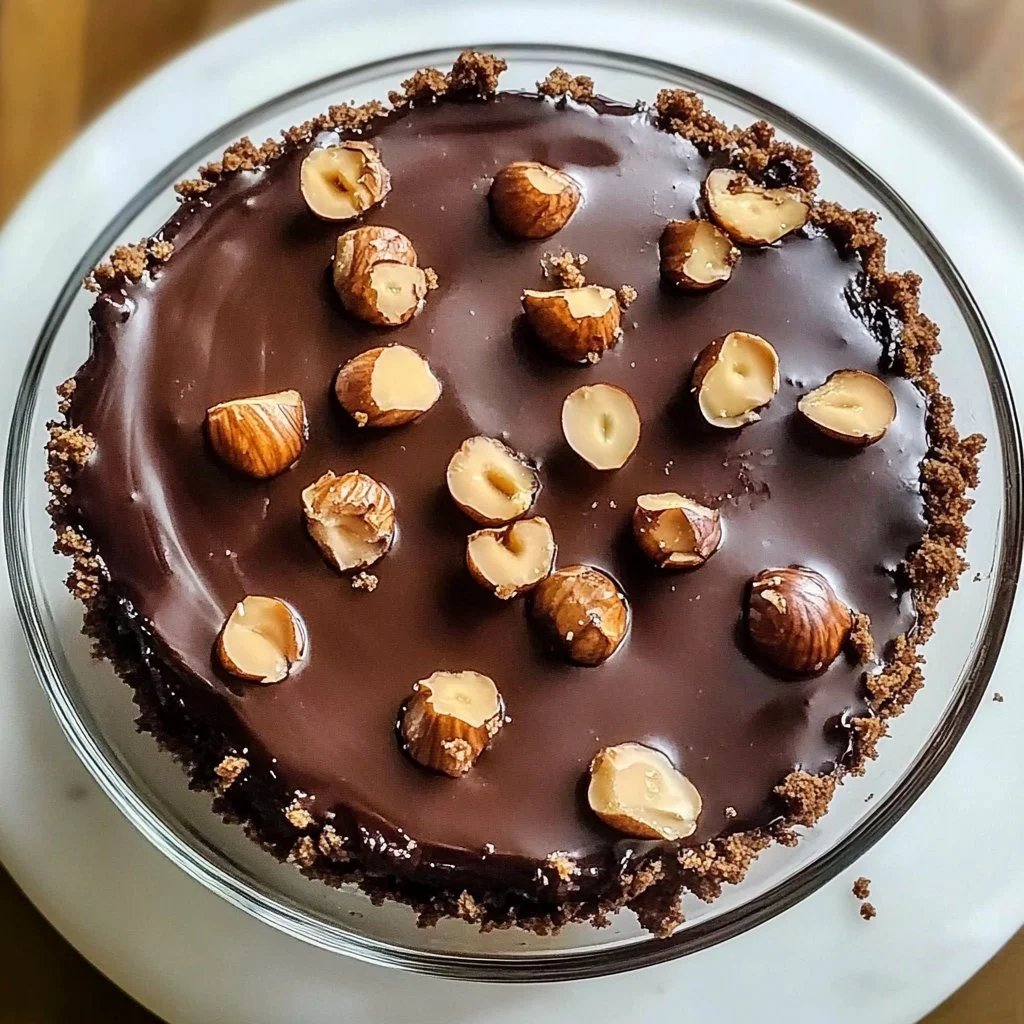
- 1 cup melted chocolate (bittersweet or semisweet)
- 1 cup heavy cream
- 1/2 cup unsalted butter (softened)
- 1/2 cup toasted hazelnuts (chopped)
Substitutes and Alternatives
If you’re looking for alternatives due to dietary restrictions or preferences, there are some easy swaps for the ingredients in Chocolate Hazelnut Cake Filling. For instance, you can use dairy-free chocolate and coconut cream as substitutes for a vegan version. Those with nut allergies can replace hazelnuts with sunflower seeds or omit them entirely while still enjoying the rich chocolate flavor.
For a lighter filling, consider using light cream or a combination of cream cheese and yogurt as a base. These alternatives can maintain the filling’s creaminess while altering the flavor slightly, adding a different dimension to your cakes and pastries.
How to Make Chocolate Hazelnut Cake Filling – Step-by-Step Directions
Step 1 – Prepare Ingredients
Start by gathering all the ingredients. Ensure that your chocolate is fully melted and smooth. This step is crucial for achieving that velvety texture we love in Chocolate Hazelnut Cake Filling.
Step 2 – Cook the Base
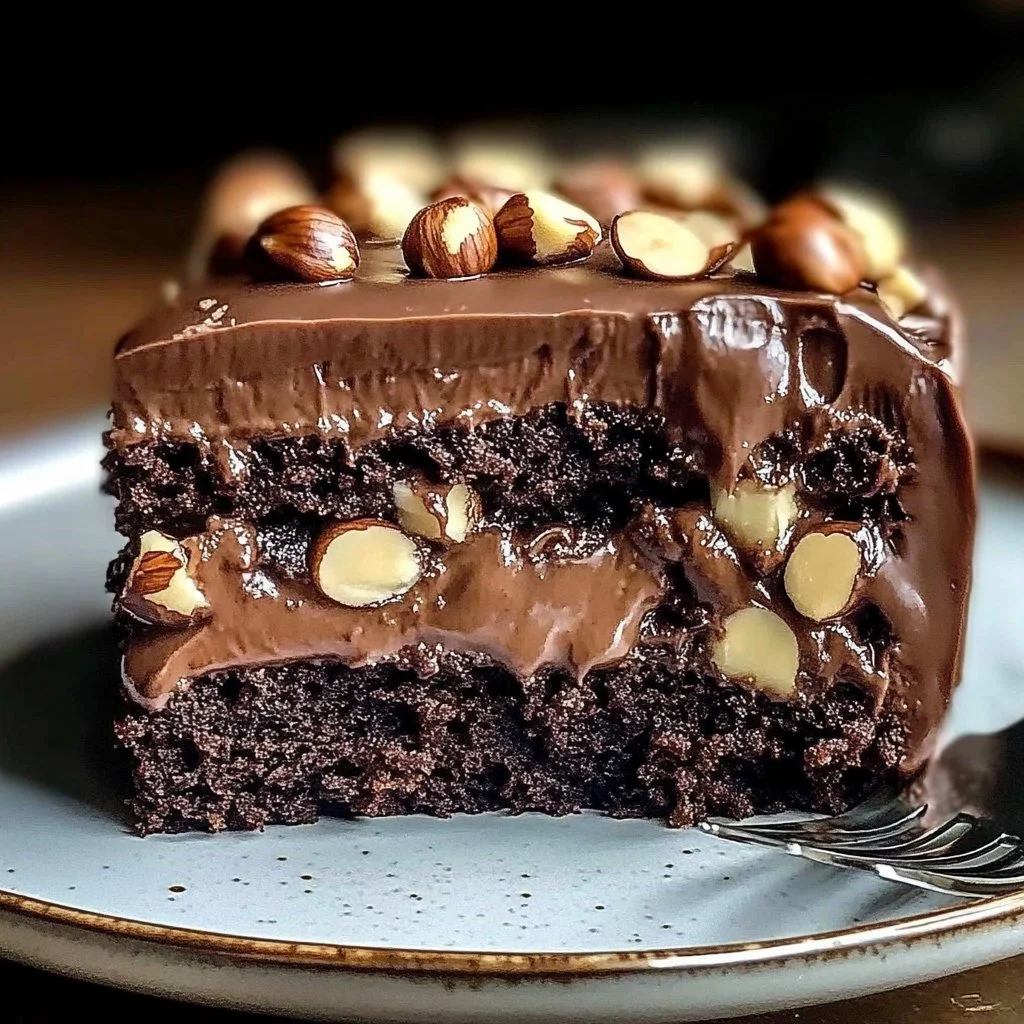
In a mixing bowl, combine the melted chocolate, heavy cream, and softened butter. Whisk these ingredients until they are smooth and well incorporated. This step should take about 2–3 minutes. You should end up with a rich, glossy mixture that is free of lumps.
Step 3 – Add Hazelnuts
Once your base is smooth, stir in the chopped toasted hazelnuts. Mix gently to distribute the nuts evenly throughout the filling. The goal here is to ensure that every dollop of the filling has that delightful nutty crunch.
Step 4 – Allow to Cool
Set your mixture aside and allow it to cool at room temperature. This will typically take about 20-30 minutes. Cooling is essential as it allows the filling to thicken to a spreadable consistency.
Step 5 – Check Consistency
After cooling, check the consistency of your Chocolate Hazelnut Cake Filling. It should be thick but still spreadable. If you find it’s too thin, refrigerate it for an additional 15-20 minutes until it reaches your desired texture.
Step 6 – Use as Desired
Now that your filling is ready, use it generously in cakes, as a dip, or as a delightful spread on pancakes or toast. The possibilities are endless, making this filling a fabulous addition to your dessert repertoire.
Step 7 – Final Touches
If you like, you can add a pinch of salt or a splash of vanilla extract for an extra layer of flavor. These touches can enhance the overall taste, making your Chocolate Hazelnut Cake Filling even more irresistible.
Step 8 – Storage Preparation
If you’re not using the filling immediately, transfer it to an airtight container. Proper storage will help maintain its freshness and flavor, so you can enjoy it later.
Step 9 – Chill If Needed
Should you prefer a thicker filling, feel free to refrigerate it further. This can be a great trick if you want to use your filling for intricate piping or decorating.
Step 10 – Enjoy
Now it’s time to indulge! Use your Chocolate Hazelnut Cake Filling generously in your desserts and enjoy the well-deserved compliments from those who taste it.
Serving Suggestions for Chocolate Hazelnut Cake Filling
Best Occasions to Serve This Dish
Chocolate Hazelnut Cake Filling shines at various occasions. It’s perfect for birthday celebrations, holiday gatherings, or casual afternoon teas. No matter the event, this filling adds a touch of elegance and indulgence that everyone will appreciate.
What to Serve With It
This rich filling pairs well with numerous desserts. Try it as a filling in layered cakes, alongside fresh berries, or as a delightful dip for cookies. It can also complement a glass of dessert wine or coffee, making for a luxurious experience.
How to Store Chocolate Hazelnut Cake Filling Properly
Best Storage Practices
To store Chocolate Hazelnut Cake Filling, place it in an airtight container and keep it in the refrigerator. It should stay fresh for up to a week if stored properly. For longer storage, you can freeze it in an airtight container for up to three months. Just ensure to label the container with the date.
Reheating and Freezing Tips
When ready to use your frozen filling, simply transfer it to the fridge and let it thaw overnight. If you need it urgently, you can place it in warm water (make sure it’s in a sealed bag) to speed up the process. Reheat gently on low heat if you’d like to thin it out before using.
Tips & Tricks for Chocolate Hazelnut Cake Filling
Mistakes to Avoid
- Using cold butter can lead to a lumpy mixture; always ensure the butter is at room temperature.
- Forgetting to chop the hazelnuts can result in uneven textures in the filling.
- Overheating the chocolate can make it seize; always melt it slow and steady.
- Not letting the mixture cool before using could lead to spreading issues.
- Skipping the resting time can make the filling too runny to work with.
Extra Tips for Better Results
For a more robust flavor, consider adding a splash of espresso or coffee to the chocolate mixture. This will enhance the chocolate richness and create depth. You might also want to experiment with flavored extracts like almond or orange for a unique twist.
Recipe Variations of Chocolate Hazelnut Cake Filling
Creative Twists
Try adding a tablespoon of cocoa powder to enhance the chocolate flavor even more. You can also experiment with different nuts like pecans or almonds for a slightly different texture. For a fruity touch, consider folding in dried fruits like cherries or apricots sautéed in a bit of rum or brandy.
Dietary Adjustments
If you’re looking for a vegan version, substitute with dairy-free chocolate and replace heavy cream with coconut cream or an alternative like almond milk. You can also use vegan butter for a complete dairy-free twist. For a gluten-free option, ensure all your ingredients are certified gluten-free.
Conclusion about Chocolate Hazelnut Cake Filling
In conclusion, Chocolate Hazelnut Cake Filling is a must-try for anyone with a sweet tooth. Its velvety richness combined with the crunchy texture of hazelnuts creates an extraordinary experience in dessert form. With its simple preparation and versatility, it easily becomes a staple in your baking collection. Whether for special occasions or just a cozy treat at home, this filling is bound to delight anyone lucky enough to indulge in it. So why wait? Grab your ingredients, and get started on creating a truly irresistible cake filling that will have everyone asking for seconds!
FAQs about Chocolate Hazelnut Cake Filling
How long does Chocolate Hazelnut Cake Filling last?
When stored in an airtight container in the refrigerator, it should last for up to one week. If frozen, it can remain fresh for up to three months.
Can I make Chocolate Hazelnut Cake Filling ahead of time?
Yes, you can prepare it ahead of time. Just store it in the refrigerator and allow it to come to room temperature or slightly warm it before use.
What can I do if my filling is too runny?
If your filling is too runny, refrigerate it for about 15-20 minutes to thicken. You can also add a little more chocolate if needed.
Can I use dairy-free ingredients in this recipe?
Absolutely! You can substitute the heavy cream with coconut cream and the chocolate with dairy-free options to make a vegan version.
What desserts is Chocolate Hazelnut Cake Filling good for?
This filling is perfect for cakes, cupcakes, pastries, or even as a spread on toast and biscuits.
Can I freeze Chocolate Hazelnut Cake Filling?
Yes, you can freeze it. Just make sure to store it in an airtight container and label it with the date before freezing.
What flavor variations can I try?
You can experiment by adding espresso powder, flavored extracts like almond or orange, or even a splash of liqueur for an adult twist.
How can I adjust the sweetness of the filling?
If you find the filling too sweet, consider adding a pinch of salt or alcohol to balance the sweetness without compromising the flavor.
Chocolate Hazelnut Cake Filling
Ingrédients
Main Ingredients
- 1 cup melted chocolate (bittersweet or semisweet)
- 1 cup heavy cream
- 1/2 cup unsalted butter (softened) Ensure butter is at room temperature to avoid lumps.
- 1/2 cup toasted hazelnuts (chopped) Chop finely for even texture.
Instructions
Preparation
- Gather all the ingredients, ensuring the chocolate is fully melted and smooth.
- In a mixing bowl, combine the melted chocolate, heavy cream, and softened butter. Whisk until smooth and well incorporated.
- Stir in the chopped toasted hazelnuts until evenly distributed.
- Allow the mixture to cool at room temperature for about 20-30 minutes to thicken.
- Check the consistency; it should be thick yet spreadable. Refrigerate if necessary to achieve desired texture.
- Use the filling in cakes, as a dip, or spread on toast. Consider adding a pinch of salt or splash of vanilla for extra flavor.
Storage and Serving
- Transfer unused filling to an airtight container and store in the refrigerator for up to a week or freeze for three months.
- To thaw frozen filling, refrigerate overnight or use warm water in a sealed bag.