

Table of Contents
Introduction to Heart-Shaped Desserts
Have you ever wondered how to impress someone special with a delightful treat? Heart-shaped desserts are the perfect answer. Their charming look makes them a favorite for celebrations, romantic dinners, or just a spontaneous treat for yourself. Imagine indulging in a sweet snack that not only tastes amazing but also symbolizes love and affection. This Heart-Shaped Desserts recipe is not just about appearance; it’s packed with flavor, easy to make, and a delightful way to express your feelings through food.
What makes this recipe stand out is its simplicity. With common ingredients that you likely already have in your kitchen, you can whip up something that looks and tastes extraordinary. Each bite of these heart-shaped delights will bring about joy, whether you’re sharing them with a loved one or savoring them during a cozy night in. The soft, fluffy texture combined with the sweetness of the icing creates a treat that’s not only satisfying but also leaves you wanting more.
Moreover, the beauty of Heart-Shaped Desserts lies in their versatility. You can customize them with different flavors or decorations, making them suitable for various occasions from Valentine’s Day to anniversaries or even just a fun baking project with kids. Isn’t it wonderful to have a recipe that you can adapt for every celebration? With a little creativity, you can make your heart-shaped treats uniquely yours.
Key Benefits of Heart-Shaped Desserts
- Deliciously Sweet: The combination of sugar and vanilla creates a mouthwatering flavor.
- Simple to Prepare: With easy-to-follow steps, anyone can master this recipe.
- Versatile Styles: Customize with colors and decorations to match any occasion.
- Perfect for Sharing: Heart shapes make these desserts ideal gifts for loved ones.
- Kid-Friendly: A fun baking activity that kids will love to help with.
- Celebratory Appeal: Great for special events or casual gatherings, making every moment sweeter.
What Makes It Stand Out
Heart-shaped desserts are inherently charming and whimsical, turning an ordinary treat into something extraordinary. The visual appeal of these desserts can enhance any gathering, transforming simple moments into fond memories. Plus, the simple ingredients allow for effortless preparation, so even novice bakers can shine.
Customization adds another layer of fun! You can easily adapt this recipe with different extracts like almond or lemon, or incorporate fun mix-ins such as chocolate chips or nuts. This makes the Heart-Shaped Desserts not only unique to your taste but also a great talking point when shared with friends and family.
Ingredients for Heart-Shaped Desserts
Complete Ingredient List with Measurements
- 2 cups all-purpose flour
- 1 cup granulated sugar
- 1/2 cup unsalted butter, softened
- 1 large egg
- 1 teaspoon vanilla extract
- 1/2 teaspoon baking powder
- 1/4 teaspoon salt
- 1 cup icing sugar (for decoration)
- Food coloring (optional)
- Sprinkles or edible glitter (optional)
Substitutes and Alternatives
If you have dietary restrictions, there are several substitutes for the ingredients in Heart-Shaped Desserts. For those who are lactose intolerant, you can swap unsalted butter for vegan butter or coconut oil. If you’re gluten-free, use a gluten-free all-purpose flour blend, which typically works well in sweet recipes.
For those looking to reduce sugar, consider using a sugar substitute or reducing the amount of granulated sugar slightly. You can also leave out the icing sugar decoration for a less sweet treat, focusing more on the cake itself, especially if you’re looking for a lighter option.
How to Make Heart-Shaped Desserts – Step-by-Step Directions
Step 1 – Prepare Ingredients
Start by gathering all your ingredients on the countertop. Measure out the flour, sugar, butter, egg, vanilla extract, baking powder, and salt. Having everything in place will make the mixing process much easier.
Step 2 – Preheat Your Oven
Preheat your oven to 350°F (175°C). This ensures that your Heart-Shaped Desserts will bake evenly. While the oven warms up, you can prepare the baking pan.
Step 3 – Grease the Baking Pan
Grease a heart-shaped baking pan with a bit of butter or non-stick spray. This prevents the dessert from sticking and ensures easy removal after baking.
Step 4 – Cream Together Butter and Sugar
In a large mixing bowl, cream the softened butter and granulated sugar together until the mixture is light and fluffy. This process incorporates air into the mix, which gives your heart-shaped treats a delightful texture.
Step 5 – Add Egg and Vanilla
To the creamed butter and sugar, add the large egg and vanilla extract. Mix well until fully incorporated, ensuring everything is blended together smoothly.
Step 6 – Mix Dry Ingredients
In another bowl, whisk together the flour, baking powder, and salt. This helps to evenly distribute the leavening agent and ensures that there are no lumps in your dry ingredients.
Step 7 – Combine Wet and Dry Mixtures
Gradually add the dry ingredients to the wet mixture. Stir until a dough forms. The dough should be soft and slightly sticky but not too wet. If it feels too sticky, you might add a tad more flour.
Step 8 – Add Food Coloring (Optional)
If you want to add a splash of color, divide the dough into portions and mix in different food colorings. This step allows for creativity and fun, particularly if kids are helping in the kitchen.
Step 9 – Press Dough into the Pan
Press the prepared dough into the greased heart-shaped pan, smoothing the top so it’s even. This ensures that the finished dessert looks perfect when you remove it from the pan.
Step 10 – Bake the Heart-Shaped Desserts
Bake in the preheated oven for 20–25 minutes. You’ll know they are done when a toothpick inserted in the center comes out clean. The edges will begin to turn a golden brown.
Step 11 – Cool and Decorate
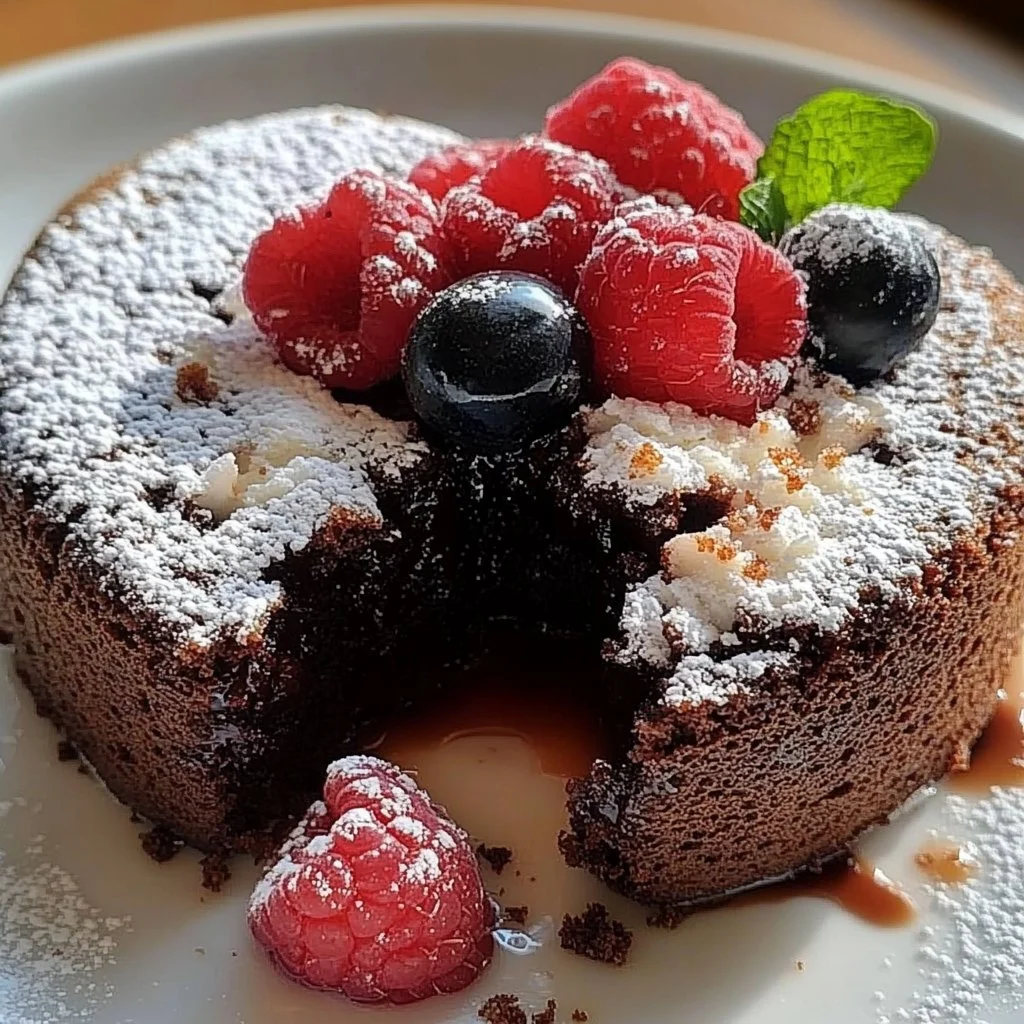
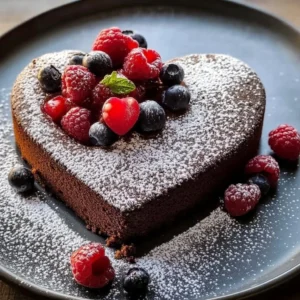
Allow your heart-shaped desserts to cool completely in the pan before trying to remove them. Once cooled, decorate with icing sugar, sprinkles, or edible glitter to create an eye-catching finish.
Serving Suggestions for Heart-Shaped Desserts
Best Occasions to Serve This Dish
The beauty of heart-shaped desserts is that they can be served for various occasions. Whether it’s Valentine’s Day, anniversaries, or simply a casual get-together, these desserts add a touch of love and sweetness. They are perfect for birthday parties too, especially for children who will love their charming shapes.
What to Serve With It
Consider serving these Heart-Shaped Desserts with a side of fresh fruit, like strawberries and raspberries. Pairing them with a scoop of vanilla ice cream or whipped cream elevates the experience to a delightful indulgence. A cup of coffee or tea also complements the sweetness beautifully, making it a complete treat.
How to Store Heart-Shaped Desserts Properly
Best Storage Practices
To keep your Heart-Shaped Desserts fresh, store them in an airtight container at room temperature for up to 3 days. If you want to store them for a longer period, you can refrigerate them, although this might change the texture slightly.
Reheating and Freezing Tips
If you want to freeze your Heart-Shaped Desserts, wrap them tightly in plastic wrap and place them in a freezer-safe container. They will keep well for up to 3 months. When you’re ready to enjoy them, thaw in the refrigerator overnight or at room temperature for a few hours. If you prefer warm desserts, pop them in the microwave for a few seconds to restore their softness.
Tips & Tricks for Heart-Shaped Desserts
Mistakes to Avoid
- Not Prepping the Pan: Failing to grease the pan can lead to sticking.
- Overmixing the Dough: Mixing too much can result in dense textures.
- Under-Baking: Make sure to test with a toothpick to avoid gooey centers.
- Skipping Cooling Time: Removing them too early can cause breakage.
- Ignoring Decoration: Skipping the sprinkles can make the desserts less festive.
Extra Tips for Better Results
For added flavor, try incorporating lemon zest or almond extract into the batter. You can also sprinkle some coarse sea salt on top of the icing to create a sweet and salty contrast, enhancing the overall taste. For a fun twist, add mini chocolate chips to the batter for another layer of flavor.
Recipe Variations of Heart-Shaped Desserts
Creative Twists
- Chocolate Version: Substitute a portion of the flour with cocoa powder for a rich chocolate flavor.
- Fruit-Filled Heart-Shaped Desserts: Add a layer of fruit preserves in the center before baking for a fruity surprise inside.
- Nutty Flavors: Mix in chopped nuts or shredded coconut for added texture and taste.
Dietary Adjustments
For a vegan version, substitute the egg with flaxseed meal mixed with water and replace the butter with a plant-based alternative. To make them gluten-free, use almond flour or a gluten-free blend. Ensure that your baking powder is gluten-free if necessary.
Conclusion about Heart-Shaped Desserts
In conclusion, Heart-Shaped Desserts are not only visually appealing but also delightful in taste and texture. They stand as a beautiful testament to the idea that food can express love and care, making them ideal for a variety of occasions. Whether you’re celebrating a holiday, a special milestone, or simply want to bring a smile to someone’s face with a homemade treat, these heart-shaped delights are sure to be a hit.
Their simplicity means that anyone can create them, even if you’re not an experienced baker. Plus, the chance to customize with colors, flavors, and decorations adds a personal touch that makes them even more special. So gather your ingredients, roll up your sleeves, and dive into the delightful world of Heart-Shaped Desserts. You won’t regret it!
FAQs about Heart-Shaped Desserts
Can I make these desserts ahead of time?
Yes, you can prepare the dough a day in advance and store it in the refrigerator until you’re ready to bake.
How long will Heart-Shaped Desserts stay fresh?
They will stay fresh for about 3 days at room temperature or up to a week in the refrigerator.
Can I freeze Heart-Shaped Desserts?
Absolutely! Wrap the cooled desserts tightly and freeze for up to 3 months. Just thaw before serving.
What should I do if my dough is too sticky?
If the dough is too sticky, add a little more flour, a tablespoon at a time, until it reaches a workable consistency.
Can I decorate these desserts differently?
Definitely! You can add various toppings like fresh fruits, whipped cream, or even chocolate ganache for a different look.
Is this recipe suitable for kids to help with?
Yes, kids will enjoy helping with mixing, decorating, and pressing the dough into the pan.
What can I use instead of eggs?
You can use flaxseed meal mixed with water as a substitute or try applesauce for a binding option.
How can I make these gluten-free?
Substitute the all-purpose flour with a gluten-free flour blend for the best results.
Heart-Shaped Desserts
Ingrédients
Main Ingredients
- 2 cups all-purpose flour You can substitute with gluten-free flour.
- 1 cup granulated sugar Can be reduced or substituted with sugar alternatives.
- 1/2 cup unsalted butter, softened Use vegan butter or coconut oil as substitutes.
- 1 large egg Substitute with flaxseed meal mixed with water for a vegan option.
- 1 teaspoon vanilla extract Almond extract can be used for variety.
- 1/2 teaspoon baking powder Ensure it’s gluten-free if necessary.
- 1/4 teaspoon salt
Decoration Ingredients
- 1 cup icing sugar For decoration.
- Food coloring (optional) For a colorful touch.
- Sprinkles or edible glitter (optional) For festive decoration.
Instructions
Preparation
- Gather all ingredients on the countertop.
- Preheat oven to 350°F (175°C).
- Grease a heart-shaped baking pan with butter or non-stick spray.
Mixing the Batter
- In a mixing bowl, cream together softened butter and granulated sugar until light and fluffy.
- Add the egg and vanilla extract, mixing well.
- In another bowl, whisk together flour, baking powder, and salt.
- Gradually add the dry ingredients to the wet mixture, stirring until a dough forms.
- If desired, divide the dough and mix in food coloring.
Baking
- Press the dough into the greased heart-shaped pan.
- Bake in the preheated oven for 20–25 minutes, or until a toothpick inserted comes out clean.
- Allow to cool in the pan before decorating.
Decorating
- Once cooled, decorate with icing sugar, sprinkles, or edible glitter.