
Table of Contents
When it comes to delightful desserts, Mini Cannoli Cups truly shine as one of the most inviting options you can prepare. Have you ever tasted those cream-filled delights from a bakery? Now, imagine taking that deliciousness and transforming it into bite-sized fun! These Mini Cannoli Cups are not just aesthetically pleasing; they’re also a breeze to make, making them perfect for any occasion. Whether you’re hosting a gathering, celebrating a birthday, or simply craving something sweet, this recipe hits all the right notes.
One of the best things about Mini Cannoli Cups is their versatility. You can customize the filling and toppings to suit your taste or dietary preferences, ensuring that everyone at the table will find something to love. The blend of creamy ricotta with a hint of citrus and sweetness creates a flavorful experience that dances on the palate. Plus, the crispy pie crust adds a delightful crunch, complementing the smooth filling perfectly.
With just a few ingredients and simple steps, these Mini Cannoli Cups become an impressive dessert that looks and tastes like you spent hours in the kitchen. The convenience of using refrigerated pie crusts not only saves time but also allows you to focus on crafting that smooth, luscious filling. So why not treat yourself and your loved ones to this scrumptious dessert? Let’s dive into this utterly delightful recipe and discover what makes Mini Cannoli Cups so special!
Key Benefits of Mini Cannoli Cups
Why You’ll Love This Recipe
- Delicious Flavor: The rich filling of ricotta cheese paired with citrus zest and a hint of vanilla gives these cups an irresistible taste.
- Easy to Make: With straightforward steps and minimal ingredients, you’ll be whipping up a batch in no time.
- Versatility: Customize your fillings and toppings based on your preferences or what you have handy.
- Perfect for Any Occasion: Whether it’s a formal dinner or a casual get-together, these cups are sure to impress.
- Family-Friendly: Everyone from kids to adults will adore these sweet treats because they’re so fun to eat!
- Great for Leftovers: If you find yourself with extra filling, it can be enjoyed in various ways beyond the cups.
What Makes It Stand Out
Mini Cannoli Cups are unique in their presentation, transforming a traditional dessert into a modern masterpiece. The use of mini muffin cups gives them a fun, approachable size that makes them perfect for parties or casual snacking. Unlike traditional cannoli, which can be somewhat messy and harder to serve, these cups offer convenience and elegance in each bite.
Moreover, the ability to customize your Mini Cannoli Cups lets you play with flavors and textures. You can chime in your favorite nuts, swap in different zests, or even alter the type of chocolate you use for topping. It’s a dessert made for personalization, bringing something special to every gathering.
Ingredients for Mini Cannoli Cups
Complete Ingredient List with Measurements
- 1 container whole-milk ricotta cheese (15 oz., drained): The star of the filling, adding creaminess and flavor.
- 1/2 cup powdered sugar: This sweetener balances the flavors of the filling.
- 2 tablespoons granulated sugar: Adds extra sweetness to the ricotta mixture.
- 1 teaspoon finely grated orange or lemon zest: For that burst of refreshing citrus flavor.
- 1/2 teaspoon vanilla extract: Enhances the overall taste of the filling.
- 1 box refrigerated pie crusts (2 count): Provides the crunchy base for your cannoli cups.
- 3 tablespoons turbinado sugar (raw sugar): Gives a sweet crunch to the pie crusts.
- 1 teaspoon ground cinnamon: Adds warmth and spice to the crust.
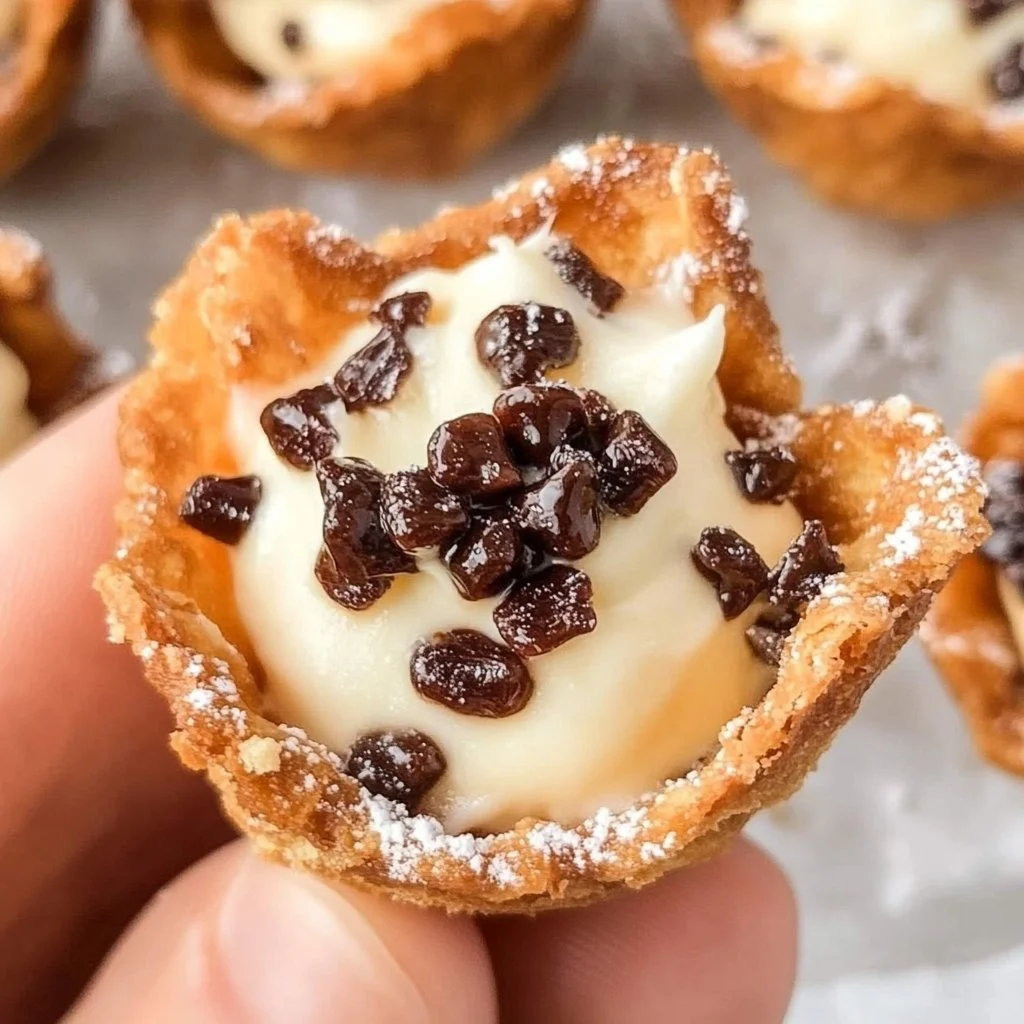
- 1/4 cup miniature semisweet chocolate chips or finely chopped pistachios: For garnish and extra flavor.
- Additional powdered sugar for dusting: Makes the cups look enticing and polished.
Substitutes and Alternatives
If you’re looking to adapt your Mini Cannoli Cups for specific dietary needs or allergies, it’s quite simple. For a gluten-free option, you can use gluten-free pie crusts available in stores or even homemade crust alternatives. If you’re chasing a lower sugar version, try using a sugar substitute in the filling, ensuring it can withstand heat if you’re baking it.
For those who prefer dairy-free options, consider using a plant-based ricotta or a silken tofu that’s been blended to mimic the creamy texture of traditional ricotta. This flexibility makes these cups not just delicious but accessible for everyone at your table.
How to Make Mini Cannoli Cups – Step-by-Step Directions
Step 1 – Prepare Ingredients
Start by gathering all your ingredients. Make sure the ricotta is properly drained to avoid watery filling. Preheat the oven to 425°F to get it nice and hot for the pastry base.
Step 2 – Cook the Base
Lightly flour a work surface and unroll the pie crusts. Then sprinkle the turbinado sugar and cinnamon over both crusts. Take a rolling pin and gently roll over the crusts to press in that flavorful mixture.
Step 3 – Cut Out Rounds
Using a 2½-inch round cookie cutter, cut out circles from the pie crusts. Depending on the thickness, you might need to gently re-roll and cut out more circles until you achieve about 48 rounds.
Step 4 – Press Into Muffin Cups
Gently press each pastry round into ungreased mini muffin cups. Ensure they create a well-defined cup shape to hold your delicious filling later.
Step 5 – Bake the Cups
Place the muffin tray in the preheated oven and bake for about 10 minutes or until the cups are golden brown. Keep an eye on them to avoid burning.
Step 6 – Cool Completely
Once baked, allow the cannoli cups to cool in the pans for about 15 minutes before transferring to a wire rack. It’s crucial that they cool completely for optimal filling.
Step 7 – Make the Filling
In a large mixing bowl, combine all the filling ingredients: ricotta, powdered sugar, granulated sugar, zest, and vanilla. Use an electric mixer on medium speed until the mixture is creamy and well-combined.
Step 8 – Prepare for Piping
Spoon the filling into a 1-gallon zip-top resealable bag. Seal the bag tightly to prevent any leaks, then refrigerate until you’re ready to assemble your treats.
Step 9 – Pipe Filling into Cups
Just before serving, take the filling out of the fridge. Snip one corner of the bag and pipe about one tablespoon of the creamy filling into each cooled pastry cup.
Step 10 – Add Toppings
To finish, sprinkle the cannoli cups with miniature semisweet chocolate chips or chopped pistachios according to your preference. Dust lightly with additional powdered sugar for that professional touch.
Serving Suggestions for Mini Cannoli Cups
Best Occasions to Serve This Dish
Mini Cannoli Cups are a hit at various gatherings, from family dinners to holiday festivities. They’re bite-sized, which makes them great for end-of-meal desserts or dessert tables. Imagine serving them at a wedding reception, or bringing them to a potluck, delighting every guest with their charming look and delicious taste. They also work well for casual gatherings where everyone can simply grab one and enjoy while mingling.
What to Serve With It
- Coffee or Espresso: The rich flavors of coffee perfectly complement the creamy sweetness of the cannoli cups.
- Fruit Salad: A light fruit salad on the side adds freshness and balances out the indulgence of the dessert.
- Ice Cream: Pairing these cups with a scoop of vanilla or pistachio ice cream creates a decadent experience.
- Chocolate Sauce: A drizzle of warm chocolate sauce can enhance the flavor and presentation.
- Whipped Cream: Lightly sweetened whipped cream can elevate the appearance and taste.
How to Store Mini Cannoli Cups Properly
Best Storage Practices
To keep Mini Cannoli Cups fresh, store them in an airtight container in the refrigerator. Make sure they are completely cooled before sealing to prevent condensation from making the crust soggy. They can be stored for up to 3-4 days without losing their delightful crunch.
Reheating and Freezing Tips
Mini Cannoli Cups are best enjoyed fresh, but if you need to store them longer, they can be frozen before filling. Place the cooled cups in a freezer-safe container, separating layers with parchment paper. When you’re ready to enjoy, thaw them in the fridge overnight, fill with the fresh ingredients, and serve within a day or two.
Tips & Tricks for Mini Cannoli Cups
Mistakes to Avoid
- Using Wet Ricotta: Always drain the ricotta well to prevent a watery filling that doesn’t hold.
- Overbaking Cups: Keep an eye on your crusts; they bake quickly and can easily turn from golden to burnt.
- Skipping the Cooling Step: Filling warm pastry cups can lead to sogginess, so let them cool completely.
- Not Rolling the Dough: Rolling out the sugar and cinnamon into the dough ensures better flavor integration.
- Filling Too Early: Assemble the cups too far in advance, and the filling can make the crust soggy.
Extra Tips for Better Results
For enhanced flavor, try adding additional spices such as nutmeg into the filling. Consider swapping the zest for lemon for a brighter taste profile. For added texture, stir in some finely chopped nuts directly into the filling before piping. Lastly, a sprinkle of sea salt on top can add a delightful contrast to the sweetness.
Recipe Variations of Mini Cannoli Cups
Creative Twists
- Chocolate Hazelnut Filling: Replace the ricotta with hazelnut spread for a chocolatey twist and top with crushed hazelnuts.
- Fruit-Infused Filling: Mix in finely diced fruits like strawberries or peaches into the ricotta for a refreshing addition.
- Caramel Drizzle: Drizzle some caramel sauce over the top along with the chocolate chips for a decadent touch.
- Spiced Filling: Add a hint of pumpkin spice or chai spices for a seasonal flavor variation.
Dietary Adjustments
For a vegan version, use silken tofu blended with sweeteners and flavors similar to those in the original recipe. For a gluten-free adaptation, utilize gluten-free pie crusts or try making your own with almond or coconut flour. Dairy-free alternatives for ricotta, such as homemade cashew cheese, can also work wonderfully.
Conclusion about Mini Cannoli Cups
In conclusion, Mini Cannoli Cups are a delightful, easy-to-make dessert that is sure to bring joy to any table. With their perfect balance of creamy sweetness and crunchy texture, they are a fantastic choice for anyone looking to impress their guests without falling into a lengthy baking process. The adaptability of the recipe means you can cater to your taste and dietary needs, making them a universal favorite. It’s time to indulge in the incredible world of Mini Cannoli Cups—try this recipe and watch them disappear faster than you can make them!
FAQs about Mini Cannoli Cups
Can I prepare it ahead of time?
Absolutely! You can prepare the cups and filling separately ahead of time. Just assemble them shortly before serving.
Can I freeze it?
Yes, but freeze the empty cups before filling them. They will maintain their texture better this way.
How long does it last?
When stored properly in the fridge, Mini Cannoli Cups can last for about 3-4 days.
What are the best substitutions?
You can substitute ricotta with vegan alternatives or use gluten-free crusts based on your dietary requirements.
Is this recipe family-friendly?
Definitely! Mini Cannoli Cups are fun to eat and appeal to both kids and adults alike.
Can I use a different zest?
Yes! Lemon zest adds brightness, but orange zest and even lime zest can create a lovely flavor too.
Can I use whipped cream instead of ricotta?
Whipped cream serves a different texture; however, you can incorporate it to make the filling lighter!
How can I make them more decadent?
Add a chocolate shell or layer in some caramel sauce for that extra indulgent touch!
Are there any toppings I should avoid?
Heavy toppings like thick icing might overwhelm the delicate flavors of the cannoli cups.
Can I use ready-made filling?
While you can use store-bought ricotta, making your own mixture enhances the flavors and freshness!
These questions should help guide your Mini Cannoli Cup journey and ensure you can make the most delicious and customizable versions of this fantastic dessert!

Mini Cannoli Cups
Equipment
- Mini muffin tin or baking sheet / parchment
- Mixing bowl
- Whisk or electric mixer
- Piping bag or spoon
Ingrédients
Cups / Shells
- 1 package mini phyllo cups or pre-made pastry cups (or you can make cups from pie crust or puff pastry/wonton wrappers)
- 1 Tbsp butter melted, optional (for brushing shells)
- 1 Tbsp granulated sugar optional – to sprinkle inside shells for sweetness/crispness
- ¼ tsp ground cinnamon optional – for flavoring shells
Filling
- 1 cup whole-milk ricotta cheese well-drained
- ½ cup mascarpone cheese or substitute part/all with cream cheese for similar texture
- ⅓ cup powdered sugar adjust sweetness to taste
- ½ tsp vanilla extract or almond extract for variation
- orange or lemon zest optional — a fine grater works best
- ¼ cup mini chocolate chips fold into filling and as topping, optional
Optional Toppings / Garnish
- chopped pistachios optional, for crunch and color
- candy cherries or candied orange peel optional, for decoration
- powdered sugar for dusting before serving
Instructions
- If using pre-made cups (phyllo, puff pastry or wonton-based): preheat the oven to 350 °F (175 °C), place cups on a baking sheet, brush lightly with melted butter if desired, sprinkle with a bit of sugar+cinnamon for extra flavor/crispness, and bake 5-10 minutes until just golden and crisp. Let cool completely.
- In a mixing bowl, whisk together the drained ricotta, mascarpone cheese, powdered sugar, vanilla extract — add citrus zest if using — until smooth and creamy. Then gently fold in the mini chocolate chips.
- Chill the filling 15-30 minutes if possible (this helps it firm up and pipe nicely).
- Fill each cooled shell with a generous spoonful or pipe the filling in using a pastry bag.
- Top each mini cannoli cup with chopped pistachios, additional mini chocolate chips, or candied fruit as desired. Dust with powdered sugar just before serving.
- Serve immediately for best texture (shell stays crisp). If you prep ahead, store shells and filling separately and assemble just before serving.