
Table of Contents
Introduction to Valentine’s Day Lunchbox Cake
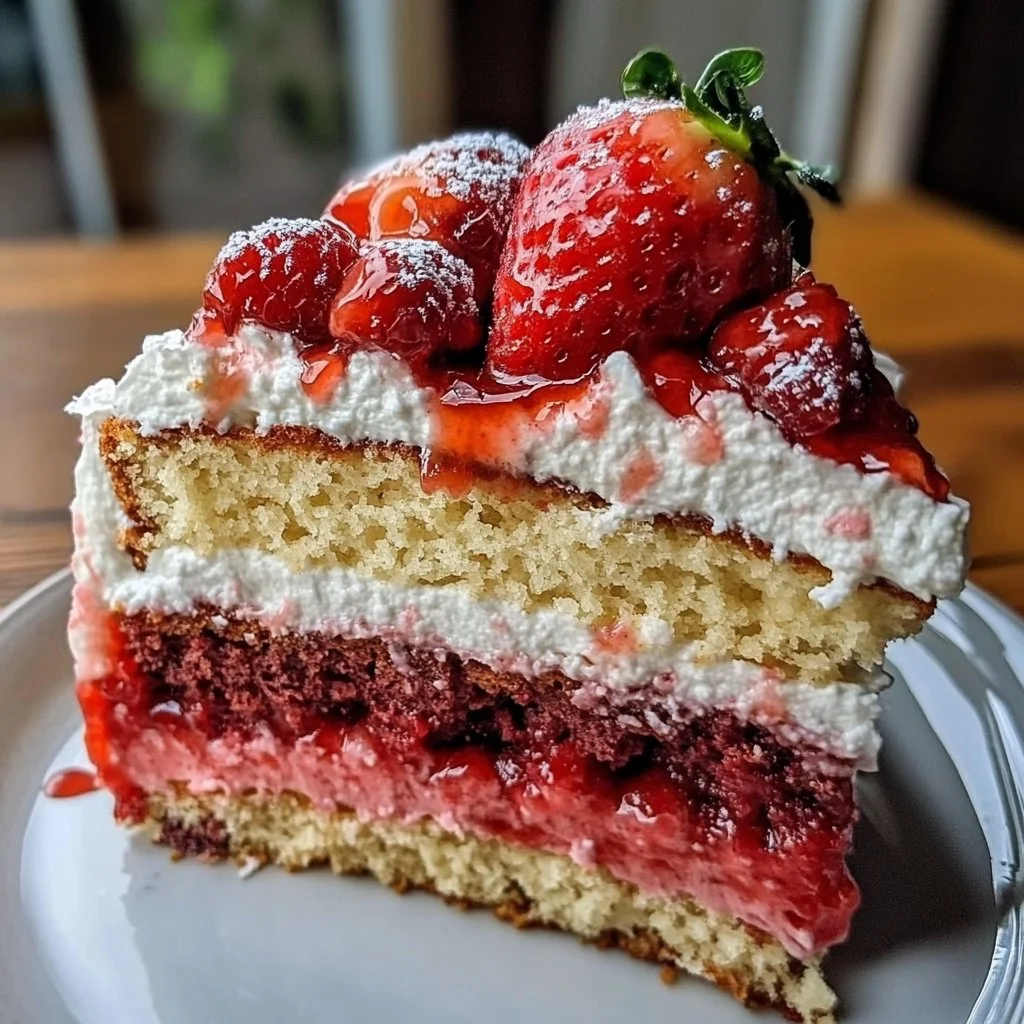
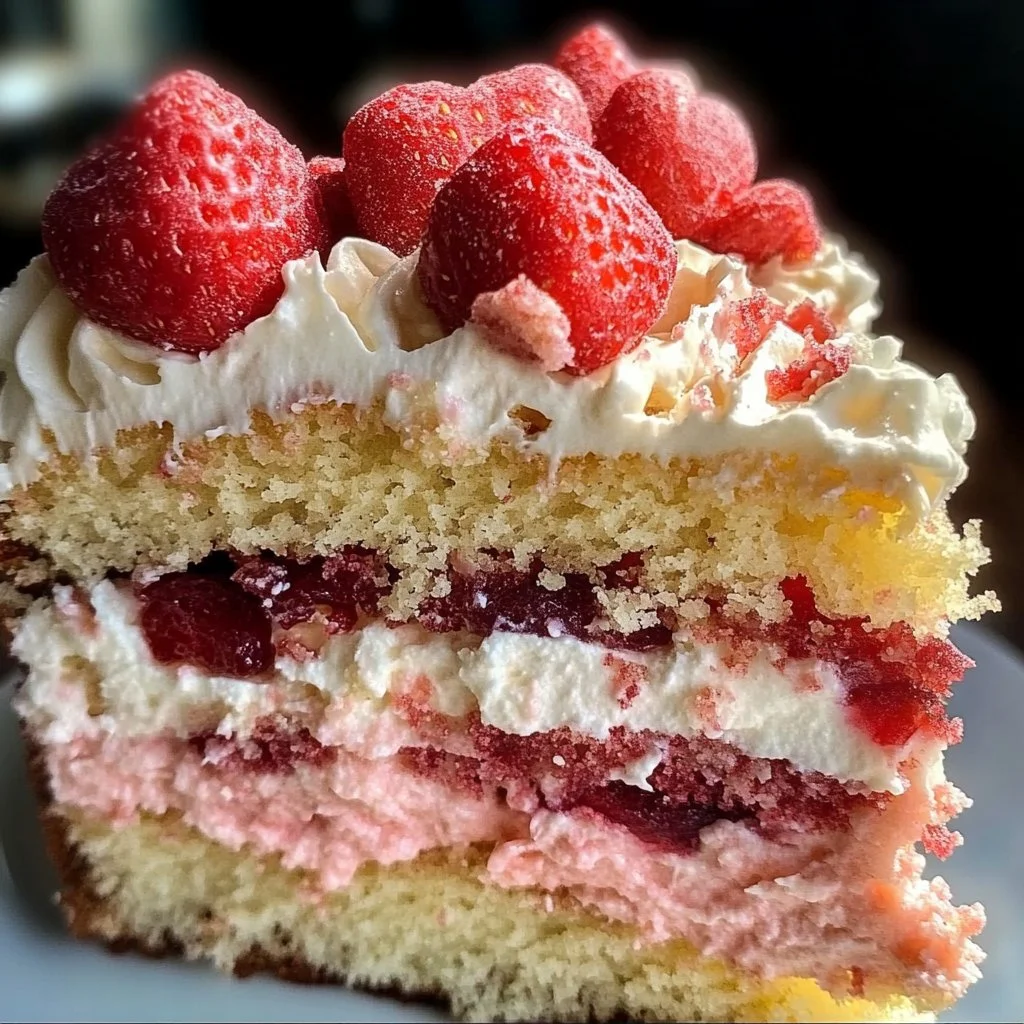
Are you looking to add a sweet touch to your Valentine’s Day celebrations? The Valentine’s Day Lunchbox Cake is your answer! This delightful treat is perfect for sharing love, whether in lunchboxes, at picnics, or simply enjoyed at home with family. Imagine a soft, fluffy cake topped with whipped cream and fresh strawberries. It’s not just a cake; it’s a sweet gesture, an expression of care, perfect for any loved one.
What’s truly special about the Valentine’s Day Lunchbox Cake is its simplicity. Made with common ingredients that you likely already have, this cake is easy enough for even novice bakers. It offers a delicious flavor profile that combines the richness of butter and sugar with the freshness of strawberries, creating a perfect balance. Plus, it’s customizable—use your favorite fruits or add different flavors to suit your taste.
Picture this: a warm, inviting smell filling your kitchen as you bake it, the joy of decorating it with your chosen toppings, and the smiles that follow when you serve it. The Valentine’s Day Lunchbox Cake is not just a dessert; it’s a way of making moments memorable. Whether you’re crafting a sweet surprise for a partner or a fun treat for a child’s lunch, this cake will be the highlight.
The unique aspect of this recipe is how it can be both personal and versatile. You can drizzle it with chocolate, sprinkle it with nuts, or even create a themed decoration that resonates with the holiday. Valentine’s Day deserves a treat that’s just as special, and this cake fits the bill!
Let’s dive into how you can create your own Valentine’s Day Lunchbox Cake, filled with love and deliciousness.
Key Benefits of Valentine’s Day Lunchbox Cake
Why You’ll Love This Recipe
- Delicious Flavor: Combines buttery richness with the freshness of strawberries.
- Easy to Make: Simple steps make it accessible for bakers of all skill levels.
- Customizable: Adapt the toppings and flavors to suit your preferences or dietary needs.
- Perfect for Sharing: Ideal for lunchboxes, parties, or special dinners.
- Visually Appealing: Bright strawberries and whipped cream create a stunning presentation.
- Versatile Occasions: Great for Valentine’s Day, birthdays, or any celebration.
What Makes It Stand Out
The Valentine’s Day Lunchbox Cake stands out due to its ease of customization. You can switch up the fruits based on what’s in season or what you have on hand. You can also alter the frosting to match your flavor preference, making it a versatile dessert that never gets old.
Moreover, this cake is not only suitable for Valentine’s Day but can be enjoyed as a sweet treat for any occasion. Birthdays, picnics, or even just an afternoon dessert can be made more special with this cake. The fact that it can be packed and enjoyed later makes it even more convenient for busy days or outdoor activities.
Ingredients for Valentine’s Day Lunchbox Cake
Complete Ingredient List with Measurements
- 1 cup all-purpose flour
- 1 cup granulated sugar
- 1/2 cup unsalted butter, softened
- 2 large eggs
- 1/2 cup milk
- 1 teaspoon baking powder
- 1 teaspoon vanilla extract
- Fresh strawberries, for topping
- Whipped cream, for frosting
Substitutes and Alternatives
If you have dietary restrictions or allergies, there are several substitutions you can make for the Valentine’s Day Lunchbox Cake. For instance, if you’re lactose intolerant, dairy-free butter and almond or soy milk can easily replace the butter and milk, respectively.
For a gluten-free option, substitute all-purpose flour with a gluten-free flour blend. Make sure to check the labels on these products to ensure they meet your dietary needs. If you or your loved ones prefer a low-sugar option, you can also use a sugar substitute that works well in baking, though it may slightly alter the flavor or texture.
How to Make Valentine’s Day Lunchbox Cake – Step-by-Step Directions
Step 1 – Prepare Ingredients
Before you begin baking, gather all the required ingredients and ensure they are at room temperature. Preheating your oven to 350°F (175°C) should also be your first task to ensure a well-baked cake.
Step 2 – Cook the Base
Grease and flour a small rectangular baking pan. In a mixing bowl, cream together the softened butter and granulated sugar until light and fluffy. This process is crucial as it incorporates air into the mixture, making your cake light.
Step 3 – Add Eggs and Vanilla
Beat in the eggs one at a time, ensuring each egg is fully incorporated before adding the next. Stir in the vanilla extract. This mixture should become creamy and maintain a pale color, showing that it’s well mixed.
Step 4 – Combine Dry Ingredients
In a separate bowl, whisk together the all-purpose flour and baking powder. Mixing your dry ingredients separately allows for an even distribution of the baking powder, ensuring your cake rises uniformly.
Step 5 – Mix the Batter
Gradually add the dry mixture to the wet ingredients, alternating with the milk. Start and end with the flour mixture, mixing until just combined. It’s essential not to overmix at this stage, as this could lead to a denser cake.
Step 6 – Bake the Cake
Pour the batter into the prepared baking pan and spread it evenly. Bake for 25-30 minutes or until a toothpick inserted into the center comes out clean. Keep an eye on your cake towards the end of the baking time to avoid overbaking.
Step 7 – Cool Completely
After baking, allow the cake to cool in the pan for about 10 minutes before transferring it to a wire rack to cool completely. This step is important for achieving the right texture and flavor.
Step 8 – Frost the Cake
Once the cake is entirely cooled, you can frost it with whipped cream. Spread the whipped cream generously over the top for added sweetness and a creamy texture.
Step 9 – Decorate with Strawberries
Decorate the frosted cake with fresh strawberries. You can arrange them in a pattern or simply place them on top for a casual look. This adds not only flavor but also a beautiful visual appeal.
Step 10 – Serve and Enjoy
Finally, slice the cake and serve it. You can also pack it into lunchboxes, making it a delightful treat to take on the go. The Valentine’s Day Lunchbox Cake is ready to be enjoyed!
Serving Suggestions for Valentine’s Day Lunchbox Cake
Best Occasions to Serve This Dish
The Valentine’s Day Lunchbox Cake is perfect for celebrating love on the special day. However, it’s also versatile enough for birthday parties, family gatherings, or even a lovely mid-week treat. Sharing it with friends or family during a casual get-together makes for a delightful dessert experience.
What to Serve With It
Consider pairing this cake with a hot beverage such as coffee or tea for a cozy dessert experience. You might also serve a side of fresh fruit for a healthy balance or a scoop of ice cream for an indulgent treat. Each of these pairs with the flavors of the Valentine’s Day Lunchbox Cake.
How to Store Valentine’s Day Lunchbox Cake Properly
Best Storage Practices
To maintain the freshness of the Valentine’s Day Lunchbox Cake, wrap it in plastic wrap or store it in an airtight container. It can be kept in the refrigerator for up to a week. If you choose to store it at room temperature, ensure that it is covered to keep it moist.
Reheating and Freezing Tips
If you have leftover cake, it can be kept in the freezer for up to three months. To reheat, simply take it out of the freezer and let it thaw in the refrigerator overnight. For a quick warm-up, place slices in the microwave for about 10 seconds, but ensure not to overheat to maintain its soft texture.
Tips & Tricks for Valentine’s Day Lunchbox Cake
Mistakes to Avoid
1 – Overmixing the batter can produce a dense cake instead of a fluffy one. Mix just enough until combined.
2 – Not properly preheating your oven can lead to incorrect baking times and uneven results.
3 – Forgetting to grease the pan can cause the cake to stick, making it hard to remove.
4 – Skipping the cooling step before frosting can lead to a melted mess instead of an attractive finish.
5 – Using stale ingredients, such as old baking powder, can affect the rise and overall texture of the cake.
Extra Tips for Better Results
For enhanced flavor, consider adding a pinch of salt to balance the sweetness. You might also play with extracts, such as almond or mint, to create a unique twist. For texture, try folding in some chopped nuts or chocolate chips into the batter before baking.
Recipe Variations of Valentine’s Day Lunchbox Cake
Creative Twists
Chocolate Lovers: Add cocoa powder to the batter to transform it into a chocolate version of the cake.
Berry Medley: Use a combination of mixed berries, like blueberries and raspberries, for a colorful and flavorful twist.
Citrus Zing: Incorporate lemon or orange zest into the batter for a refreshing citrus flavor.
Layered Delight: Make multiple layers of the cake, alternating with whipped cream and fruit to create a stunning layered dessert.
Dietary Adjustments
For a vegan version, substitute eggs with flaxseed meal or applesauce and use a dairy-free butter alternative. To ensure it’s gluten-free, opt for gluten-free flour and check other ingredients for cross-contamination.
Conclusion about Valentine’s Day Lunchbox Cake
In conclusion, the Valentine’s Day Lunchbox Cake is a fantastic dessert that combines ease and flavor excellently. Its delightful taste and straightforward preparation make it perfect for bakers of all experience levels. The cake’s versatility allows you to customize it to your liking, ensuring that it remains a staple in your kitchen for various occasions.
Whether you’re celebrating love on Valentine’s Day or simply enjoying a sweet afternoon treat, this cake is sure to impress. With the fresh strawberries and whipped cream on top, it’s as pleasing to the eye as it is to the palate. Don’t miss out on making your own Valentine’s Day Lunchbox Cake this holiday season; it’s a delightful way to bring joy to those you love!
FAQs about Valentine’s Day Lunchbox Cake
Can I make the cake ahead of time?
Yes, you can bake the cake a day or two in advance. Store it properly in the fridge to keep it fresh.
How do I store leftovers?
Wrap any leftover cake in plastic wrap or store it in an airtight container. It can be refrigerated for up to a week.
Can I freeze the Valentine’s Day Lunchbox Cake?
Absolutely! Once cooled, wrap it tightly in plastic wrap and store it in the freezer for up to three months.
What can I substitute for eggs?
For a vegan option, you can use flaxseed meal mixed with water or applesauce as an egg substitute.
Is there a gluten-free version of this cake?
Yes, simply use a gluten-free flour blend instead of all-purpose flour in the recipe.
What other fruits can I use for the topping?
You can use a variety of fruits like blueberries, raspberries, or even sliced peaches for a unique twist.
How long will the whipped cream last on the cake?
The whipped cream is best enjoyed within a couple of days. For longer storage, keep the whipped cream separate and add it right before serving.
Can I use a different type of milk?
Yes! Alternatives like almond milk, soy milk, or oat milk work perfectly well in this recipe.
What should I serve with the cake?
The cake pairs nicely with coffee, tea, or a scoop of vanilla ice cream for a delightful complement.
How do I enhance the flavor of the cake?
Adding a pinch of salt can help balance the sweetness, while spices like cinnamon or nutmeg can add warmth to the flavor profile.

Valentine’s Day Lunchbox Cake
Equipment
- Mixing bowl
- Hand Mixer
- Cake Pans
- Spatula
Ingrédients
Vanilla Cake
- 1 cup all-purpose flour
- 1 tsp baking powder
- 1/4 tsp salt
- 1/2 cup granulated sugar
- 1/4 cup unsalted butter softened
- 1 egg room temperature
- 1/2 cup milk
- 1 tsp vanilla extract
Buttercream Frosting
- 1/2 cup unsalted butter softened
- 1 1/2 cups powdered sugar
- 1 tsp vanilla extract
- 1–2 tbsp heavy cream as needed
- pink or red food coloring optional
- sprinkles optional decoration
Instructions
- Preheat oven to 350°F (175°C). Grease and line small cake pans.
- Whisk flour, baking powder, and salt in a bowl.
- Beat butter and sugar until light and fluffy. Add egg and vanilla, mixing well.
- Alternate adding dry ingredients and milk until just combined.
- Divide batter into pans and bake for 20–25 minutes. Cool completely.
- Beat butter for frosting until creamy. Add powdered sugar, vanilla, and cream until smooth. Tint if desired.
- Assemble mini cakes with frosting between layers and on the outside. Decorate with sprinkles.