
Table of Contents
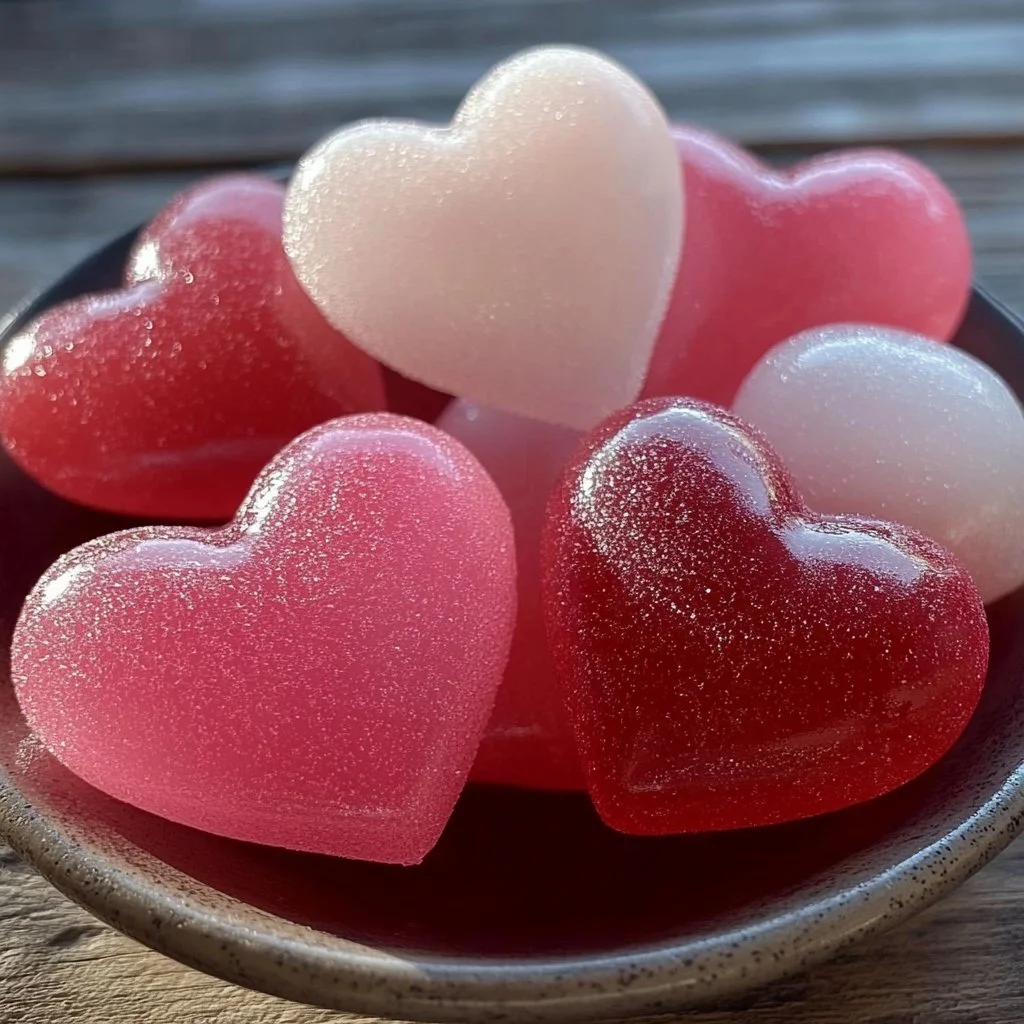
Introduction to Valentine’s Day Hearts Candy
When it comes to special occasions, Valentine’s Day is a time for love, affection, and sweet surprises. What better way to express your feelings than with a delightful homemade treat? Valentine’s Day Hearts Candy captures the essence of the holiday in a fun, edible way that’s perfect for sharing (or enjoying all by yourself!). The combination of sugar, corn syrup, and water creates a treat that’s not only sweet but also customizable to fit various tastes.
Each bite of Valentine’s Day Hearts Candy is a burst of flavor, and the process of making it is as enjoyable as the final product. Picture this: you’re in your cozy kitchen, mixing together vibrant colors and delightful scents. You can choose any flavor you desire, from classic vanilla to zesty citrus, which makes this recipe stand out. It’s an excellent craft activity for kids or a fun date night project.
The beauty of Valentine’s Day Hearts Candy is that it brings people together. It’s perfect for gifting, sharing with friends, or creating a romantic dessert for that special someone. Plus, it’s easy to make and doesn’t require any advanced skills or fancy equipment. Wouldn’t it be wonderful to create something that delights not just the taste buds but also warms the heart? This homemade treat is not just for Valentine’s Day; it’s a fun activity anytime you want to spread sweetness.
Key Benefits of Valentine’s Day Hearts Candy
Why You’ll Love This Recipe
- Delicious Flavors: Customize with different extracts for a pleasing variety.
- Easy to Make: Simple ingredients and steps make it accessible for everyone.
- Visually Attractive: Bright colors make for stunning presentation.
- Fun for Everyone: Engage kids or friends in the candy-making process.
- Gifts from the Heart: Perfect for heartfelt gifts on Valentine’s Day or any occasion.
- Versatile Uses: Great for parties, events, or just a sweet treat at home.
What Makes It Stand Out
One of the most unique aspects of Valentine’s Day Hearts Candy is the ability to customize both flavor and color. You can let your creativity run wild by experimenting with various flavor extracts, such as almond, mint, or even coconut. This versatility ensures that each batch can be tailored to personal preferences, making them the perfect sweet treat for anyone.
Another attractive element is the presentation. These candies not only taste fantastic but also appeal to the eyes. Their vibrant colors and heart-shaped forms instantly enhance the atmosphere, making them a wonderful addition to any celebration. Whether you’re planning a romantic dinner or a fun-filled Valentine’s party, these candies can serve as both decor and dessert.
Ingredients for Valentine’s Day Hearts Candy
Complete Ingredient List with Measurements
- 1 cup granulated sugar
- 1/4 cup corn syrup
- 1/2 cup water
- Flavored extracts (such as vanilla or almond)
- Food coloring (various colors)
- Powdered sugar (for dusting)
- Cornstarch (for dusting)
Substitutes and Alternatives
If you have any dietary restrictions or preferences, there are several alternatives you can use. Instead of granulated sugar, you might consider using a sugar substitute like stevia or erythritol, especially if you’re watching your sugar intake. Regular corn syrup can be replaced with agave syrup for a different flavor profile.
For those who are allergic to certain flavors or have dietary restrictions, using natural flavor extracts is a wonderful option. You can even make your own extracts by infusing alcohol with different fruits or herbs. If you prefer to avoid food coloring, you can use natural options derived from beets, spinach, or turmeric to provide color without artificial ingredients.
How to Make Valentine’s Day Hearts Candy – Step-by-Step Directions
Step 1 – Prepare Ingredients
Before diving into candy-making, gather all your ingredients and measure them out. It’s essential to have everything ready at hand to maintain a smooth workflow. You’ll also want to prepare your heart-shaped molds by lightly greasing them to ensure easy removal later.
Step 2 – Cook the Base
In a medium saucepan, combine the granulated sugar, corn syrup, and water. Place the saucepan over medium heat and stir continuously until the sugar has completely dissolved. It’s crucial to keep an eye on this step, as getting the sugar fully dissolved will ensure a smooth texture.
Step 3 – Boil the Mixture
Once the sugar is dissolved, allow the mixture to boil without stirring. Use a candy thermometer to monitor the temperature. You want the mixture to reach the hard-ball stage, which is around 250°F (121°C). This process takes about 8-10 minutes, so stay alert and focused.
Step 4 – Cool Slightly
Once the mixture reaches the desired temperature, remove it from heat and let it cool for about 5-10 minutes. This cooling period is essential, allowing you to add flavorings and colors without the risk of burning yourself.
Step 5 – Add Flavors and Colors
Divide the cooled mixture into several bowls, depending on how many different colors and flavors you want. Add your chosen flavored extracts to each bowl, experimenting with different combinations. Then, add food coloring to create a rainbow of vibrant candies.
Step 6 – Mold the Candy
Carefully pour the flavored mixtures into your prepared heart-shaped molds. Ensure not to overfill them, as the candy will expand slightly as it cools. If you have children helping, this step can be a fun activity for them.
Step 7 – Allow to Cool Completely
Let the molds sit at room temperature until the candy has hardened completely. This process could take several hours, depending on the size of your molds. Patience is key to achieving the perfect texture!
Step 8 – Dust with Powdered Sugar and Cornstarch
To prevent sticking, dust your completely cooled candies with a mix of powdered sugar and cornstarch. This will help maintain their shape and prevent them from clumping together in storage.
Step 9 – Remove from Molds
Once dusted, gently remove the candies from the molds. Be careful to preserve their structure as you take them out. If you find any edges that stuck, a gentle twist should release them without breaking.
Step 10 – Enjoy Your Treats!
Now that your Valentine’s Day Hearts Candy is prepared, it’s time to enjoy your delicious homemade treats! Whether you’re giving them as gifts or indulging yourself, these candies are sure to bring smiles and sweetness.

Serving Suggestions for Valentine’s Day Hearts Candy
Best Occasions to Serve This Dish
These delightful candies are perfect for any romantic occasion—Valentine’s Day, anniversaries, or even just as a surprise for someone you care about. Their vibrant colors and fun shapes bring joy to any gathering, making them a great addition to parties or family get-togethers. You could also use them as cute decor for a romantic dinner, embodying a sweet centerpiece that mirrors your feelings.
What to Serve With It
Pair your Valentine’s Day Hearts Candy with a selection of delightful accompaniments. You might consider serving them alongside a rich hot chocolate or a refreshing fruit punch. They can also complement a charcuterie board, offering a sweet contrast to savory cheeses and meats. For an extra treat, drizzled chocolate or whipped cream can enhance the flavor experience even more.
How to Store Valentine’s Day Hearts Candy Properly
Best Storage Practices
To keep your Valentine’s Day Hearts Candy fresh, store them in an airtight container at room temperature. Avoid humid environments as moisture can cause the candy to become sticky. Place a layer of powdered sugar between layers if you’re stacking them to further prevent sticking.
Reheating and Freezing Tips
If you need to store the candies for an extended time, you can freeze them. Place the candies in a freezer-safe, airtight bag, ensuring to remove as much air as possible. When you’re ready to enjoy them, allow them to thaw at room temperature for a few hours before serving.
Tips & Tricks for Valentine’s Day Hearts Candy
Mistakes to Avoid
1 – Not Monitoring Temperature
Failing to keep an eye on the temperature could result in candy that is too soft or overly hard. Invest in a reliable candy thermometer to prevent this.
2 – Overcrowding Molds
Pouring too much mixture into your molds can lead to a messy outcome. Use a small amount for each mold and top off as needed.
3 – Forgetting to Dust
Neglecting to dust your candies may lead to a sticky mess. Always remember the powdered sugar and cornstarch step for best results.
4 – Underestimating Cooling Time
Patience is crucial; don’t rush the cooling process. Removing the candies too early could compromise their structural integrity.
5 – Skipping Flavor Testing
Always taste a small amount before adding extracts to ensure you achieve the desired flavor profile.
Extra Tips for Better Results
To enhance flavors, consider infusing your sugar with herbs or spices prior to making the candy. Additional flavoring can also come from fruit purees that can be added instead of extracts, creating an entirely new dimension of taste. Finally, drizzling melted chocolate over the finished candies adds an elegant touch that can elevate the candy even further.
Recipe Variations of Valentine’s Day Hearts Candy
Creative Twists
1 – Chocolate-Dipped Variation
Add an extra layer by dipping your candies in melted chocolate. This adds richness and depth, making the hearts even more indulgent.
2 – Nutty Flavor Options
For a unique flavor profile, incorporate nut extracts like hazelnut or pistachio. You can even stir in finely chopped nuts for added texture.
3 – Savory Sweet Mix
For those who enjoy the sweet and salty combination, sprinkle some sea salt on top of the candies before they harden. This brings a sophisticated twist not often seen in traditional candy.
Dietary Adjustments
For vegan variations, substitute the granulated sugar with coconut sugar and ensure your extracts are vegan-friendly. If you’re working with gluten-free participants, rest assured that all the ingredients listed are inherently gluten-free, making it a safe choice for gatherings. Additionally, you can make these candies dairy-free by ensuring no dairy is added in optional chocolate coatings.
Conclusion about Valentine’s Day Hearts Candy
In summary, Valentine’s Day Hearts Candy is not just a delightful treat but an experience filled with creativity and love. Crafting these candies allows you to express affection through a sweet, thoughtful gift, perfect for your loved ones. The easy process combined with endless customization options makes this recipe a favorite for bakers of all skill levels. Whether it’s for sharing at a gathering or enjoying with family, these homemade candies bring smiles and create cherished memories. So, gather your ingredients and make this charming treat for yourself or someone special this Valentine’s Day!
FAQs about Valentine’s Day Hearts Candy
How long can I store Valentine’s Day Hearts Candy?
Stored in an airtight container, they should last for about 2-3 weeks at room temperature.
Can I make Valentine’s Day Hearts Candy ahead of time?
Absolutely! These candies can be made days in advance, making them perfect for planning your Valentine’s Day festivities.
What happens if I don’t have a candy thermometer?
If you don’t have a thermometer, you can do a « cold water test. » Drop a small amount into cold water; if it forms a hard ball, it’s ready.
Can I use natural colorings instead of food dye?
Yes! You can use natural options like beet juice or turmeric to color your candy, avoiding artificial dyes.
Can I reuse leftover candy?
While you can remelt leftovers, it’s best to make a fresh batch for optimal flavor and texture each time.
How can I prevent sticking after storing?
Dusting them with powdered sugar and cornstarch before storing will help keep them from sticking together.
Are there any nut-free options?
Yes, stick with extracts and flavors that are nut-free to ensure the candies are safe for those with nut allergies.
Is there a way to make these candies healthier?
You might consider using natural sweeteners or reducing the sugar amount slightly for a lower-calorie option.
Valentine’s Day Heart Candy
Equipment
- Saucepan
- Silicone Heart Molds
- Spatula
Ingrédients
Heart Candy
- 1 cup granulated sugar
- 1/2 cup light corn syrup
- 1/4 cup water
- 1/2 tsp flavored extract strawberry or cherry
- red or pink food coloring
- powdered sugar for dusting molds
Instructions
- Lightly dust silicone heart molds with powdered sugar and set aside.
- In a saucepan, combine sugar, corn syrup, and water over medium heat.
- Cook, stirring occasionally, until sugar dissolves and mixture reaches a gentle boil.
- Remove from heat and carefully stir in flavored extract and food coloring.
- Pour mixture into prepared heart molds.
- Allow candies to set at room temperature for about 30 minutes.
- Gently remove candies from molds and store in an airtight container.