
Table of Contents
Introduction about Terrifying Coffin Sandwiches
Have you ever wanted to impress your friends with a dish that not only tastes great but also looks delightfully spooky? If so, you’re in for a treat — or should I say, a trick! Allow me to introduce you to Terrifying Coffin Sandwiches, a fun recipe perfect for Halloween parties or any gathering that embraces a bit of eerie charm.
Imagine serving delicious sandwiches shaped like tiny coffins; how exciting is that? It’s easy, fun, and a great way to involve the whole family in the kitchen. These sandwiches use simple ingredients but provide endless opportunities for creativity and personalization. So, are you ready to dive into the world of sandwiches that are not only mouthwatering but also wonderfully spooky? Let’s get started!
Key Benefits of Terrifying Coffin Sandwiches
Why you’ll love this recipe
- Delicious Taste: The combination of ham, cheese, and other fillings creates a flavor that everyone loves.
- Easy to Make: You don’t have to be a master chef to create these. They’re straightforward and perfect for all cooking levels.
- Quick Preparation: These sandwiches can be whipped up in no time, making them an ideal last-minute party food.
- Family-Friendly: Kids will love the spooky design, and you can easily customize the fillings to cater to their tastes.
- Great for Any Occasion: Whether it’s Halloween or a casual get-together, they fit right in.
- Fun Presentation: The coffin shape makes for an eye-catching display that sparks conversation and adds fun to the meal.
What makes it stand out
Terrifying Coffin Sandwiches stand out due to their unique presentation. Traditionally, sandwiches are often rectangular or square; turning them into coffin shapes adds an element of surprise and delight. This creativity makes it ideal for seasonal festivities, especially Halloween, giving it a personality that ordinary sandwiches simply don’t have.
Moreover, the fillings can be customized according to individual dietary needs and preferences. Whether you want to go meaty, cheesy, or even plant-based, the possibilities are endless!
Ingredients for Terrifying Coffin Sandwiches
Complete ingredient list with measurements
To make your delicious Terrifying Coffin Sandwiches, you’ll need the following ingredients:
- Sliced Bread: 8 slices (white, whole wheat, or any preferred type)
- Jamón York: 8 slices
- Cheese: 8 slices (or 4 quesitos/cream cheese if you prefer)
- Sobrasada: 4 tablespoons (optional, for added spice)
- Paté: 4 tablespoons
- Chorizo Pamplonés: 8 slices
- Alfalfa sprouts: 1 cup
- Soft cheese spread (queso de untar): for sticking and decorating
- Template: for coffin shape (or create your own)
Substitutes and alternatives
If someone has dietary restrictions or preferences, here are some common swaps:
- Bread: Gluten-free bread or lettuce wraps for gluten-free options.
- Cheese: Vegan cheese options are widely available for dairy-free alternatives.
- Ham: Replace with turkey, roast beef, or even a veggie spread.
- Paté and Chorizo: Use hummus or roasted vegetables for vegetarian or vegan versions.
- Alfalfa sprouts: Baby spinach or other greens can be used if you can’t find alfalfa.
How to Make Terrifying Coffin Sandwiches – Step-by-Step Directions
Step 1 – Prep your workspace and ingredients
Before diving into making these enchanting sandwiches, let’s set the stage. Start by clearing your work area and gathering all your ingredients. Having everything on hand will make the process smooth, and you’ll find yourself moving through the steps with ease.
Step 2 – Create your coffin template
You can either use a pre-made template or create your own coffin-shaped cutting template. To make it, draw a coffin shape on a piece of cardboard. This will serve as your guide for cutting the sandwich bread. Cut this out for easy use!
Step 3 – Cut the bread
Using your template, lay it over the slices of bread and use a sharp knife to cut around it. This will give you coffin-shaped bread pieces. Aim for two pieces per sandwich. Repeat this until you have as many coffins as you need.
Step 4 – Prepare the fillings
Now, let’s get creative with our fillings. If you’re using jamón york or chorizo, slice them to fit perfectly within your coffin shapes. Likewise, slice the cheese into manageable pieces that will fit well. Be sure to mix up fillings for great flavor combinations!
Step 5 – Assemble your first sandwich
Take one coffin-shaped piece of bread. Spread a thin layer of soft cheese or cream cheese on top. Then, stack your chosen fillings — for example, a delicious layer of jamón york followed by a slice of cheese. Put another coffin-shaped piece of bread on top, pressing gently to secure it.
Step 6 – Secure the sandwiches
For added decoration and stability, apply a little more soft cheese on the top of the sandwich. This will also be helpful when attaching decorations or garnishes, like a strip of chorizo or a bit of fresh alfalfa.
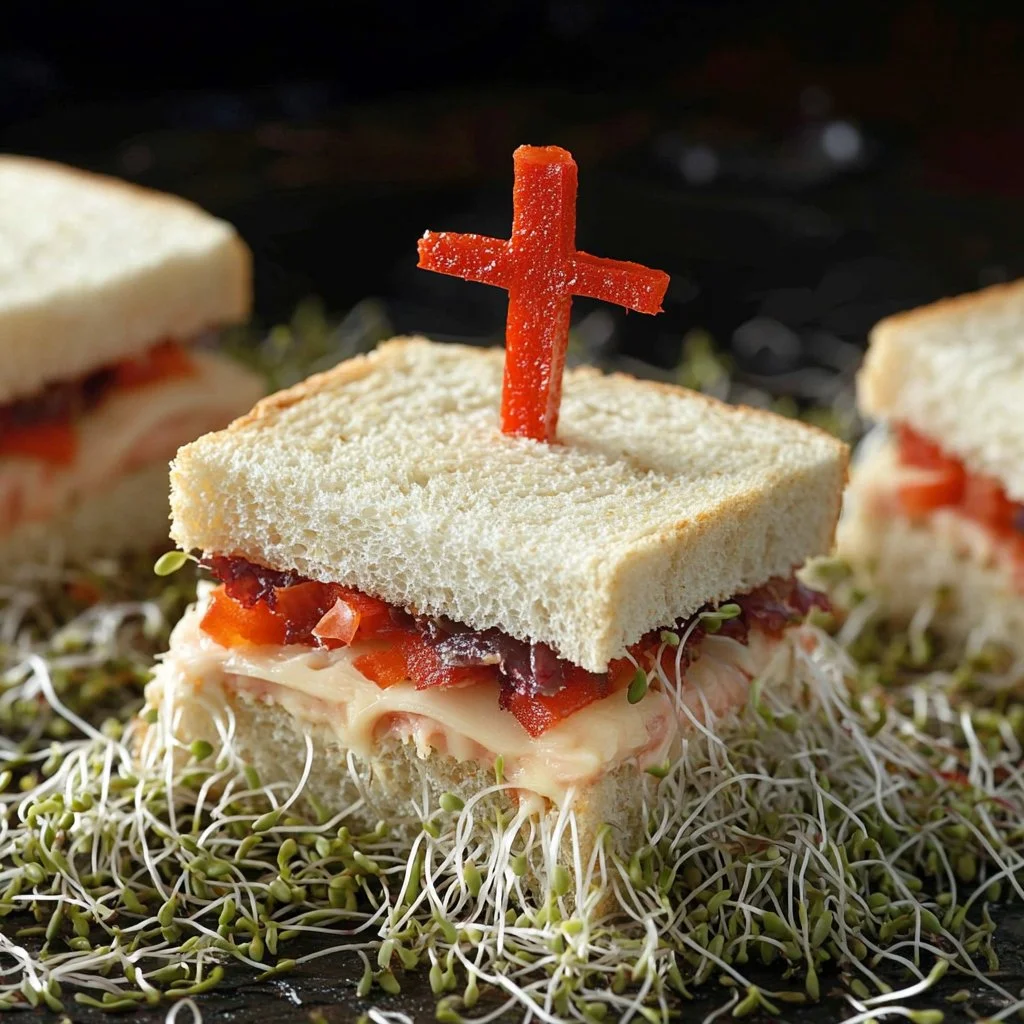
Step 7 – Create the decorative cross
Cut two strips of chorizo pamplonés. One should be longer than the other to form a neat cross on top of your sandwich. Secure these strips on the softened cheese layer so they adhere. This gives your Terrifying Coffin Sandwiches that eerie finishing touch!
Step 8 – Prepare to serve
On a platter, create a bed of alfalfa sprouts to present your sandwiches. This not only looks great but also adds a fresh crunch to your dish! Carefully place each coffin sandwich on top of the sprouts.
Step 9 – Time to share!
Your Terrifying Coffin Sandwiches are now ready to be served! Gather your family and friends around, and don’t forget to take some photos before they disappear.
Step 10 – Enjoy responsibly!
Make sure to enjoy these sandwiches promptly. They’re at their freshest right after making. Gather around the table, share some spooky stories, and dig in!
Serving Suggestions for Terrifying Coffin Sandwiches
Best occasions to serve this dish
The Terrifying Coffin Sandwiches are perfect for:
- Halloween parties: They add a festive touch that guests will love.
- Birthday parties: Especially great for kids who enjoy a good thrill.
- Casual get-togethers: Easy finger food that’s perfect for chatting and mingling.
- Picnics: They are portable and fun, making them ideal for outdoor settings.
What to serve with it
To complete your spooky meal, consider pairing the sandwiches with:
- Chips: Tortilla chips or veggie chips for a crunchy contrast.
- Dips: Guacamole, salsa, or a creamy ranch dip.
- Beverages: Refreshing fruit punches, spooky mocktails, or even dark sodas for a themed beverage.
- Desserts: Treats like ghost-shaped cookies or spooky cupcakes to complete the theme.
Storing Terrifying Coffin Sandwiches Properly
Best storage practices
After making your delicious Terrifying Coffin Sandwiches, proper storage is key to maintaining their freshness.
- Refrigeration: Store leftover sandwiches in an airtight container in the refrigerator. They are best consumed within 1-2 days.
- Freezing: You can freeze the assembled sandwiches. Wrap each sandwich tightly in plastic wrap and then place them in a freezer-safe container. They can last up to a month.
Reheating and freezing tips
- Freezing/Thawing: Take them out of the freezer 4-6 hours before you plan to eat them. Leave them in the refrigerator to thaw overnight.
- Avoid sogginess: When reheating, it’s best to enjoy them cold or at room temperature for the best texture. If you want to reheat, pop them in the toaster oven for a few minutes until warm.
Tips & Tricks for Terrifying Coffin Sandwiches
Mistakes to avoid
- Overfilling: Keep the amount of filling balanced; too much can make the sandwich hard to eat.
- Cutting the bread: Ensure your cuts are clean. Using a very sharp knife will yield better shapes.
- Choosing quality ingredients: Always opt for the freshest ingredients for the best flavor.
Extra tips for better results
- Use different bread types: Experiment with rye or sourdough for different flavors.
- Make the fillings ahead: Prepare your fillings in advance for quicker assembly on the day of serving.
- Create an assembly line: If making for a sizeable group, setting up an assembly line can be fun and efficient!
Recipe Variations of Terrifying Coffin Sandwiches
Creative twists
- Nutty Add-Ons: Incorporate nuts like chopped almonds or walnuts for a crunch.
- Spices and Herbs: Sprinkle some Italian seasoning or fresh herbs like basil for an elegant touch.
- Seasonal Flavors: In fall, try pumpkin-spice cream cheese spread instead of regular cheese for a seasonal touch.
Dietary adjustments
- Gluten-Free: Use gluten-free bread or large lettuce leaves.
- Dairy-Free: Substitute with vegan cheeses or spreads.
- Vegan Options: Replace all fillings with hummus, roasted veggies, and plant-based spreads.
Conclusion about Terrifying Coffin Sandwiches
In summary, Terrifying Coffin Sandwiches are not just a meal, but an experience that brings joy and creativity to any event. From the simple preparation to the delightful presentation, this recipe will surely be a hit with family and friends.
So why not give it a try? Engage your creativity, explore different fillings, and don’t hesitate to share your results! Your journey into the world of spooky sandwiches awaits, and I’m eager to hear your feedback.
FAQs about Terrifying Coffin Sandwiches
What if it doesn’t turn out right?
No worries! Cooking is often about experimentation. If your sandwiches don’t look perfect, they’ll still taste great. Just have fun with the creation!
Can I prepare it ahead of time?
Absolutely! You can assemble the sandwiches a few hours before your gathering as long as you store them properly in the refrigerator. For the best taste and texture, try to serve them the same day.
What are the best ingredient substitutions?
Great question! Feel free to swap out ingredients based on dietary needs. For instance, use turkey instead of ham, and choose dairy-free cheese for a lactose-free version.
How long can it be stored?
The sandwiches are best consumed fresh but may be stored in the fridge for 1-2 days. If frozen, they can last for up to a month.
Can I use store-bought dough or crust?
Sure! While homemade bread adds a personal touch, store-bought options can save time and still taste great.
Is this recipe kid-friendly or family-appropriate?
Definitely! Kids will love the spooky appearance and fun, delicious flavors. You can customize fillings to their liking, ensuring everyone has a great meal.
Can I make this recipe allergen-free?
You certainly can! Simply swap out any allergens for alternatives, such as gluten-free bread, dairy-free cheese, and plant-based spreads.
By following this guide to making Terrifying Coffin Sandwiches, you can create a delightful, spooky treat that will impress everyone at your next gathering. So put on your chef hat, roll up your sleeves, and enjoy the magic of cooking!

Terrifying Coffin Sandwiches
Ingrédients
Main Ingredients
- 8 slices Sliced Bread White, whole wheat, or any preferred type
- 8 slices Jamón York
- 8 slices Cheese Or 4 quesitos/cream cheese if preferred
- 4 tablespoons Sobrasada Optional, for added spice
- 4 tablespoons Paté
- 8 slices Chorizo Pamplonés
- 1 cup Alfalfa sprouts
- Soft cheese spread (queso de untar) For sticking and decorating
- Template For coffin shape (or create your own)
Instructions
Preparation
- Start by clearing your work area and gathering all your ingredients.
- Create a coffin template by drawing a coffin shape on cardboard and cutting it out.
- Using the template, cut the bread into coffin shapes, aiming for two pieces per sandwich.
- Prepare your fillings; slice the jamón york, chorizo, and cheese to fit well inside the coffin shapes.
Assembly
- Take one coffin-shaped piece of bread, spread a thin layer of soft cheese or cream cheese on top, then stack your chosen fillings.
- Place another coffin-shaped piece of bread on top and press gently.
- Apply more soft cheese on top to secure decorations, like a strip of chorizo or alfalfa.
- Cut two strips of chorizo pamplonés to create a decorative cross on top, securing them with softened cheese.
- On a platter, create a bed of alfalfa sprouts and place the sandwiches on top.
Serving
- Gather family and friends to serve and enjoy your Terrifying Coffin Sandwiches promptly.