

Table of Contents
Introduction to Spring Brownies
There’s something magical about spring—flowers bloom, days get longer, and the weather warms up, making it the perfect season for treats that echo the vibrancy of the outdoors. This is where the delightful Spring Brownies come in, combining the rich flavors of chocolate with a festive touch that makes them a must for any spring gathering. Have you ever felt the urge to elevate your brownie game beyond the classic fudgy goodness? With Spring Brownies, you’ve found the perfect recipe that will not only satisfy your sweet tooth but also impress your guests.
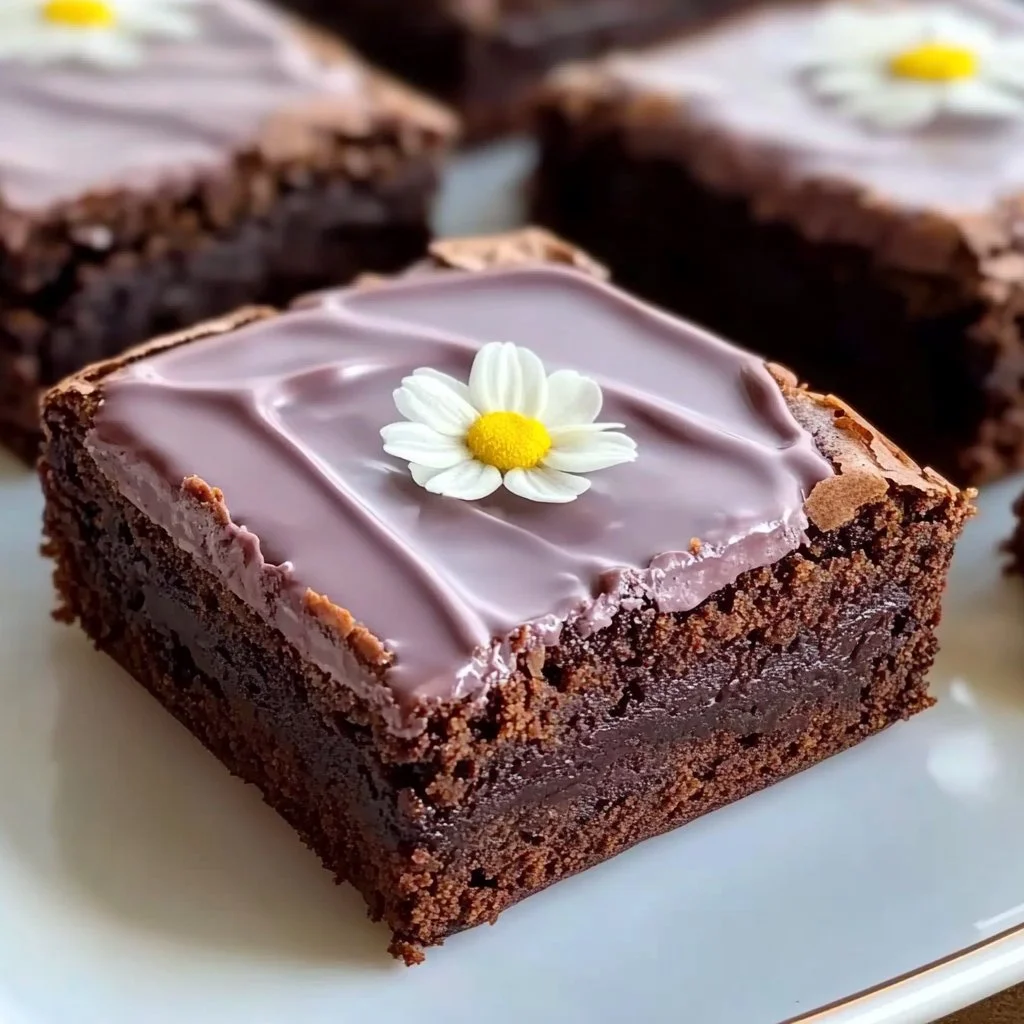
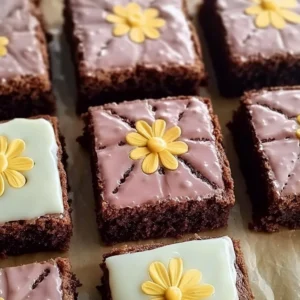
What sets these brownies apart is their lush chocolate texture that pairs beautifully with pastel candies and colorful frosting, transforming a simple dessert into a stunning centerpiece for your spring celebrations. Whether it’s a family picnic, a birthday party, or an Easter gathering, these brownies offer a deliciously sweet way to celebrate the season. Imagine the joy on your friend’s faces as they bite into a rich, chocolaty brownie topped with vibrant candies—the taste is as delightful as the look!
Not only are Spring Brownies easy to make, but they also allow for personalization. You can adapt the toppings to fit any occasion and relish the creative process in the kitchen. This recipe becomes a canvas for your imagination. Making Spring Brownies is not just about baking; it’s an opportunity to bond with loved ones while creating something special together. So, gather your ingredients and let’s dive into the wonder of Spring Brownies!
Key Benefits of Spring Brownies
Why You’ll Love This Recipe
- Decadent Flavor: The harmonious blend of butter, sugar, and cocoa makes these brownies irresistibly rich.
- Simplicity: With straightforward steps, you can whip up a batch in no time, perfect for last-minute occasions.
- Versatility: Customize your brownie toppings to match any spring event or personal preference.
- Crowd-Pleaser: Loved by kids and adults alike, they’re sure to be a hit at any gathering.
- Beautiful Presentation: Pastel candies and frosting make for an eye-catching dessert that stands out on any table.
- Fulfilling Treat: These brownies are not just sweet; they provide a satisfying, rich chocolate experience.
What Makes It Stand Out
Spring Brownies stand out thanks to their ability to blend tradition with a seasonal twist. While classic brownies are a staple dessert, adding a spring element makes them fresh and exciting. The use of pastel candies gives a nod to the colors of blooming flowers, while the frosting elevates them into a more elegant treat.
Additionally, the recipe allows space for creativity. You can mix in your favorite nuts or even add a swirl of peanut butter for a gourmet touch. With every batch, you can play with different toppings or share them with others, turning an already delightful treat into a unique experience with every bake.
Ingredients for Spring Brownies
Complete Ingredient List with Measurements
- 1 cup unsalted butter, melted
- 2 cups granulated sugar
- 4 large eggs
- 1 teaspoon vanilla extract
- 1 cup all-purpose flour
- 1 cup unsweetened cocoa powder
- 1/2 teaspoon salt
- 1/4 teaspoon baking powder
- Pastel candies for topping
- Frosting for decorating
Substitutes and Alternatives
If you have dietary restrictions or are allergic to certain ingredients, there are plenty of swaps available to still enjoy Spring Brownies. For instance, if you’re looking to make them dairy-free, consider using coconut oil or a dairy-free butter substitute instead of unsalted butter.
For a gluten-free option, you can replace the all-purpose flour with a gluten-free blend. Just be sure that the mix includes xanthan gum, which helps to hold the brownies together. If you don’t have eggs or want a vegan version, you can use flax eggs as a binding agent—mix one tablespoon of flaxseed meal with two and a half tablespoons of water and let it sit for a few minutes.
How to Make Spring Brownies – Step-by-Step Directions
Step 1 – Prepare Ingredients
Begin by gathering all your ingredients. It’s essential to have everything ready, as the process goes quickly. Preheat your oven to 350°F (175°C) and grease a 9×13 inch baking pan to ensure easy removal after baking.
Step 2 – Cook the Base
In a large mixing bowl, combine the melted butter and granulated sugar. Use a whisk or a wooden spoon to mix them thoroughly until you achieve a smooth, glossy mixture. This step usually takes about 2–3 minutes. Then, beat in the eggs one at a time, ensuring each is well incorporated before adding the next. Stir in the vanilla extract at the end for extra flavor.
Step 3 – Combine Dry Ingredients
In a separate bowl, whisk together the all-purpose flour, cocoa powder, salt, and baking powder. This helps to ensure that the leavening agents are evenly distributed throughout the batter, which is crucial for achieving a perfect rise.
Step 4 – Mix Wet and Dry Ingredients
Gradually add the dry ingredient mixture to the wet ingredients. Mix until just combined; be careful not to overmix, as this can lead to a tough brownie. The texture should be thick and slightly gooey.
Step 5 – Pour into Baking Pan
Pour the brownie batter into your prepared baking pan, using a spatula to spread it evenly across the surface. Smooth out the top to ensure it bakes uniformly.
Step 6 – Bake the Brownies
Place the pan in the preheated oven and bake for about 20–25 minutes. To check for doneness, insert a toothpick into the center; it should come out with a few moist crumbs attached, indicating that your Spring Brownies are perfectly cooked while still fudgy.
Step 7 – Cool Completely
Once baked, remove the brownies from the oven and let them cool completely in the pan. This will help set the texture, making them easier to cut later.
Step 8 – Frost the Brownies
Once fully cooled, you can frost the brownies with your choice of frosting. Whether you opt for a classic chocolate buttercream or a lighter whipped frosting, apply it generously across the surface.
Step 9 – Decorate with Candies
After frosting, it’s time to bring your creative side to life! Scatter pastel candies over the surface, pressing them lightly into the frosting to ensure they stick. This not only enhances the taste but adds vibrant pops of color.
Step 10 – Cut and Serve
Finally, cut the brownies into squares or rectangles. Serve them at your next spring gathering and watch as they disappear within moments!
Serving Suggestions for Spring Brownies
Best Occasions to Serve This Dish
Spring Brownies are perfect for a variety of occasions. They work wonderfully for birthday parties, picnics, or family gatherings, adding a touch of sweetness to any celebration. Their colorful appearance makes them a fitting treat for spring-themed events like Easter brunch, where they can function as both dessert and decoration.
If you’re hosting a backyard barbecue, these brownies provide a satisfyingly sweet option for guests. Their rich flavor is sure to be a hit alongside fresh fruits and chilled beverages.
What to Serve With It
You can serve Spring Brownies alongside vanilla ice cream for a classic combo or offer a scoop of whipped cream for extra indulgence. Fresh berries such as strawberries or raspberries make a lovely side, adding freshness that balances the chocolate’s richness. For drinks, pair them with iced tea, lemonade, or coffee for a delightful afternoon treat.
How to Store Spring Brownies Properly
Best Storage Practices
To keep your Spring Brownies at their best, store them in an airtight container at room temperature, where they can last for up to four days. If you want to keep them longer, consider refrigerating them. Just note that refrigeration may alter their texture slightly, making them denser.
If you prefer to freeze your brownies, allow them to cool completely and then cut them into squares before placing them in an airtight container or wrapping them well in plastic wrap. They can last in the freezer for up to three months, ensuring you always have a delicious treat on hand.
Reheating and Freezing Tips
When it’s time to enjoy your frozen Spring Brownies, you can thaw them overnight in the refrigerator or let them sit at room temperature for about an hour. To reheat, preheat your oven to 350°F (175°C) and place the brownies in for about 10 minutes to warm them through. You can also microwave a single piece for about 15-20 seconds for a quick treat, just be cautious not to overheat.
Tips & Tricks for Spring Brownies
Mistakes to Avoid
1 – Overmixing the Batter: This can lead to tough brownies. Mix until just combined for best results.
2 – Not Using Room Temperature Eggs: Cold eggs can affect the batter consistency. Always use eggs that are at room temperature.
3 – Misjudging Baking Time: Every oven is different. Keep an eye on the brownies as they approach the end of the cooking time.
4 – Skipping Cooling Time: Resist cutting into the brownies while they are still warm; cooling helps develop their texture.
5 – Using the Wrong Pan Size: A different size can affect the baking time and final result. Stick to a 9×13 inch pan as indicated.
Extra Tips for Better Results
For richer flavor, consider browning the butter before mixing it with sugar. This adds a nutty depth to your Spring Brownies. Selecting high-quality cocoa powder can also make a significant difference in taste.
If you have time, let the frosted brownies chill in the refrigerator for a little while before serving. This helps the frosting set firm and enhances the flavors, resulting in a treat everyone will rave about.
Recipe Variations of Spring Brownies
Creative Twists
1 – Nutty Crunch: Fold in chopped nuts like walnuts or pecans into the batter for added texture and flavor. They provide a lovely crunch that contrasts with the fudgy base.
2 – Minty Delight: Add a few drops of peppermint extract to the batter, or use mint-flavored candies or chocolates as toppings for a refreshing twist.
3 – Peanut Butter Swirl: Dropping spoonfuls of peanut butter into the batter before baking creates a delightful peanut butter ripple effect that complements the chocolate beautifully.
4 – Fruit-Infused: Consider adding dried fruit pieces like cherries or cranberries for a chewy texture and burst of flavor.
Dietary Adjustments
If you’re looking to make these brownies vegan, substitute eggs with a mixture of flaxseed meal and water. Use a vegan butter alternative or coconut oil for a dairy-free option. For gluten-free brownies, replace regular flour with a gluten-free baking mix, ensuring that it includes the right binding agents to maintain the chewy texture.
Conclusion about Spring Brownies
In conclusion, Spring Brownies are a delightful treat to welcome the joyful season. Their rich chocolate flavor, combined with the playful touch of pastel candies and smooth frosting, makes them harmoniously appealing to both the eyes and the palate. They are simple enough to make yet versatile enough to fit various occasions, whether you’re celebrating a holiday or just indulging on a sunny afternoon. This recipe stands out as a timeless classic, allowing for creativity and personal touches that reflect your style. With Spring Brownies, every bite is a reminder of the warmth and beauty that spring brings, making them a must-try treat this season.
FAQs about Spring Brownies
How long can I store Spring Brownies?
Spring Brownies can be stored in an airtight container at room temperature for up to four days and can last up to three months in the freezer.
Can I make Spring Brownies ahead of time?
Yes, you can make them a day or two in advance. Store them in an airtight container at room temperature until ready to serve.
Can I freeze Spring Brownies?
Absolutely! To freeze, cut the brownies into squares, wrap them well, and place them in an airtight container.
How do I reheat frozen Spring Brownies?
To reheat, thaw them overnight in the fridge or at room temperature, then warm in a 350°F (175°C) oven for approximately 10 minutes.
What can I use instead of eggs?
Flax eggs are a great substitute; combine one tablespoon of flaxseed meal with 2.5 tablespoons of water. Let it sit until it thickens.
What’s the best way to prevent my brownies from sticking?
Greasing your baking pan and lining it with parchment paper can help prevent sticking and make for easier removal.
How do I know when my brownies are done?
Perform the toothpick test; insert it into the center, and if it comes out with a few moist crumbs, your brownies are perfectly baked.
Can I use different toppings for the brownies?
Yes! You can use various candies, nuts, or even a dusting of powdered sugar to customize your brownies according to your preferences.
How can I make these brownies gluten-free?
Simply swap out all-purpose flour for a gluten-free baking blend, ensuring it contains binding agents.
What’s the best way to frost Spring Brownies?
Allow the brownies to cool completely before frosting. Spread your chosen frosting evenly for a smooth, beautiful finish.
Spring Brownies
Ingrédients
For the Brownie Base
- 1 cup unsalted butter, melted Can substitute with coconut oil for dairy-free option.
- 2 cups granulated sugar
- 4 large eggs Use room temperature eggs for better batter consistency.
- 1 teaspoon vanilla extract
- 1 cup all-purpose flour Can replace with a gluten-free blend.
- 1 cup unsweetened cocoa powder Use high-quality cocoa for better flavor.
- 1/2 teaspoon salt
- 1/4 teaspoon baking powder
For Topping
- 1 cup pastel candies Any type of colorful candies can be used.
- 1 cup frosting Choose your favorite flavor of frosting.
Instructions
Preparation
- Preheat your oven to 350°F (175°C) and grease a 9×13 inch baking pan.
- Gather all your ingredients to ensure a smooth baking process.
Making the Batter
- In a large mixing bowl, combine melted butter and granulated sugar until smooth and glossy.
- Beat in the eggs one at a time, ensuring each is well combined before adding the next. Stir in vanilla extract.
- In another bowl, whisk together flour, cocoa powder, salt, and baking powder.
- Gradually add the dry mixture to the wet ingredients, mixing until just combined.
Baking
- Pour the batter into the prepared baking pan and spread it evenly.
- Bake for 20-25 minutes. Check doneness with a toothpick; it should come out with moist crumbs.
- Let the brownies cool completely in the pan before frosting.
Decorating
- Once cooled, spread frosting over the brownies.
- Top with pastel candies, pressing them lightly into the frosting.
Serving
- Cut the brownies into squares and serve at your next gathering.