
Table of Contents
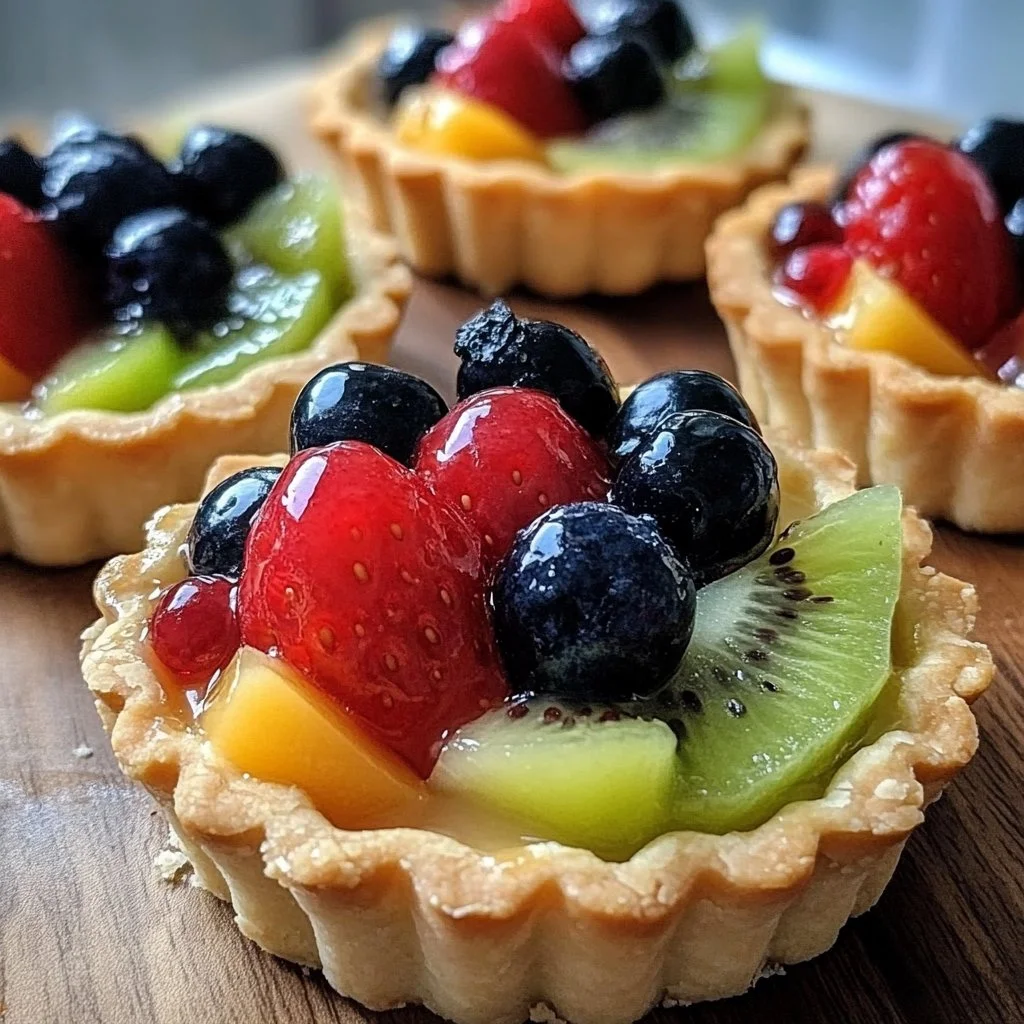
When it comes to delightful desserts, Mini Fruit Tarts hold a special place in our hearts. They are small, inviting, and bursting with flavor, making them the perfect treat for any occasion. Imagine biting into a crisp, flaky crust filled with rich pastry cream and topped with vibrant, fresh fruits. Doesn’t that sound delicious? These Mini Fruit Tarts are not only visually stunning but also incredibly easy to make at home.
What truly makes Mini Fruit Tarts special is their versatility. You can tailor them to suit any season or occasion. Whether you’re celebrating a birthday, hosting a summer barbecue, or simply looking for a sweet snack, these tarts can easily fit the bill. The balance of creamy, fruity, and crunchy textures is truly satisfying, leaving everyone wanting more.
Have you ever wanted a dessert that impresses without requiring hours in the kitchen? This Mini Fruit Tarts recipe is straightforward enough for beginners yet sophisticated enough to wow your guests. With simple ingredients and minimal steps, you’ll find yourself making these tarts over and over again.
So, if you’re ready to indulge in this delicious journey, let’s dive into the wonderful world of Mini Fruit Tarts, where every bite is a celebration of flavor!
Key Benefits of Mini Fruit Tarts
Why You’ll Love This Recipe
- Flavor Explosion: The combination of pastry cream and fresh fruits creates a delightful contrast in flavors and textures.
- Simplicity: The steps are straightforward and easy to follow, making it a breeze for novice bakers.
- Versatile: You can customize the fruit topping based on what’s in season or your personal favorites.
- Family Appeal: Kids and adults alike will enjoy these irresistibly adorable tarts.
- Perfect for Any Occasion: Whether it’s a holiday, picnic, or an elegant dinner, Mini Fruit Tarts fit right in.
What Makes It Stand Out
These Mini Fruit Tarts stand out due to their delightful presentation and customizable nature. You can mix and match different fruits, allowing everyone to personalize their tarts. For example, berries and citrus fruits are great options that fit well into this recipe.
Another unique aspect is the crisp tart shell contrasted with smooth pastry cream and juicy fruits. This combination not only pleases the palate but also the eye, making these tarts an excellent centerpiece for dessert tables. Whether for summer picnics or holiday feasts, Mini Fruit Tarts are sure to be a hit.
Ingredients for Mini Fruit Tarts
Complete Ingredient List with Measurements
- 1 cup all-purpose flour: The base for your tart shells, providing structure.
- 1/4 cup powdered sugar: Adds sweetness to the crust without the graininess of granulated sugar.
- 1/2 cup unsalted butter, softened: Provides a rich and creamy texture to the tart shells.
- 1 cup pastry cream (store-bought or homemade): The creamy filling that carries the flavor.
- Assorted fresh fruits (e.g., berries, kiwi, mango, etc.): For topping and decoration, choose fruits that are ripe and vibrant.
- Mint leaves for garnish (optional): Adds an aromatic and colorful touch.
Substitutes and Alternatives
If you’re looking to adapt this recipe for dietary restrictions or preferences, there are plenty of substitutes available. For a gluten-free option, you can swap the all-purpose flour with a gluten-free flour blend.
If you’re dairy-free, considering using a plant-based butter and a non-dairy pastry cream. You might also explore using a nut-based pastry cream for a unique twist. Only limited by your creativity, you can enjoy Mini Fruit Tarts without compromising on flavor!
How to Make Mini Fruit Tarts – Step-by-Step Directions
Step 1 – Prepare Ingredients
Begin by gathering all your ingredients on a clean countertop. This will help streamline the preparation process and ensure you won’t miss any steps.
Step 2 – Cook the Base
Preheat the oven to 350°F (175°C). In a bowl, combine the flour and powdered sugar. Mix well to ensure an even distribution.
Step 3 – Form the Dough
Add the softened butter to the flour mixture. Using a fork or your hands, mix until a dough begins to form. It should be soft and slightly sticky.
Step 4 – Roll Out the Dough
On a lightly floured surface, roll out the dough to about 1/8 inch thickness. This will ensure your tart shells are tender yet sturdy enough to hold the filling.
Step 5 – Cut the Dough
Use a cookie cutter or a glass to cut the dough into small circles that will fit your mini tart pans. Aim for a size that allows you to press the dough into each pan without it being too thin.
Step 6 – Press into Tart Pans
Carefully press the cut dough into the mini tart pans, ensuring the dough is evenly distributed across the bottom and up the sides.
Step 7 – Bake the Tarts
Place the tart pans in the preheated oven and bake for about 10–12 minutes. The tarts should be golden brown when they’re done. Keep an eye on them to avoid over-baking.
Step 8 – Cool Completely
Once baked, take the tart shells out of the oven and allow them to cool completely on a wire rack. This step is crucial for maintaining the structural integrity of the tarts.
Step 9 – Fill with Pastry Cream
Once the shells are cool, fill each one with the pastry cream. You can use a spoon or a piping bag for a more polished look.
Step 10 – Top with Fresh Fruits
Finally, top each tart with your choice of assorted fresh fruits. Arrange them beautifully for an eye-catching presentation.
Serving Suggestions for Mini Fruit Tarts
Best Occasions to Serve This Dish
Mini Fruit Tarts are perfect for spring and summer gatherings. You can serve them at birthday parties, bridal showers, or even an afternoon tea. Their vibrant colors make them a delightful addition to any dessert table.
In winter, consider featuring them during celebrations like New Year’s Eve. They add a touch of lightness that balances heavier seasonal desserts.
What to Serve With It
- A drizzle of chocolate or fruit coulis for extra flavor.
- A dollop of whipped cream alongside the tarts can enhance the experience.
- Coffee or espresso pairs nicely with the creamy texture of the tarts.
- Sparkling water or fruit-infused drinks can complement the fruity profile.
How to Store Mini Fruit Tarts Properly
Best Storage Practices
Store the Mini Fruit Tarts in the refrigerator to maintain their freshness. It’s best to keep them covered in an airtight container. Proper storage will keep them from becoming soggy and the fruits from losing their vibrancy.
Reheating and Freezing Tips
It’s not advisable to freeze the filled Mini Fruit Tarts, as the texture of the fruits may not hold up. However, you can prepare the tart shells in advance and freeze them. When ready to serve, let them thaw, fill with cream, and top with fresh fruits.
Tips & Tricks for Mini Fruit Tarts
Mistakes to Avoid
- Overbaking the Shells: Keep a close eye on the tarts. Overbaking can lead to a hard texture rather than a tender one.
- Using Watery Fruits: Choose firm fruits to prevent soggy tarts.
- Skipping Cooling Time: Filling warm tart shells can melt the pastry cream and create a mess.
- Not Prepping in Advance: Gather your ingredients and tools before starting to avoid confusion.
- Not Measuring Accurately: Use proper measuring cups for the flour and sugar to get the right dough consistency.
Extra Tips for Better Results
- Experiment with different fruit combinations for exciting flavor profiles.
- Add a splash of vanilla extract to the pastry cream for an extra layer of flavor.
- Consider using a sprinkle of lemon zest over the fruit for a refreshing twist.
- Try a glaze with apricot jam to give the fruits a beautiful shine.
Recipe Variations of Mini Fruit Tarts
Creative Twists
- Chocolate Mini Fruit Tarts: Incorporate melted chocolate into the pastry cream for decadent variations.
- Nutty Tart Crusts: Swap some of the flour for ground nuts like almond or hazelnut to enhance the flavor.
- Lemon Curd Filling: Use lemon curd in place of pastry cream for a zesty twist.
- Seasonal Toppings: Use fruits that reflect the time of year, such as pumpkin puree in the fall topped with apples.
Dietary Adjustments
For a vegan version, replace butter with coconut oil or a plant-based margarine and use a vegan pastry cream. For those needing gluten-free options, a mix of almond flour and coconut flour can work well in the tart crust.
If you need a dairy-free option, consider using alternative milk and plant-based cream for the filling.
Conclusion about Mini Fruit Tarts
If you’re looking for a delightful dessert to impress family and friends, Mini Fruit Tarts are an exceptional choice. With their vibrant colors, ideal balance of flavors, and stunning presentation, they can easily brighten up any event. Plus, they are simple to make, allowing you to enjoy the baking process without feeling overwhelmed.
Everyone will love the bite-sized treats that are as delightful to eat as they are to look at. So why not gather your ingredients and get started? You’ll find that these Mini Fruit Tarts quickly become a household favorite!
FAQs about Mini Fruit Tarts
Can I prepare it ahead of time?
Yes! You can bake the tart shells ahead of time and fill them just before serving.
Can I freeze it?
It’s best to freeze the tart shells only. Fill them with cream and fruits before serving for the best texture.
How long does it last?
Mini Fruit Tarts can stay fresh in the refrigerator for up to 2-3 days if stored properly.
What are the best substitutions?
You can substitute all-purpose flour with gluten-free flour and use dairy-free milk in the pastry cream.
Is this recipe family-friendly?
Absolutely! Kids love eating these fun, colorful treats, and they are perfect for family gatherings.
Can I use frozen fruit?
Fresh fruit is recommended, but thawed frozen fruit can work in a pinch. Just drain any excess moisture.
How do I know when the tart shells are done?
They should be golden brown. Use a toothpick to check—they should come out clean from the base.
What’s the best way to slice fruits for topping?
Slice fruits thinly for easy placement and visual appeal on the tarts.
Can I add a glaze on top?
Yes! A simple glaze can add shine and extra flavor. Consider using apricot jam heated and brushed over the fruits.
Can I use other fillings besides pastry cream?
Certainly! Explore options like fruit curds, whipped cream, or yogurt for different flavors!

Mini Fruit Tarts
Ingrédients
For the Tart Shells
- 1 cup all-purpose flour Provides structure to the tart shells.
- 1/4 cup powdered sugar Adds sweetness without graininess.
- 1/2 cup unsalted butter, softened Provides rich and creamy texture.
For the Filling and Topping
- 1 cup pastry cream Store-bought or homemade.
- 2 cups assorted fresh fruits (e.g., berries, kiwi, mango) Choose ripe and vibrant fruits.
- optional mint leaves for garnish Adds aromatic and colorful touch.
Instructions
Preparation
- Gather all your ingredients on a clean countertop to streamline the preparation process.
Making the Tart Shells
- Preheat the oven to 350°F (175°C).
- In a bowl, combine the flour and powdered sugar, mixing well.
- Add the softened butter to the flour mixture, mixing until a soft, slightly sticky dough forms.
- On a lightly floured surface, roll out the dough to about 1/8 inch thickness.
- Cut the dough into small circles to fit into mini tart pans.
- Press the cut dough into the mini tart pans, ensuring an even distribution.
- Bake the tarts in the preheated oven for about 10–12 minutes until golden brown.
- Allow the tart shells to cool completely on a wire rack.
Assembly
- Once cooled, fill each tart shell with pastry cream using a spoon or piping bag.
- Top each tart with assorted fresh fruits, arranging them for an eye-catching presentation.