

Table of Contents
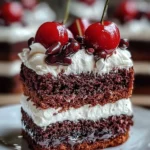
Mini Black Forest Layer Cakes: A Delightful Recipe! takes the classic Black Forest flavors and transforms them into cute, bite-sized desserts. Imagine diving into moist chocolate layers, rich cherry filling, and fluffy whipped cream all wrapped together in a mini cake. Doesn’t that sound heavenly? This recipe is not just another cake; it’s an experience filled with nostalgia, flavor, and creativity.
One of the reasons this recipe is so special is its balance between taste and simplicity. It’s perfect for parties, holidays, or just a casual dessert at home. Whether you’re an experienced baker or just starting out, these mini cakes will impress everyone at your table. Plus, the portioned size allows you to indulge without feeling overwhelmed. Who wouldn’t enjoy a mini treat that packs a big punch?
Do you find yourself often craving the richness of chocolate combined with the tartness of cherries? This Mini Black Forest Layer Cakes: A Delightful Recipe! satisfies that craving in the most delightful way. It’s ideal for gatherings because each mini cake is visually appealing, making them perfect as table centerpieces. The ease of preparation means you can spend less time in the kitchen and more time making memories with your loved ones.
Key Benefits of Mini Black Forest Layer Cakes: A Delightful Recipe!
- Irresistible Flavor: The combination of rich chocolate and tart cherries creates a delightful contrast.
- Family-Friendly: Perfect for both kids and adults, making it a versatile option for gatherings.
- Customizable: You can easily adapt the ingredients based on what you have and your dietary needs.
- Quick to Prepare: With less than an hour from start to finish, these cakes are easy to whip up.
- Impressive Presentation: The small size makes each piece look adorable and inviting, ideal for any occasion.
What Makes It Stand Out
The originality of Mini Black Forest Layer Cakes: A Delightful Recipe! lies in its layered structure. Traditionally, Black Forest cake is a large, multi-layered dessert, but transforming it into mini versions allows for creativity and so much fun. You can stack, layer, and decorate them any way you like, which is perfect for any gathering.
Customization is another highlight of this recipe. Want to add layers of different flavors or swap out the cherries for strawberries? Go for it! This recipe provides a foundation, allowing your creativity to shine through. It’s a fantastic way to celebrate holidays, birthdays, or even casual picnics with friends.
Ingredients for Mini Black Forest Layer Cakes: A Delightful Recipe!
Complete Ingredient List with Measurements
- 1 cup all-purpose flour
- ½ cup unsweetened cocoa powder
- 1 cup sugar
- ½ tsp baking powder
- ½ tsp baking soda
- ¼ tsp salt
- 1 large egg
- ½ cup milk
- ½ cup hot coffee (or hot water)
- ⅓ cup vegetable oil
- 1 tsp vanilla extract
- 1 ½ cups cherry pie filling (or homemade)
- Optional: 1–2 tbsp Kirsch (traditional)
- 1 ½ cups cold heavy cream
- ¼ cup powdered sugar
- 1 tsp vanilla extract
- Optional: 2 tbsp cream cheese for stability
- Fresh cherries with stems for decoration
- Chocolate shavings or curls for topping
While most ingredients are staples, don’t forget the cherry pie filling, as it’s the star of the dessert.
Substitutes and Alternatives
If you’re looking to replace certain ingredients for dietary needs, there are plenty of alternatives. For instance, if you need a gluten-free option, replace all-purpose flour with a gluten-free baking blend. The results will still be delightful.
Dairy-free creamer can be used in place of milk for those who are lactose intolerant or dairy-free. Egg replacements are available too, such as flax eggs or applesauce, which will help keep the cake moist and fluffy without using animal products. These options ensure everyone can enjoy Mini Black Forest Layer Cakes: A Delightful Recipe!
How to Make Mini Black Forest Layer Cakes: A Delightful Recipe! – Step-by-Step Directions
Step 1 – Prepare Ingredients
Start by gathering all your ingredients. It’ll save time as you cook. Preheat your oven to 175°C (350°F).
Step 2 – Mix the Dry Ingredients
In a large mixing bowl, whisk together the flour, cocoa powder, sugar, baking powder, baking soda, and salt. Ensure there are no lumps for a smooth batter.
Step 3 – Combine the Wet Ingredients
Add the egg, milk, vegetable oil, and vanilla extract to the dry ingredients. Mix until you achieve a smooth consistency.
Step 4 – Add Hot Coffee
Slowly pour in the hot coffee while stirring. This will thin the batter, and that’s a good sign!
Step 5 – Spread and Bake
Evenly spread the batter in a prepared sheet pan or in two round cake tins. Bake for about 12–15 minutes, or until the top springs back when touched.
Step 6 – Cool the Cake
Once baked, let the chocolate cake cool completely in the pan. This helps retain its moisture.
Step 7 – Cut the Cakes
Using a 2.5–3 inch round cutter, cut out 12 circles from the cooled cake. Each mini layer cake will require 2 circles.
Step 8 – Prepare the Whipped Cream
In a separate bowl, beat the cold heavy cream, powdered sugar, and vanilla until stiff peaks form. Add cream cheese for stability if you wish.
Step 9 – Begin Assembling
Take one cake circle and place it at the bottom. Pipe or spoon a thick layer of whipped cream on top.
Step 10 – Add Cherry Filling
Spoon a generous amount of cherry pie filling onto the whipped cream layer. Place a second cake circle on top and repeat the process. Finish it off with whipped cream, chocolate shavings, and fresh cherries for decoration.
Serving Suggestions for Mini Black Forest Layer Cakes: A Delightful Recipe!
Best Occasions to Serve This Dish
Mini Black Forest Layer Cakes: A Delightful Recipe! is perfect for celebrations like birthdays, anniversaries, or festive holidays. The mini size means you can easily serve a crowd without overwhelming portions.
Think about bringing these mini cakes to potlucks or family gatherings. They travel well and are sure to delight everyone involved. They can also add a charming touch to wedding receptions or baby showers.
What to Serve With It
- Coffee or Espresso: A hot cup of coffee balances the sweetness perfectly.
- Ice Cream: Vanilla or chocolate ice cream complements the flavors.
- Fruits: Fresh berries or sliced fruits make for a light side.
- Sparkling Water: A refreshing drink option to cleanse the palate.
How to Store Mini Black Forest Layer Cakes: A Delightful Recipe! Properly
For the best storage practices, keep the assembled mini cakes in the refrigerator. They’ll last up to five days. Using an airtight container helps maintain freshness and moisture.
If you need to store the cakes individually, wrap each one in plastic wrap or place them in small containers and refrigerate. This way, they stay fresh longer without losing their delightful texture.
Reheating and Freezing Tips
Reheating these cakes isn’t recommended since they’re best enjoyed cold. However, if you need to thaw frozen mini cakes, let them sit in the refrigerator overnight for optimal texture and taste.
For freezing, assemble your mini cakes, wrap them in plastic, and store them in the freezer for up to two months. When ready to eat, let them thaw in the fridge for a few hours.
Tips & Tricks for Mini Black Forest Layer Cakes: A Delightful Recipe!
Mistakes to Avoid
- Overmixing the Batter: This can lead to dense cakes. Mix until just combined.
- Not Allowing to Cool: Assembling the cakes while hot can cause the cream to melt.
- Skipping the Whipped Cream Stabilizer: Adding cream cheese helps maintain the whipped cream structure.
- Incorrect Oven Temperature: Make sure your oven is preheated to ensure even baking.
- Not Using Quality Ingredients: Quality matters, especially the cocoa and cherries, for the best flavor.
Extra Tips for Better Results
For improved flavor, consider adding a hint of almond extract or espresso powder to the batter. You can also drizzle a bit of melted chocolate over the cakes before adding the decorations for an extra touch.
Don’t hesitate to play with the cherry filling. If cherries aren’t in season, try strawberries or blackberries for a twist. This recipe lends itself well to creativity!
Recipe Variations of Mini Black Forest Layer Cakes: A Delightful Recipe!
Creative Twists
- Coffee Infusion: Swap water for brewed espresso in the batter for a deeper flavor.
- Caramel Drizzle: Add salted caramel sauce between layers for a decadent twist.
- Fruit Layers: Layer in alternate fruits, such as strawberries or raspberries, with the cherry filling.
- Nutty Additions: Chopped nuts can be sprinkled between layers for added texture.
Dietary Adjustments
For a vegan version of Mini Black Forest Layer Cakes: A Delightful Recipe!, use flax eggs, almond milk, and dairy-free whipped cream. Choosing gluten-free flour is an excellent option as well.
To keep it dairy-free, ensure you’re using vegan cream cheese and whipped toppings. There’s no reason anyone should miss out on such a delightful treat!
Conclusion about Mini Black Forest Layer Cakes: A Delightful Recipe!
Mini Black Forest Layer Cakes: A Delightful Recipe! stands out as a crowd-pleaser that delivers on both flavor and presentation. The combination of rich chocolate and tart cherries is always a hit, making it suitable for numerous occasions. Whether you’re celebrating a special event or savoring a simple dessert at home, these mini cakes bring joy in every bite.
Trying this recipe is not just about following steps; it’s about experiencing the creativity of baking. The satisfaction of creating delightful little cakes for friends and family enhances any gathering. So why wait? Dive into the world of Mini Black Forest Layer Cakes: A Delightful Recipe! today.
FAQs about Mini Black Forest Layer Cakes: A Delightful Recipe!
- Can I prepare it ahead of time? Yes, these mini cakes can be made a day in advance and stored in the fridge.
- Can I freeze it? Absolutely! Wrap them well and they can be frozen for up to two months.
- How long do they last? They should be consumed within five days if stored in the fridge.
- What are the best substitutions? Gluten-free flour can replace all-purpose flour, and dairy-free milk works well.
- Is this recipe family-friendly? Yes, kids love the small size and combination of flavors.
- What type of cherries should I use? You can use store-bought cherry pie filling or make your own with fresh or frozen cherries.
- How do I make it more decadent? Consider adding layers of chocolate ganache or caramel in between the cake layers.
- What if I don’t have heavy cream? Coconut cream is a great alternative for whipped toppings.
Mini Black Forest Layer Cakes
Ingrédients
For the cake
- 1 cup all-purpose flour Can substitute gluten-free flour for a gluten-free option.
- ½ cup unsweetened cocoa powder
- 1 cup sugar
- ½ tsp baking powder
- ½ tsp baking soda
- ¼ tsp salt
- 1 large egg Can use flax egg as a substitute for vegan version.
- ½ cup milk Use dairy-free milk for a dairy-free option.
- ½ cup hot coffee Can substitute with hot water.
- ⅓ cup vegetable oil
- 1 tsp vanilla extract
For the filling and topping
- 1 ½ cups cherry pie filling Homemade or store-bought.
- 1 ½ cups cold heavy cream Coconut cream is a good dairy-free alternative.
- ¼ cup powdered sugar
- 1 tsp vanilla extract
- Optional: 2 tbsp cream cheese For stabilizing the whipped cream.
- Fresh cherries with stems for decoration
- Chocolate shavings or curls for topping
Instructions
Preparation
- Start by gathering all your ingredients. Preheat your oven to 175°C (350°F).
- In a large mixing bowl, whisk together the flour, cocoa powder, sugar, baking powder, baking soda, and salt until smooth.
- Add the egg, milk, vegetable oil, and vanilla extract to the dry ingredients. Mix until you achieve a smooth consistency.
- Slowly pour in the hot coffee while stirring to thin the batter.
Baking
- Spread the batter evenly in a prepared sheet pan or in two round cake tins. Bake for about 12-15 minutes or until the top springs back when touched.
- Once baked, let the chocolate cake cool completely in the pan.
- Using a 2.5–3 inch round cutter, cut out 12 circles from the cooled cake. Each mini layer cake will require 2 circles.
Assembling
- In a separate bowl, beat the cold heavy cream, powdered sugar, and vanilla until stiff peaks form. If desired, add cream cheese for stability.
- Take one cake circle and place it at the bottom. Pipe or spoon a thick layer of whipped cream on top.
- Spoon cherry pie filling onto the whipped cream layer, then place a second cake circle on top and repeat the process.
- Finish off with whipped cream, chocolate shavings, and fresh cherries for decoration.