
Table of Contents
Introduction to Merry Christmas Cake: 7 Steps to Holiday Bliss
As the holiday season rolls around, the excitement in the air is palpable. The lights twinkle, the scent of pine fills our homes, and there’s nothing that brings people together like a beautifully baked cake. The Merry Christmas Cake: 7 Steps to Holiday Bliss is the epitome of festive joy, making it the perfect dessert to celebrate this special time of year. Have you ever found a recipe that instantly makes you feel nostalgic? This cake is one of those delightful finds.
People often ask, what makes a cake truly special during the holidays? Well, for starters, this Merry Christmas Cake is not just any dessert; it is a warm, inviting treat that embodies the spirit of the season. The blend of rich butter, sweet sugar, and festive decorations creates a concoction that appeals to both the eyes and taste buds. Plus, it’s easy enough for bakers of any skill level to whip up, so you can focus on enjoying time with family and friends rather than stressing in the kitchen.
Imagine cutting into a moist, fluffy slice of cake, the sweet aroma wafting through the air, while the festive colors of red and green sprinkles bring a smile to everyone’s face. The beauty of the Merry Christmas Cake: 7 Steps to Holiday Bliss lies in its simplicity. With just a handful of ingredients and straightforward steps, you can create a dessert that feels indulgent without being overwhelming. As you gather around the table, isn’t it wonderful to have a slice of homemade goodness that brings everyone together?
In this article, we’ll delve deep into the recipe, its benefits, serving ideas, storage tips, and also answers to some common questions. Whether you’re planning a holiday gathering or simply want to treat yourself, making the Merry Christmas Cake: 7 Steps to Holiday Bliss is an experience that will make the season even more memorable.
Key Benefits of Merry Christmas Cake: 7 Steps to Holiday Bliss
Why You’ll Love This Recipe
- Delicious Flavor: The rich buttery taste combined with vanilla essence creates a treat everyone loves.
- Simplicity: With just a few ingredients, it’s easy enough for beginner bakers.
- Versatile: Can be decorated in different ways, allowing for customization to suit any occasion.
- Festive Appeal: Perfectly embodies the spirit of the holiday season with vibrant sprinkles.
- Quick Preparation: The straightforward steps allow you to bake this cake in under an hour.
- Perfect for Sharing: Ideal for gatherings, ensuring there’s enough to go around.
What Makes It Stand Out
The Merry Christmas Cake: 7 Steps to Holiday Bliss stands out in a sea of holiday desserts due to its approachability. It seeks to bring traditional flavors and appealing aesthetics together in a dish that doesn’t require high-level baking skills. The decorations also give you room for creativity, meaning no two cakes have to look the same.
Customization is another key aspect. You can change the type of frosting used or add fruits and nuts for those wanting something a bit different. This could be a deeply satisfying moment, as the cake not only becomes a dessert but a centerpiece on your holiday table.
Ingredients for Merry Christmas Cake: 7 Steps to Holiday Bliss
Complete Ingredient List with Measurements
- 2 cups all-purpose flour
- 1 ½ cups sugar
- 1 cup unsalted butter
- 4 large eggs
- 1 cup milk
- 2 tsp baking powder
- 1 tsp vanilla extract
- ½ tsp salt
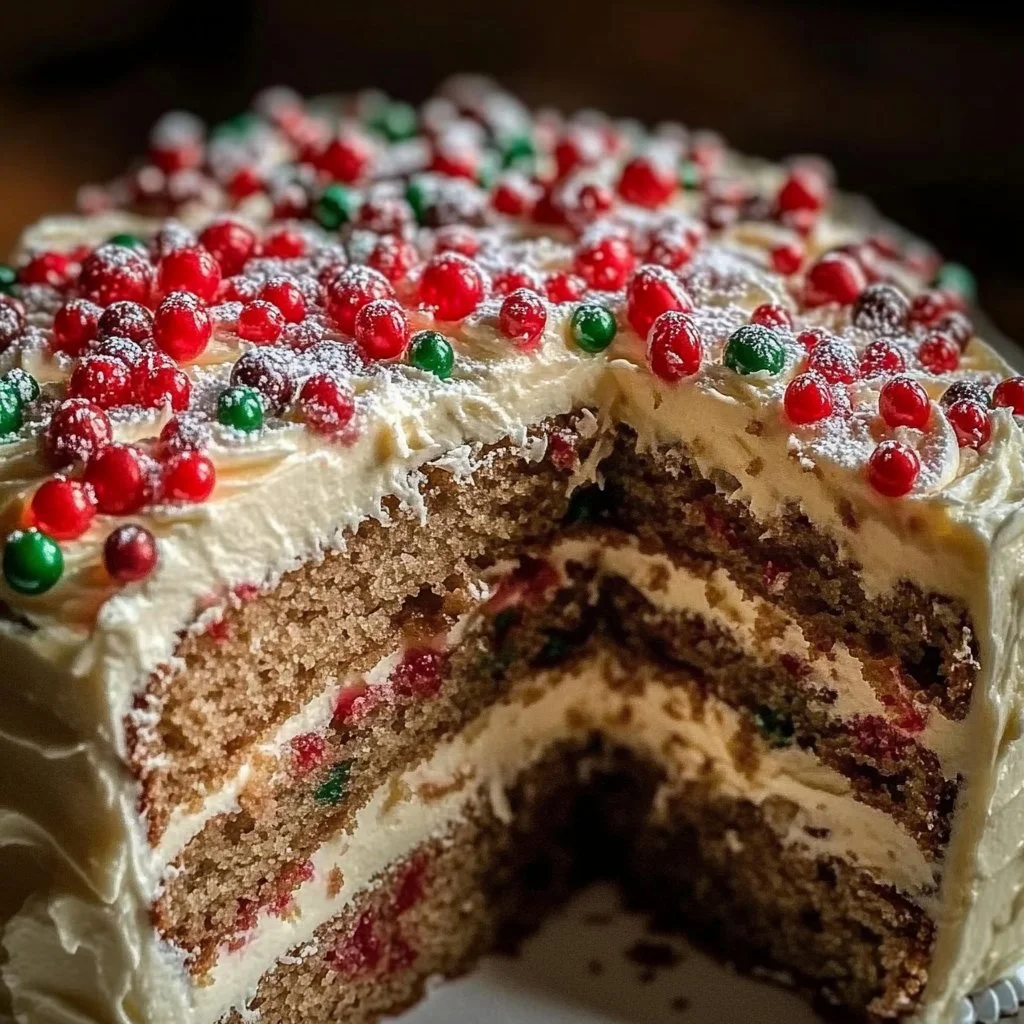
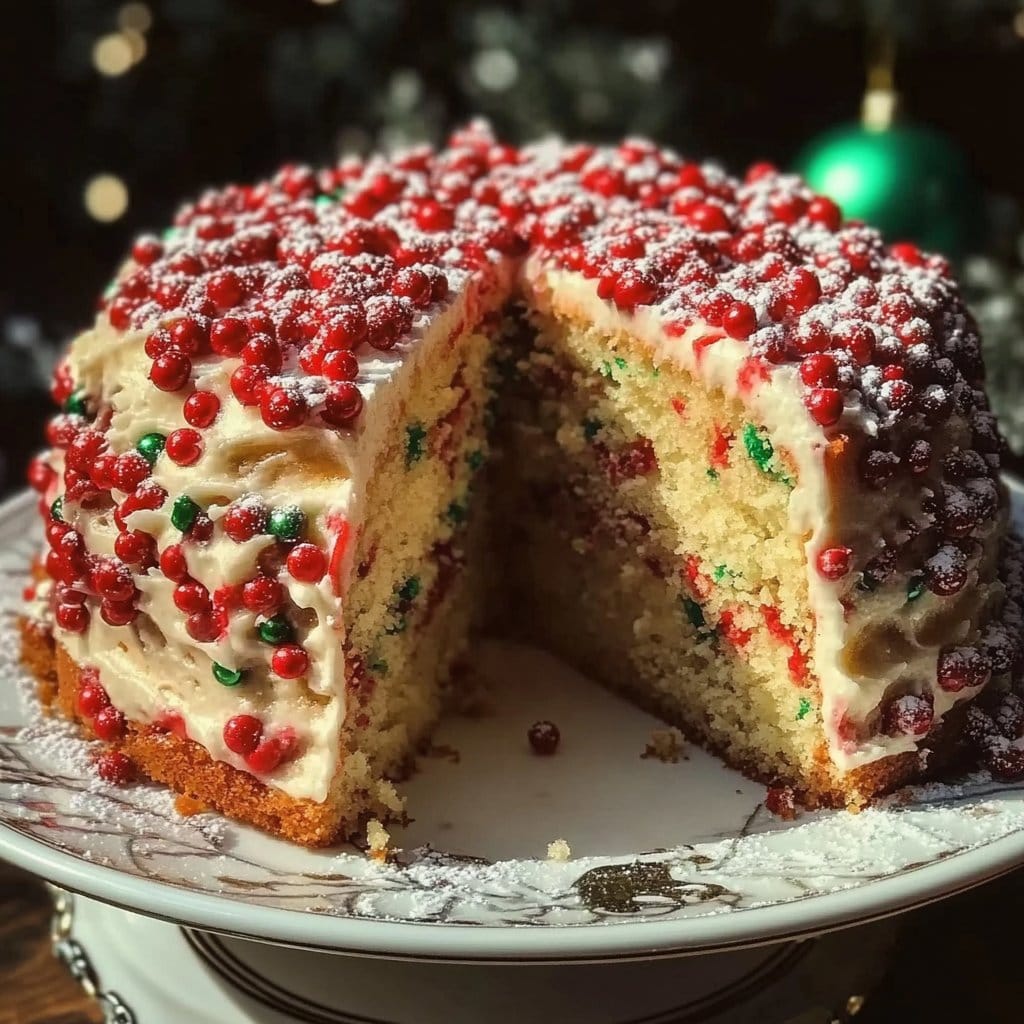
- Red and green sprinkles
- 1 cup frosting
Substitutes and Alternatives
If you have dietary concerns or allergies, you’ll be pleased to know that this Merry Christmas Cake can easily accommodate various needs. For instance, if you’re looking for a dairy-free option, substitute the unsalted butter with a vegan butter alternative and the milk with almond or oat milk.
Gluten-free flour can replace the all-purpose flour for those with gluten sensitivities, while still providing a delightful cake texture. It’s always wonderful to enjoy a delicious dessert without worrying about dietary restrictions.
How to Make Merry Christmas Cake: 7 Steps to Holiday Bliss – Step-by-Step Directions
Step 1 – Prepare Ingredients
Begin your baking journey with proper preparation. Gather all your ingredients and pre-measure them for convenience. This ensures that everything is at hand when you’re ready to start mixing.
Step 2 – Preheat Your Oven
Preheat your oven to 350°F (175°C). This step is crucial for achieving that fluffy texture everyone loves. While the oven is heating, you can focus on preparing the cake batter.
Step 3 – Grease and Flour Cake Pans
Take two 9-inch round cake pans and grease them using either butter or cooking spray. Then, dust them with flour to prevent the cake from sticking. This will ensure a smoother release once your cakes are baked.
Step 4 – Cream Butter and Sugar
In a mixing bowl, combine the unsalted butter and sugar. Cream them together using a hand mixer or stand mixer until the mixture is light and fluffy. This process typically takes about 3–4 minutes and sets the stage for a beautiful batter.
Step 5 – Add Eggs
One at a time, add in the eggs, mixing well after each addition. This step is essential as it helps to incorporate air into the batter, contributing to the overall lightness of the cake.
Step 6 – Incorporate Milk and Vanilla Extract
Pour in the milk and vanilla extract, then mix the batter until combined. This will give your cake its delicious flavor and moisture, making each slice soft and delightful.
Step 7 – Combine Dry Ingredients
In another bowl, mix together the all-purpose flour, baking powder, and salt. Gradually add this dry mixture to your wet ingredients, stirring gently until fully incorporated. Avoid over-mixing, as this can affect the cake’s texture.
Step 8 – Pour and Bake
Pour the batter evenly into your prepared cake pans. Put them in the oven and bake for 30-35 minutes, or until a toothpick inserted in the center comes out clean. The cakes should rise beautifully and turn a lovely golden-brown.
Step 9 – Cool and Frost
Once baked, let the cakes cool in the pans for about 10 minutes before transferring them to wire racks to cool completely. Once cool, it’s time to add your frosting! A simple layer of buttercream or cream cheese frosting works wonderfully here.
Step 10 – Decorate with Sprinkles
Complete your creation by decorating the frosted cake with red and green sprinkles. This adds not only flavor but a festive touch that makes your Merry Christmas Cake: 7 Steps to Holiday Bliss a holiday favorite.
Serving Suggestions for Merry Christmas Cake: 7 Steps to Holiday Bliss
Best Occasions to Serve This Dish
The Merry Christmas Cake: 7 Steps to Holiday Bliss isn’t just a dessert; it’s a celebration. Perfect for holiday parties, family gatherings, and festive dinners, this cake serves as a joyful addition to any occasion. Its visual appeal makes it an ideal centerpiece, sparking conversations and bringing smiles.
During Christmas brunch, this cake pairs nicely with warm beverages like coffee, tea, or hot chocolate. Additionally, it shines at New Year celebrations, symbolizing new beginnings and sweet memories.
What to Serve With It
Incorporating sides can elevate your dessert experience. Serve your Merry Christmas Cake alongside a scoop of vanilla ice cream or whipped cream for added richness. Fresh fruit, like strawberries or oranges, could offer a refreshing balance to the sweet cake. For beverages, consider pairing it with festive eggnog, cider, or even a splash of sparkling wine for adult gatherings.
How to Store Merry Christmas Cake: 7 Steps to Holiday Bliss Properly
Best Storage Practices
To keep your Merry Christmas Cake fresh, store it in an airtight container at room temperature for up to 3 days. If you need to keep it for a longer period, refrigerate it, where it can stay fresh for about a week.
If you choose to frost your cake, ensure it is covered well to prevent the frosting from hardening or losing its flavor.
Reheating and Freezing Tips
For those who wish to enjoy a slice later, freezing is an excellent option. Wrap slices of the cake in plastic wrap and then foil to prevent freezer burn. Simply thaw the cake in the refrigerator overnight and bring it to room temperature before serving.
If you’d like to reheat a slice, pop it in the microwave for about 10-15 seconds, keeping it warm but not hot. This will revive its moistness without compromising quality.
Tips & Tricks for Merry Christmas Cake: 7 Steps to Holiday Bliss
Mistakes to Avoid
- Over-Mixing: Overworking the batter can lead to a dense cake, so mix just until combined.
- Oven Temperature: Ensure your oven is fully preheated; inaccurate temperatures can affect baking time and texture.
- Skipping Cooling Time: Trying to frost the cake while it’s warm can result in melted frosting; always wait until it’s completely cool.
- Neglecting to Grease the Pans: Forgetting to grease and flour your pans can lead to stuck cakes, making removal difficult.
- Not Measuring Ingredients Accurately: Baking is a science; use proper measuring techniques for the best results.
Extra Tips for Better Results
For enhanced flavor, consider adding a hint of almond extract along with the vanilla. Additionally, using room temperature ingredients like eggs and butter helps create an even batter. If you want to impress guests, add a layer of fruit preserves between the cakes before frosting for a burst of flavor.
Recipe Variations of Merry Christmas Cake: 7 Steps to Holiday Bliss
Creative Twists
- Chocolate Variation: Substitute a portion of the flour with cocoa powder to create a chocolate cake base that pairs beautifully with peppermint frosting.
- Spiced Cake: Incorporate cinnamon or nutmeg into the batter for a warm, spiced flavor profile reminiscent of holiday baked goods.
- Fruit-Infused Cake: Add chopped fruits, like cranberries or apples, to the batter to create a delightful surprise in each bite.
Dietary Adjustments
For a vegan Merry Christmas Cake, replace the eggs with flaxseed meal or applesauce and use a plant-based butter substitute. Gluten-free options are also simple by using a gluten-free baking flour mix in place of regular flour, ensuring everyone can join in the festive fun.
Conclusion about Merry Christmas Cake: 7 Steps to Holiday Bliss
The Merry Christmas Cake: 7 Steps to Holiday Bliss is more than just a dessert; it’s an embodiment of holiday spirit that brings joy and togetherness. Its simple yet delightful flavors make it a favorite for everyone, whether you’re a seasoned baker or just starting. Easy to make, it requires minimal ingredients but yields maximum satisfaction, making it a go-to holiday recipe for many.
As you celebrate with friends and family, imagine the laughter and joy created around a cake that not only pleases the palate but also warms the heart. This holiday season, let the Merry Christmas Cake be a reminder of simpler times filled with love, joy, and gratitude. Bake it, share it, and most importantly, savor every delicious bite.
FAQs about Merry Christmas Cake: 7 Steps to Holiday Bliss
Can I make this cake in advance?
Yes, you can bake the cake a day or two ahead of time. Just store it in an airtight container to keep it fresh.
How should I store leftovers of the cake?
Keep any leftover cake in an airtight container at room temperature for a few days, or refrigerate for up to a week.
Can I freeze this cake?
Absolutely! Wrap well in plastic wrap and foil. It freezes well and can be thawed when you’re ready to enjoy.
What can I use instead of eggs?
For an egg substitute, you can use flaxseed meal mixed with water or unsweetened applesauce.
Is it possible to make this cake gluten-free?
Yes! You can use a gluten-free flour blend to make the Merry Christmas Cake gluten-free.
How can I keep the cake moist?
Be careful not to overbake the cake, as well as ensuring you’re using the correct amount of ingredients helps maintain moisture.
Can I change the frosting?
Certainly! Cream cheese frosting or ganache can be a fantastic alternative to the standard frosting.
How do I know when the cake is done?
Insert a toothpick in the center; if it comes out clean or with a few crumbs, your cake is ready!
Merry Christmas Cake
Ingrédients
Main Ingredients
- 2 cups all-purpose flour
- 1.5 cups sugar
- 1 cup unsalted butter softened
- 4 large eggs room temperature
- 1 cup milk room temperature
- 2 tsp baking powder
- 1 tsp vanilla extract
- 0.5 tsp salt
- 1 cup frosting for topping
- to taste red and green sprinkles for decoration
Instructions
Preparation
- Begin by gathering and pre-measuring all your ingredients for convenience.
- Preheat your oven to 350°F (175°C).
- Grease and flour two 9-inch round cake pans.
Mixing
- In a mixing bowl, cream together the unsalted butter and sugar until light and fluffy.
- Add the eggs one at a time, mixing well after each addition.
- Incorporate the milk and vanilla extract until the mixture is well combined.
- In another bowl, mix together the all-purpose flour, baking powder, and salt. Gradually add to the wet ingredients, stirring gently until combined, avoiding over-mixing.
Baking
- Pour the batter evenly into the prepared cake pans.
- Bake for 30-35 minutes, or until a toothpick inserted into the center comes out clean.
Cooling and Decorating
- Allow the cakes to cool in the pans for about 10 minutes before transferring to wire racks to cool completely.
- Once cooled, frost the cakes with your choice of frosting and decorate with red and green sprinkles.