

Table of Contents
Introduction to Homemade Butter Tarts
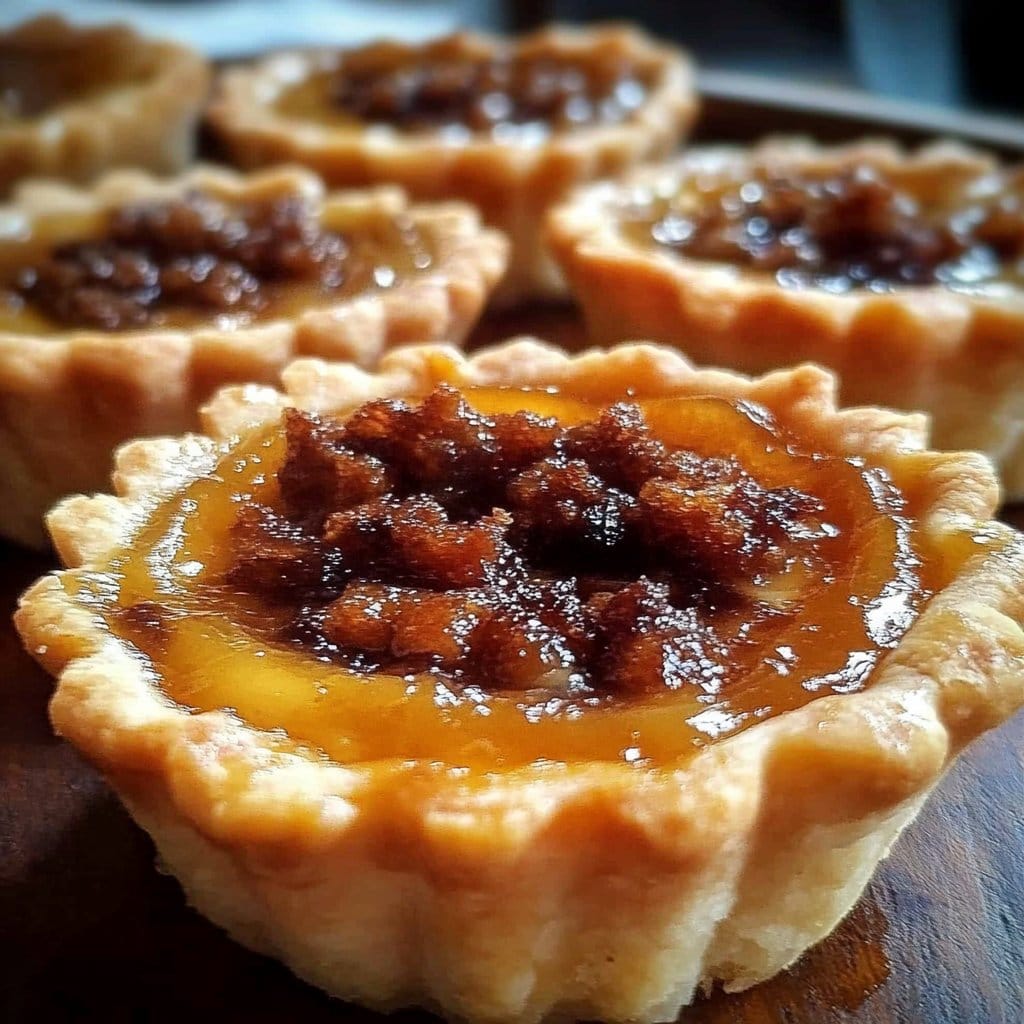
Have you ever craved a sweet, gooey treat that warms your heart and brings back fond memories? If so, then Homemade Butter Tarts may be just what you’re looking for. These delightful little pastries are a beloved staple in Canadian cuisine, and their rich, buttery filling has enchanted taste buds for generations. Imagine sinking your teeth into a crisp tart shell, giving way to a luscious, syrupy center that’s made even better with the optional addition of raisins or pecans. What truly makes Homemade Butter Tarts special is not just their wonderful flavor but also their ability to evoke emotions, making them perfect for any occasion.
Making Homemade Butter Tarts is easier than it seems! This recipe requires minimal ingredients yet results in a rich and satisfying dessert. The balance of sweetness from the brown sugar and corn syrup creates a perfect harmony with the buttery crust. The versatility of this treat allows you to personalize it according to your taste, whether you prefer it plain, with nuts, or with dried fruit. This adaptability is why many find it one of their favorite go-to desserts.
When looking to impress guests at a gathering or simply to enjoy with your family, Homemade Butter Tarts offer an inviting comfort. Their charming appearance, especially when baked to a golden perfection, can brighten up any table. Whether it’s a holiday dessert or a simple weeknight treat, these tarts have a way of bringing people together. Let’s dive deeper into why you should give this irresistible dessert a try!
Key Benefits of Homemade Butter Tarts
Why You’ll Love This Recipe
- Rich Flavor: The combination of brown sugar and corn syrup form a uniquely sweet and rich filling.
- Easy to Make: With simple ingredients, even beginners can whip these up.
- Customizable: Add raisins, nuts, or keep it classic to suit your taste.
- Perfect for Any Occasion: Ideal for holidays, celebrations, or an everyday treat.
- Make Ahead: These tarts can be prepared in advance and stored, making them great for planning.
What Makes It Stand Out
What sets Homemade Butter Tarts apart from other desserts is their historical significance and cultural relevance. They represent a slice of Canadian heritage, often passed down through generations. Their unique, gooey filling is a delightful contrast to the crisp tart shell, making every bite a true pleasure. You can also experiment with various fillings, which adds a personal touch to this traditional recipe.
Furthermore, the tarts can perfectly adapt to different dietary restrictions. Whether you’re accommodating a gluten-free friend or someone who prefers vegan recipes, there are numerous ways to customize the ingredients without sacrificing taste. This is another layer that differentiates Homemade Butter Tarts from other sweets.
Ingredients for Homemade Butter Tarts
Complete Ingredient List with Measurements
For the Crust:
- 1 cup all-purpose flour
- 1/4 cup unsalted butter, softened
- 1/4 cup granulated sugar
- 1/4 teaspoon salt
- 2 tablespoons cold water
For the Filling:
- 1/2 cup brown sugar
- 1/2 cup corn syrup
- 2 large eggs
- 1 teaspoon vanilla extract
- 1/2 cup raisins or pecans (optional)
Substitutes and Alternatives
If you’re gluten-sensitive, you can swap the all-purpose flour with a gluten-free flour blend. For those who are vegan, replacing eggs with ground flaxseed mixed with water can help create a great alternative. You might also consider using coconut oil instead of butter for a dairy-free version. These substitutions ensure everyone can enjoy the deliciousness of Homemade Butter Tarts!
How to Make Homemade Butter Tarts – Step-by-Step Directions
Step 1 – Prepare Ingredients
Begin by gathering all your ingredients and measuring them out. It’s a great way to ensure you have everything you need before you start mixing.
Step 2 – Cook the Base
In a mixing bowl, combine 1 cup of all-purpose flour, 1/4 cup softened unsalted butter, 1/4 cup granulated sugar, and 1/4 teaspoon salt. Use your fingers or a pastry cutter to mix the ingredients until they have a crumbly texture. Gradually add cold water, 2 tablespoons at a time, until the dough starts forming.
Step 3 – Roll Out the Dough
Transfer the dough onto a lightly floured surface. Using a rolling pin, roll the dough out until it’s about 1/8 inch thick. Cut out circles that are slightly larger than your muffin tin cups.
Step 4 – Fit the Crusts
Gently press each cut-out dough circle into the muffin tin. You’ll want to ensure each tart shell is evenly distributed and reaches the edges.
Step 5 – Prepare the Filling
In another mixing bowl, whisk together 1/2 cup brown sugar, 1/2 cup corn syrup, 2 large eggs, and 1 teaspoon vanilla extract until the mixture is smooth and well combined. This will create the rich filling that makes Homemade Butter Tarts truly special.
Step 6 – Add Raisins or Pecans
If desired, place a few raisins or pecans at the bottom of each tart crust. This optional step adds extra texture and a delightful flavor contrast to the sweet filling.
Step 7 – Fill the Tart Shells
Pour the filling mixture evenly into each prepared tart shell. Be careful not to overfill, as the mixture will puff up slightly while baking.
Step 8 – Bake in the Oven
Place the muffin tin in the preheated oven at 375°F (190°C). Bake for 20-25 minutes or until the filling is set and the tops are golden brown. The edges should be crispy while the center remains just a bit soft.
Step 9 – Cool Down
Once the tarts are out of the oven, allow them to cool in the tin for 10 minutes. Carefully remove the tarts and place them on a wire rack to cool completely.
Serving Suggestions for Homemade Butter Tarts
Best Occasions to Serve This Dish
Homemade Butter Tarts are perfect for a variety of occasions. Enjoy them as a sweet treat during the holiday season, and they make a fantastic addition to any family gathering or potluck. Their charming aesthetic and nostalgic flavor make them a hit at weddings and other celebrations.
What to Serve With It
Pair your tarts with a dollop of whipped cream or a scoop of vanilla ice cream for an indulgent dessert. They also go well with a cup of hot tea or coffee, making the perfect afternoon snack. You can even serve them alongside fresh fruit like berries for a lighter touch.
How to Store Homemade Butter Tarts Properly
Best Storage Practices
To keep your Homemade Butter Tarts fresh, store them in an airtight container at room temperature. They will remain good for about 2-3 days. If you live in a particularly warm climate, refrigeration might be necessary to prevent spoilage.
Reheating and Freezing Tips
If you have leftovers, you can freeze your Homemade Butter Tarts. Place them in a single layer in an airtight container and store them for up to 3 months. To reheat, simply take them out of the freezer and let them thaw in the refrigerator overnight. Then, warm them up in the oven at 350°F (175°C) for 10-15 minutes or until heated through.
Tips & Tricks for Homemade Butter Tarts
Mistakes to Avoid
1 – Overmixing the Dough: This will lead to tough crusts instead of flaky ones; mix just until combined.
2 – Not Chilling the Dough: If the dough gets too warm while rolling, it will become difficult to work with.
3 – Overfilling the Tarts: Avoid filling the shells too high to prevent overflow while baking.
4 – Baking at Too High a Temperature: This can lead to burnt edges while leaving the center undercooked. Stick to the recommended temperature.
5 – Skipping the Cooling: Allowing the tarts to cool ensures the filling sets properly.
Extra Tips for Better Results
Using cold butter helps to create a flakier crust, so make sure it’s well-chilled before use. For added flavor, consider using brown butter in your crust. Brush the edges of the tarts with an egg wash for a beautiful golden finish.
Recipe Variations of Homemade Butter Tarts
Creative Twists
You can experiment with various types of fillings to give Homemade Butter Tarts your personal touch. For a chocolate twist, add mini chocolate chips into the filling before baking. If you’d like a citrusy flavor, consider adding the zest of an orange or lemon into the filling mixture for a refreshing variation.
Dietary Adjustments
To make a vegan version, use almond or oat milk and a flax egg instead of the regular eggs. For gluten-free options, there are gluten-free flour blends available that work well in crusts. You can also substitute the corn syrup with maple syrup or agave for a unique flavor.
Conclusion about Homemade Butter Tarts
In conclusion, Homemade Butter Tarts are a delightful treat that everyone should try at least once! Their simplicity and rich flavors make this recipe not only accessible but also rewarding for those who whip them up. With the option to customize your tarts, you can make them a reflection of your own tastes and preferences, whether you choose to keep them traditional or play them up with creative variations. Their nostalgic quality makes them perfect for any occasion, allowing you to share a piece of Canada’s culinary tradition. So, why wait? Gather your ingredients today and indulge in the deliciousness of Homemade Butter Tarts!
FAQs about Homemade Butter Tarts
How do I store Homemade Butter Tarts?
Store your Homemade Butter Tarts in an airtight container at room temperature for up to 2-3 days, or refrigerate if needed.
Can I make Homemade Butter Tarts ahead of time?
Yes, you can prepare the tarts a day in advance. They can be stored in the fridge before baking and then baked just before serving for best results.
What can I substitute for corn syrup in the filling?
You can replace corn syrup with maple syrup or agave syrup for a different flavor while maintaining the same consistency.
Can I make the crust gluten-free?
Absolutely! Use a gluten-free flour blend for the crust to make your Homemade Butter Tarts suitable for those with gluten sensitivities.
What other ingredients can I add to the filling?
Consider adding chopped nuts, dried fruit, or even chocolate chips to personalize your filling.
How long can I freeze Homemade Butter Tarts?
You can freeze your Homemade Butter Tarts for up to 3 months. Store them in an airtight container for best quality.
Should Homemade Butter Tarts be served warm or cold?
These tarts can be enjoyed either warm or at room temperature, depending on personal preference.
Can I use a store-bought crust for this recipe?
Yes, if you are short on time, a store-bought tart crust can offer convenience without sacrificing taste.
What’s the best way to reheat leftover tarts?
Let the tarts thaw overnight in the refrigerator if frozen, and then warm them in the oven at 350°F (175°C) for about 10-15 minutes.
Is it necessary to pre-bake the crust?
No, in this recipe, you do not need to pre-bake the crust as the filling will cook through while the tarts are baking.

Homemade Butter Tarts
Ingrédients
For the Crust
- 1 cup all-purpose flour Can substitute with gluten-free flour blend.
- 1/4 cup unsalted butter, softened Use cold butter for a flakier crust.
- 1/4 cup granulated sugar
- 1/4 teaspoon salt
- 2 tablespoons cold water
For the Filling
- 1/2 cup brown sugar
- 1/2 cup corn syrup Can substitute with maple syrup or agave.
- 2 large eggs Can substitute with ground flaxseed mixed with water for vegan.
- 1 teaspoon vanilla extract
- 1/2 cup raisins or pecans Optional for additional texture.
Instructions
Preparation
- Gather all ingredients and measure them out.
- In a mixing bowl, combine flour, butter, sugar, and salt. Mix until crumbly.
- Gradually add cold water until the dough starts forming.
- Roll the dough out to 1/8 inch thick and cut out circles larger than muffin tin cups.
- Press each dough circle into the muffin tin.
Filling
- Whisk together brown sugar, corn syrup, eggs, and vanilla until smooth.
- If desired, place raisins or pecans at the bottom of each tart crust.
- Pour the filling mixture into each tart shell, careful not to overfill.
Baking
- Bake in a preheated oven at 375°F (190°C) for 20-25 minutes or until set and golden brown.
- Allow to cool in the tin for 10 minutes before transferring to a wire rack.