
Table of Contents
Introduction to Choc Ripple Cake
Have you ever found yourself craving a dessert that is both indulgent and quick to prepare? The Choc Ripple Cake is a sensational option that offers just that. This dessert is not only delicious but also incredibly easy to make. With its silky layers of whipped cream and chocolate ripple biscuits complemented by a delightful chocolate garnish, this cake is bound to impress both family and friends. Imagine sinking your teeth into a rich, creamy dessert that nobody can resist—because that’s exactly what the Choc Ripple Cake delivers!
What sets this recipe apart from other cakes? It requires minimal baking skills and can be put together in just a few simple steps. Whether you’re planning a birthday celebration, a holiday gathering, or a simple family dinner, this cake adapts perfectly to any occasion. It’s forgiving and flexible, enabling you to customize flavors or presentation while always tasting fantastic. The combination of the crunchy biscuits with the soft cream texture creates a delightful contrast—one bite and you’ll want more!
Plus, let’s not forget how it looks! Layered and garnished with chocolate shavings, the Choc Ripple Cake is not only a treat for the palate but also a feast for the eyes. It’s the perfect centerpiece for any dessert table. So, if you’re ready to elevate your dessert game and surprise your guests with something spectacular, keep reading to discover how to make this delightful Choc Ripple Cake!
Key Benefits of Choc Ripple Cake
Why You’ll Love This Recipe
- Incredibly Simple: This recipe doesn’t require any baking or complex techniques, making it approachable for everyone.
- Decadent Flavor: The combination of cream and chocolate biscuits offers a rich and satisfying dessert experience.
- Versatile Customizations: You can easily modify it to suit dietary restrictions or personal tastes.
- Impressive Presentation: With minimal effort, you can create a stunning dessert that looks professional.
- Make-Ahead Friendly: Best made a day in advance, it allows the flavors to meld while saving you time on the day of the event.
- Kid-Friendly Treat: Children love the creamy, chocolatey goodness, making it an excellent choice for family gatherings.
What Makes It Stand Out
The Choc Ripple Cake stands out due to its unique blend of texture and flavor. The soft cream melds beautifully with the chocolate ripple biscuits, creating a harmonious relationship that feels luxurious yet homely. This cake also holds a special place in many homes as a nostalgic dessert, often associated with childhood memories of family gatherings and celebrations.
Customization is another standout feature of this recipe. You can easily swap ingredients based on your preferences or dietary restrictions without losing its core essence. For instance, opt for dairy-free cream for your vegan friends or incorporate different flavors like coffee or berries to make it your own. This adaptability makes the Choc Ripple Cake an excellent choice for anyone looking to impress with a fuss-free yet delightful dessert.
Ingredients for Choc Ripple Cake
Complete Ingredient List with Measurements
- 200g chocolate ripple biscuits
- 1 cup milk
- 500ml thickened cream
- 1/2 cup icing sugar
- 1 teaspoon vanilla extract
- Chocolate shavings (for garnish)
Substitutes and Alternatives
If you’re looking for suitable substitutes for allergies or dietary needs, there are several options available for this recipe. For a gluten-free version, look for gluten-free chocolate biscuits that mimic the texture and flavor of traditional chocolate ripple biscuits.
When it comes to the cream, consider using coconut cream as a dairy-free alternative; it provides a similar texture while adding a unique flavor twist. For those who may want a less sweet version, reduce the amount of icing sugar or use a sugar substitute suitable for baking, ensuring it meets your dietary needs.
How to Make Choc Ripple Cake – Step-by-Step Directions
Step 1 – Prepare Ingredients
Start by assembling all your ingredients. Measure out 200g of chocolate ripple biscuits and set aside 1 cup of milk in a shallow bowl. This will be used to dip the biscuits. Ensure that your heavy cream is cold; this will help in achieving the desired whipped texture.
Step 2 – Cook the Base
Take each chocolate ripple biscuit and dip it briefly into the milk. Be careful not to soak them; they should be damp but not falling apart. Arrange a single layer of these dipped biscuits in a rectangular dish, ensuring they are close together for the best results.
Step 3 – Whip the Cream
In a mixing bowl, add the cold thickened cream, icing sugar, and vanilla extract. Use an electric mixer to whip the mixture. Aim for soft peaks, which indicates that the cream has reached the right texture. This process usually takes about 3-5 minutes.
Step 4 – Layer with Cream
Once your cream is whipped, take a generous portion and spread it over the layer of biscuits. Use a spatula to create an even layer, ensuring every biscuit is nicely covered with the creamy mixture.
Step 5 – Repeat Layers
Continue the process by adding another layer of dipped biscuits on top of the whipped cream. Follow this by another layer of the cream mixture. Repeat these layers until all ingredients are utilized, ending with a layer of cream on top.
Step 6 – Refrigerate
Cover your dish with plastic wrap or a lid. Refrigerate the assembled Choc Ripple Cake for at least 4 hours, but for best results, leave it overnight. This allows the biscuits to soften and the flavors to meld together beautifully.
Step 7 – Work on the Presentation
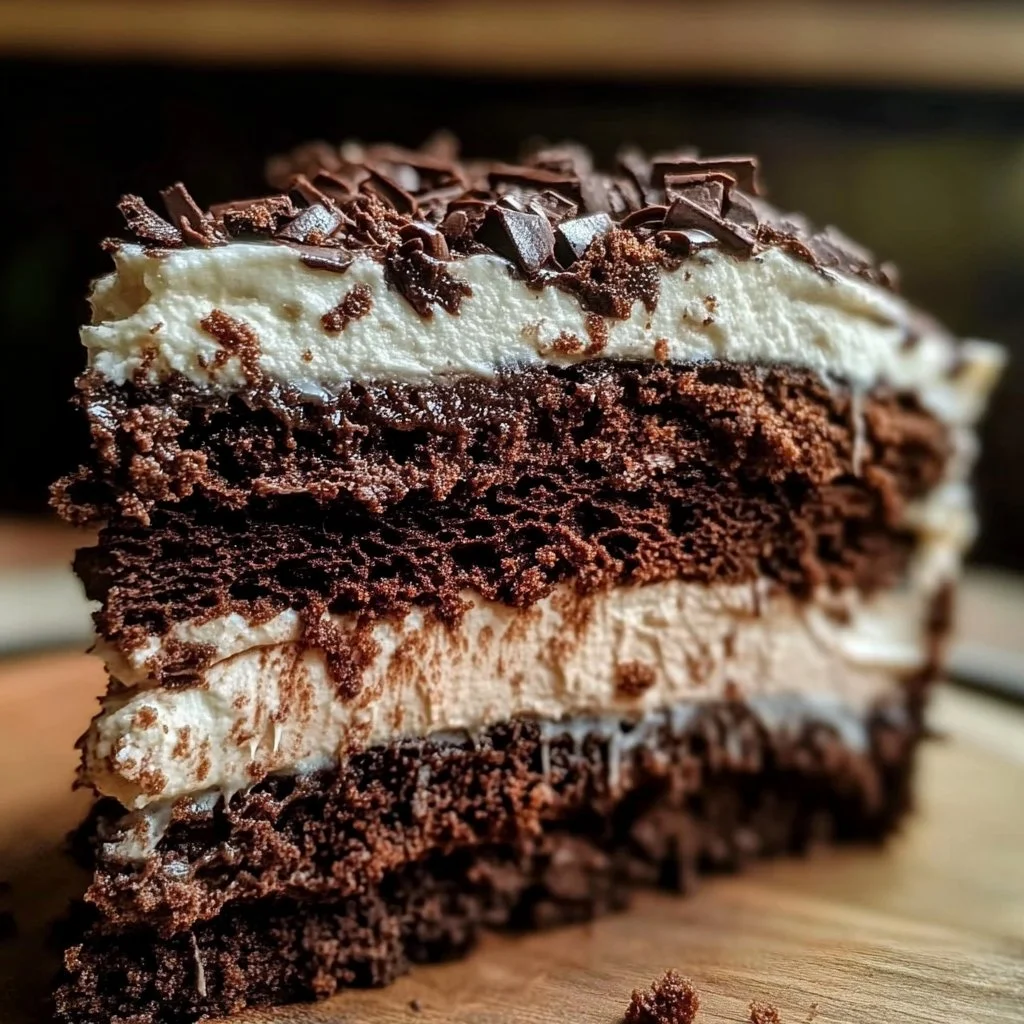
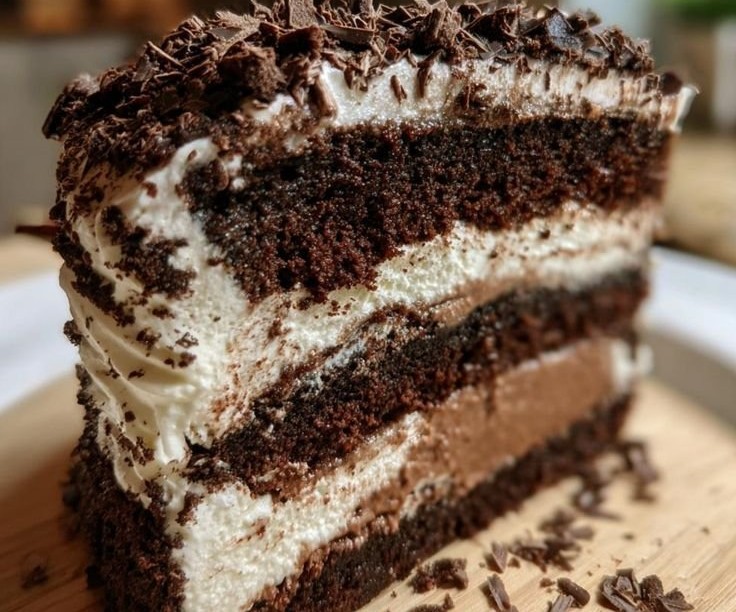
Right before serving, generously sprinkle chocolate shavings on top of your chilled cake. This adds a touch of elegance and enhances the chocolate flavor, making it not only taste good but also look fabulous.
Step 8 – Cut and Serve
When ready to serve, use a sharp knife to cut neat slices. The cake should hold its shape beautifully, showcasing the layers of cream and biscuits.
Serving Suggestions for Choc Ripple Cake
Best Occasions to Serve This Dish
The Choc Ripple Cake shines at various events! It’s an exceptional choice for birthdays, where its rich flavor can delight guests of all ages. Holiday gatherings also benefit from its luxurious presence. Imagine serving this decadent dessert during festive dinners—everyone will be raving about it!
For casual gatherings, this cake serves as a perfect sweet treat. Whether it’s a backyard barbecue or a picnic, its easy transport and serve nature make it an ideal companion.
What to Serve With It
Pair the Choc Ripple Cake with fresh berries or fruit coulis for an added touch of freshness. A scoop of vanilla ice cream or a dollop of whipped cream can enhance the indulgence. To complement the chocolate flavors, consider serving it with a rich coffee or a glass of dessert wine.
How to Store Choc Ripple Cake Properly
Best Storage Practices
The Choc Ripple Cake can be stored in the refrigerator for up to five days. Be sure to keep it covered with plastic wrap to prevent it from absorbing any fridge odors. If you have leftovers, they should be placed in an airtight container to maintain their freshness.
Reheating and Freezing Tips
This cake is best enjoyed chilled and doesn’t require reheating. If you prefer to make it ahead of time, freezing is an option. Wrap individual slices in plastic wrap and store in an airtight container for up to a month. When ready to enjoy, simply thaw them in the refrigerator overnight.
Tips & Tricks for Choc Ripple Cake
Mistakes to Avoid
- Soaking the Biscuits Too Long: Dipping the biscuits should be a brief process. Over-soaking can cause them to fall apart.
- Using Warm Ingredients: Ensure the cream is cold; warm ingredients will not whip to the proper texture.
- Skipping Refrigeration Time: Allow the cake to set in the fridge. Not doing so will result in a less cohesive dessert.
- Uneven Layers: Be mindful when layering. Uneven layers can lead to an unbalanced cake shape.
- Over-Whipping the Cream: Whipping beyond soft peaks can result in a grainy texture. Stop once you’ve reached the right consistency.
- Not Garnishing: Don’t skip the chocolate shavings; they not only enhance the flavor but also the appearance.
Extra Tips for Better Results
To add a twist to the traditional flavors, consider adding espresso powder to the cream for a mocha effect. For an added crunch, layer in some crushed nuts between the biscuit layers. Use a wide, shallow dish to create a more elegant presentation, allowing for finer slices that showcase your beautiful layers.
Recipe Variations of Choc Ripple Cake
Creative Twists
- Berry Choc Ripple Cake: Incorporate fresh berries, such as raspberries or strawberries, between the layers for added fruity freshness and color.
- Mint Chocolate Ripple Cake: Add a few drops of peppermint extract to the whipped cream for a cool minty flavor that pairs beautifully with chocolate.
- Coffee Choc Ripple Cake: Mix instant coffee powder into the cream for a coffee-flavored cake. It’s a delightful pick-me-up!
- Nutty Delight Choc Ripple Cake: Layer in toasted nuts, such as pistachios or almonds, for added texture and a nutty flavor that elevates the entire dessert.
Dietary Adjustments
For a vegan version, swap out the thickened cream for coconut cream or a plant-based heavy cream alternative. Use dairy-free chocolate biscuits and a sugar substitute if desired. For gluten-free options, simply select gluten-free biscuits that still capture that delicious chocolate flavor.
Conclusion about Choc Ripple Cake
The Choc Ripple Cake is a timeless classic that embodies the essence of effortless indulgence. With its simple preparation and lavish flavors, it makes every occasion feel special. Whether you’re celebrating a birthday or simply enjoying a quiet night in, this cake provides satisfaction with minimal fuss.
Its versatile nature allows for endless customization—feel free to explore numerous flavors and variations, making it your own. As you layer each biscuit and cream, you’re not just making a dessert; you’re creating a delightful experience that friends and family will cherish. So go ahead, try your hand at this Choc Ripple Cake recipe, and let the sweetness bring joy to your table!
FAQs about Choc Ripple Cake
Can I make Choc Ripple Cake ahead of time?
Absolutely! In fact, it’s recommended to make the cake at least a few hours in advance, or even the day before, to allow the flavors to meld.
How long can I store Choc Ripple Cake?
You can store the Choc Ripple Cake in the refrigerator for up to five days. Just make sure it is covered properly.
Can I freeze Choc Ripple Cake?
Yes, you can freeze individual slices for up to a month. Wrap them tightly in plastic wrap and store in an airtight container.
What can I use instead of chocolate ripple biscuits?
You can use any chocolate-flavored biscuits or cookies. Gluten-free chocolate cookies work well for a gluten-free option.
How should I serve Choc Ripple Cake?
Serve chilled, and consider garnishing with chocolate shavings or fresh fruit for an added touch of elegance.
Can I use a different type of cream?
Yes, you can use dairy-free cream alternatives such as coconut cream for a vegan version.
Can I add flavors to the cream?
Definitely! Feel free to incorporate vanilla, coffee, or mint extracts to enhance the flavor of the whipped cream.
What is the best way to cut the Choc Ripple Cake?
Use a sharp knife and clean it between cuts to ensure each slice is neat and maintains its layering.
Is this recipe kid-friendly?
Yes! Kids will love the creamy texture and the chocolatey flavor, making it a hit for family gatherings.
What if I don’t have icing sugar?
You can make your own icing sugar by blending granulated sugar until it’s finely powdered if needed.
Choc Ripple Cake
Ingrédients
Main Ingredients
- 200 g chocolate ripple biscuits Look for gluten-free alternatives if needed.
- 1 cup milk Used for dipping the biscuits.
- 500 ml thickened cream Ensure it is cold for whipping.
- 1/2 cup icing sugar Can be reduced for a less sweet version.
- 1 teaspoon vanilla extract Optional flavor enhancement.
- Chocolate shavings For garnish.
Instructions
Preparation
- Start by assembling all your ingredients. Measure out 200g of chocolate ripple biscuits and set aside 1 cup of milk in a shallow bowl.
- Ensure that your heavy cream is cold; this will help in achieving the desired whipped texture.
Assembly
- Dip each chocolate ripple biscuit briefly into the milk. Arrange a single layer of these dipped biscuits in a rectangular dish.
- In a mixing bowl, whip the cold thickened cream, icing sugar, and vanilla extract using an electric mixer until soft peaks form, about 3-5 minutes.
- Spread a generous portion of the whipped cream over the layer of biscuits. Repeat the layering process until all ingredients are used, ending with a layer of cream on top.
Chilling
- Cover the dish with plastic wrap or a lid and refrigerate for at least 4 hours, or overnight for best results.
Garnishing and Serving
- Sprinkle chocolate shavings on top right before serving.
- Use a sharp knife to cut neat slices and serve chilled.