
Table of Contents
There’s something incredibly comforting about warm, cheesy garlic breadsticks that just feels like home. When you take that first bite, the cheesy goodness paired with the buttery, garlicky flavor makes your taste buds sing with joy. Have you ever wished to create that delicious experience from the comfort of your own kitchen? With the recipe titled “Indulge in Cheesy Garlic Breadsticks: Easy Recipe for Everyone,” you can bring that delightful taste to your table effortlessly. This homemade recipe is simple enough for anyone to prepare, yet it delivers a satisfying treat that family and friends will adore.
The delightful aroma of fresh garlic and melting cheese wafting through your home as these breadsticks bake is practically irresistible. Imagine enjoying a warm breadstick straight from the oven, oozing with cheese and buttery garlic, while the stress of the day melts away. This recipe is special not just for its taste but also for the simplicity that allows even novice cooks to impress their loved ones. Whether it’s a family dinner, a cozy movie night, or a party, these cheesy garlic breadsticks make any occasion feel extra special.
This easy recipe captures the essence of comfort food while being versatile enough to tailor to personal tastes. You don’t need to be a culinary whiz to indulge in this delightful homemade treat. With just a few ingredients and straightforward steps, you’ll create a dish that invites everyone to gather around the table. So, let’s dive into the world of cheesy garlic goodness and discover why this recipe is a must-try for every household.
Key Benefits of Indulge in Cheesy Garlic Breadsticks: Easy Recipe for Everyone
Why You’ll Love This Recipe
- Incredible Flavor: The combination of garlic, melted cheese, and buttery goodness is simply mouthwatering.
- Simplicity: Made with common kitchen ingredients, this recipe is straightforward and easy to follow.
- Versatile: Customize with your favorite cheeses or herbs to suit your preferences.
- Family Appeal: Kids and adults alike love cheesy breadsticks, making them a crowd-pleaser for any gathering.
- Perfect for Any Meal: These breadsticks can accompany a meal, stand alone as a snack, or be served at parties.
What Makes It Stand Out
This recipe stands out due to its simplicity and the delightful outcome. While many breadstick recipes can be daunting, this approach ensures that even the least experienced cooks can achieve stellar results. You can whip them up for a casual weekday dinner or dress them up for a special occasion.
Moreover, the option to customize toppings makes it even more appealing. Whether you prefer extra herbs, different cheese combinations, or a sprinkle of red pepper flakes for a kick, the possibilities are endless. You can even use these breadsticks as a centerpiece at gatherings, impressing guests with minimal effort.
Ingredients for Indulge in Cheesy Garlic Breadsticks: Easy Recipe for Everyone
Complete Ingredient List with Measurements
- 1/2 cup warm water: This helps to activate the yeast.
- 1/4 cup warm water: Additional water to balance the dough’s consistency.
- 1 tablespoon granulated sugar: This feeds the yeast, aiding in the rising process.
- 1 packet active dry yeast (2 1/4 teaspoons): The key ingredient that makes your breadsticks rise.
- 2 tablespoons olive oil: Adds flavor and moisture to the dough.
- 1 teaspoon salt: Enhances the overall flavor.
- 1 teaspoon white vinegar: Helps to strengthen the dough and improve texture.
- 3 cups bread flour or all-purpose flour: Base for the dough, providing structure.
- 1/4 cup salted butter: For spreading on the breadsticks for added richness.
- 3 cloves fresh garlic, minced: The star flavor that makes these breadsticks irresistible.
- 1/2 cup grated Parmesan cheese: Adds a salty, nutty flavor.
- 1 cup shredded mozzarella cheese: Melts beautifully, creating that gooey texture we all love.
Substitutes and Alternatives
Not every kitchen has the same ingredients, and that’s perfectly okay. If you’re out of bread flour, all-purpose flour works just fine. Both options yield delicious results, though bread flour may give a slightly chewier texture.
For a dairy-free version, try using olive oil instead of butter and vegan cheese in place of mozzarella and Parmesan. If you have dietary restrictions regarding gluten, there are great gluten-free flour blends available on the market that can stand in for all-purpose or bread flour.
If you find you’re out of fresh garlic, using garlic powder can work in a pinch! Generally, 1/8 teaspoon of garlic powder is equivalent to one clove of garlic. You can also experiment with garlic-infused oil for a different flavor profile.
How to Make Indulge in Cheesy Garlic Breadsticks: Easy Recipe for Everyone – Step-by-Step Directions
Step 1 – Prepare Ingredients
Gather all the ingredients on your kitchen counter. This makes the preparation process more efficient and organized.
Step 2 – Activate the Yeast
In a large bowl, combine 1/2 cup of warm water with 1 tablespoon of sugar and 1 packet of active dry yeast. Stir gently and let it rest for about 5 minutes until it becomes frothy. This is the key step to ensuring your breadsticks rise properly.
Step 3 – Combine Remaining Ingredients
Add the remaining 1/4 cup of warm water, 2 tablespoons of olive oil, 1 teaspoon of salt, and 1 teaspoon of white vinegar into the activated yeast mixture. Stir until everything is well mixed.
Step 4 – Incorporate the Flour
Gradually add 3 cups of bread flour or all-purpose flour into the mixture. Begin mixing with a spoon, then switch to kneading with your hands after a dough forms. Knead until the dough is smooth and elastic, which should take about 5–7 minutes.
Step 5 – Let the Dough Rise
Cover the bowl with a clean cloth and leave it in a warm place for about one hour or until the dough has doubled in size. This rising phase gives the breadsticks their soft texture.
Step 6 – Preheat the Oven
Preheat your oven to 475°F (245°C). At this point, you can also place a pizza stone or an upside-down cookie sheet in the oven to heat up.
Step 7 – Shape the Dough
Once the dough has risen, punch it down to release the air. Spread it out onto a piece of parchment paper, shaping it into a rectangle about 1/3 inch thick.
Step 8 – Add the Garlic Butter
In a small bowl, melt 1/4 cup of salted butter and mix in the minced garlic. Spread this savory mixture evenly over the dough, ensuring every inch is covered with flavor.
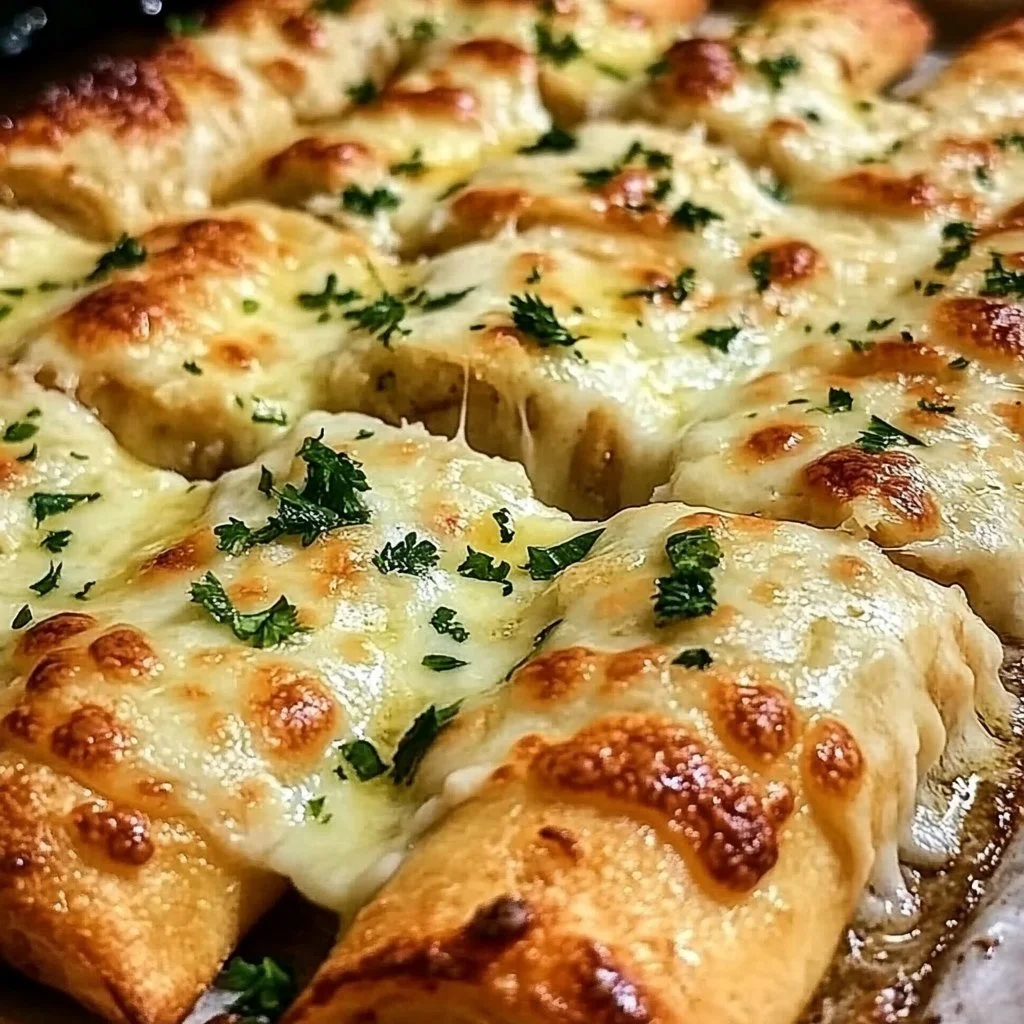
Step 9 – Cheese It Up
Generously sprinkle the grated Parmesan and shredded mozzarella cheese over the top of the buttered dough. Feel free to add more if you like it extra cheesy!
Step 10 – Bake the Breadsticks
Carefully transfer the dough (still on parchment) onto your preheated pizza stone or baking sheet. Bake for 8–12 minutes, or until the breadsticks turn golden brown and the cheese is bubbly.
Step 11 – Slice and Serve
Once baked, let them cool for a few minutes before slicing into individual breadsticks. Serve warm and enjoy every bite!
Serving Suggestions for Indulge in Cheesy Garlic Breadsticks: Easy Recipe for Everyone
Best Occasions to Serve This Dish
These irresistible cheesy garlic breadsticks are perfect for any gathering. Serve them as an appetizer during family dinners or holidays, and watch everyone reach for seconds. They also shine at casual get-togethers, movie nights, or game day parties.
Pair these breadsticks with a bowl of marinara sauce for dipping—it enhances the garlic flavor while adding tanginess. You can also incorporate them into Italian-themed meals, offering a delightful complement to pasta dishes or salads.
What to Serve With It
- Marinara Sauce: A classic dipping sauce that pairs wonderfully with cheesy breadsticks.
- Soup: These breadsticks are fantastic alongside tomato soup or creamy potato soup.
- Salads: Add a refreshing garden salad to balance out the richness.
- Wine: A light white wine, like Pinot Grigio, complements the flavors beautifully.
How to Store Indulge in Cheesy Garlic Breadsticks: Easy Recipe for Everyone Properly
Best Storage Practices
To keep your cheesy garlic breadsticks fresh, store them in an airtight container at room temperature for up to 3 days. If you want to keep them longer, consider refrigerating them, where they can last about a week.
Make sure the breadsticks are fully cooled before storing to prevent moisture buildup that could make them soggy.
Reheating and Freezing Tips
When you’re ready to enjoy the leftovers, preheat your oven to 350°F (175°C) and bake the breadsticks for about 5-10 minutes to warm them up and restore their crispiness. If you’re freezing them, let them cool completely before wrapping them tightly in plastic wrap and placing them in a freezer-safe bag. They can last up to 3 months in the freezer.
Tips & Tricks for Indulge in Cheesy Garlic Breadsticks: Easy Recipe for Everyone
Mistakes to Avoid
- Using Cold Water: Make sure your water is warm, not hot, to avoid killing the yeast.
- Skipping the Rising Time: Don’t rush the dough; letting it rise properly is essential for fluffy breadsticks.
- Overmixing Dough: Knead until just smooth; overworking the dough could make breadsticks tough.
- Not Preheating the Oven: A hot oven is necessary for achieving that perfect golden crust.
- Neglecting to Use Parchment Paper: This step helps prevent sticking and allows for easy transfer to the oven.
Extra Tips for Better Results
For a richer flavor, consider adding herbs like oregano or basil into the butter mixture before spreading it on the dough. Drizzling a little olive oil on top before baking can enhance the breadsticks’ crispy texture, adding richness.
Experiment with different types of cheese for added flavor; gouda or cheddar can add delightful nuances. Serving the breadsticks with fresh parsley or basil for garnish gives them a lovely presentation!
Recipe Variations of Indulge in Cheesy Garlic Breadsticks: Easy Recipe for Everyone
Creative Twists
- Cheesy Pesto Breadsticks: Substitute the garlic butter with pesto for a fresh herbal twist.
- Stuffed Breadsticks: Add pepperoni or vegetables inside the dough before baking for a twist that’s like a pizza.
- Herbed Garlic Butter: Mix in various herbs like thyme or rosemary for an aromatic addition that elevates the flavor profile.
Dietary Adjustments
For a vegan version, swap the butter with vegan alternatives and use vegan cheese to ensure everyone can enjoy this indulgent treat. If you’re looking for gluten-free options, use a gluten-free flour blend and check for gluten-free yeast to accommodate dietary needs.
Conclusion about Indulge in Cheesy Garlic Breadsticks: Easy Recipe for Everyone
In conclusion, the indulgence of cheesy garlic breadsticks cannot be overstated. This recipe is a delightful blend of simplicity and flavor, making it accessible for everyone, regardless of cooking expertise. With the ability to customize these breadsticks to fit any occasion, they promise satisfaction whether it’s a family dinner or a festive gathering. As they bake, your home will fill with an enticing aroma, creating an inviting atmosphere that beckons everyone to the table. Try it out—the joy of making your own cheesy garlic breadsticks is a rewarding experience that brings people together, and your loved ones will thank you for it!
FAQs about Indulge in Cheesy Garlic Breadsticks: Easy Recipe for Everyone
Can I prepare it ahead of time?
Yes, you can prepare the dough ahead of time. Just let it rise, then punch it down and refrigerate it. When you’re ready to bake, allow it to come to room temperature before shaping and baking.
Can I freeze it?
Definitely! Once the breadsticks are baked and cooled, wrap them tightly and store them in the freezer for up to 3 months. Thaw and reheat before serving for the best texture.
How long does it last?
When stored properly in an airtight container, cooked breadsticks will last for up to 3 days at room temperature or up to a week in the fridge.
What are the best substitutions?
If you’re out of any specific ingredient, feel free to swap bread flour for all-purpose flour, and use garlic powder if fresh garlic isn’t available.
Is this recipe family-friendly?
Absolutely! Kids love cheesy garlic breadsticks, and it’s a fun family activity to make them together.
Can I make these breadsticks spicy?
Yes! You can sprinkle crushed red pepper flakes over the top before baking for a kick of heat.
What type of cheese should I use?
While Parmesan and mozzarella are traditional, feel free to experiment with your favorites like cheddar or feta for a unique twist.
How do I ensure my dough rises properly?
Make sure your yeast is active and that the water is warm—between 100°F to 115°F. A warm, draft-free place is ideal for rising dough.
Can I reshape the breadsticks after they rise?
Yes, if you want different shapes or sizes, gently knock the air out of the dough and reshape it before baking.
What is the best way to serve these breadsticks?
Serve warm with marinara sauce on the side for a perfect dipping experience!
Cheesy Garlic Breadsticks
Ingrédients
Dough Ingredients
- 1/2 cup warm water Helps to activate the yeast.
- 1/4 cup warm water Additional water to balance the dough’s consistency.
- 1 tablespoon granulated sugar Feeds the yeast, aiding in the rising process.
- 1 packet active dry yeast 2 1/4 teaspoons, key ingredient for rising.
- 2 tablespoons olive oil Adds flavor and moisture.
- 1 teaspoon salt Enhances overall flavor.
- 1 teaspoon white vinegar Helps to strengthen the dough.
- 3 cups bread flour or all-purpose flour Base for the dough.
Topping Ingredients
- 1/4 cup salted butter For spreading on the breadsticks.
- 3 cloves fresh garlic, minced The star flavor.
- 1/2 cup grated Parmesan cheese Adds a salty, nutty flavor.
- 1 cup shredded mozzarella cheese Melts beautifully.
Instructions
Preparation
- Gather all the ingredients on your kitchen counter.
- In a large bowl, combine 1/2 cup of warm water, 1 tablespoon of sugar, and 1 packet of active dry yeast. Stir gently and let it rest for about 5 minutes until frothy.
- Add the remaining 1/4 cup of warm water, 2 tablespoons of olive oil, 1 teaspoon of salt, and 1 teaspoon of white vinegar into the activated yeast mixture. Stir until well mixed.
- Gradually add 3 cups of bread flour or all-purpose flour into the mixture. Begin mixing with a spoon, then knead with your hands until smooth and elastic (5-7 minutes).
- Cover the bowl with a clean cloth and leave it in a warm place for about one hour or until the dough has doubled in size.
Baking
- Preheat your oven to 475°F (245°C).
- Once the dough has risen, punch it down to release the air. Spread it onto parchment paper, shaping it into a rectangle about 1/3 inch thick.
- In a small bowl, melt 1/4 cup of salted butter and mix in the minced garlic. Spread this mixture evenly over the dough.
- Generously sprinkle the grated Parmesan and shredded mozzarella cheese over the top. Add more cheese if desired.
- Transfer the dough onto your preheated pizza stone or baking sheet. Bake for 8-12 minutes, or until golden brown and bubbly.
- Let them cool for a few minutes before slicing into individual breadsticks. Serve warm.