

Table of Contents
Have you ever wanted to show off your baking skills while also having a bit of fun? If so, you’re going to love making Bloody Red Velvet Cake Pops! These delightful little bites are perfect for any occasion, especially around Halloween or themed parties. Who wouldn’t want to impress their friends and family with these striking and delicious treats?
In this article, I’ll guide you through everything you need to know about creating these scrumptious cake pops. We’ll explore the key benefits of this recipe, the ingredients required, a step-by-step guide on how to make them, and more. It’s a festive treat that looks fantastic and is incredibly easy to whip up! So, are you ready to dive into the world of Bloody Red Velvet Cake Pops? Let’s get started!
Key Benefits of Bloody Red Velvet Cake Pops
Why You’ll Love This Recipe
There are many reasons to fall in love with Bloody Red Velvet Cake Pops. Here are some key benefits:
- Delicious Flavor: The rich, velvety taste of red velvet paired with cream cheese frosting is irresistible.
- Easy to Make: With just a few steps, you can create these show-stopping desserts.
- Quick Preparation: The hands-on preparation takes under an hour, making it a time-efficient treat.
- Family-Friendly: These cake pops are fun to make, especially with kids. They can get creative with decorating!
- Customizable: You can personalize them with different colors and toppings to suit any occasion.
What Makes It Stand Out
What sets Bloody Red Velvet Cake Pops apart from regular cake pops? It’s all in the presentation and theme! The red color signifies boldness, making it perfect for Halloween or spooky-themed gatherings. Not only do these cake pops taste delicious, but they also add a festive touch to your dessert table.
Moreover, these cake pops can easily be customized. Want to switch up the flavors? Feel free to explore other cake varieties or frosting flavors! The flexibility of this recipe allows you to make it your own.
Ingredients for Bloody Red Velvet Cake Pops
Complete Ingredient List
To whip up these fun treats, you’ll need the following ingredients:
- Red Velvet Cake (prepared)
- Cream Cheese Frosting
- White Chocolate (for coating)
- Red Food Coloring
- Lollipop Sticks
- Sprinkles (for decoration, optional)
Substitutes and Alternatives
Here are some alternatives you can consider if you have dietary restrictions or preferences:
- Gluten-Free Cake: Use gluten-free flour in your red velvet cake recipe.
- Dairy-Free Frosting: Replace cream cheese frosting with a vegan version.
- Dark Chocolate: If you prefer, you can use dark chocolate for coating instead of white chocolate.
- Natural Coloring: Consider beet juice or other natural food dyes instead of red food coloring for a more organic approach.
How to Make Bloody Red Velvet Cake Pops – Step-by-Step Directions
Making Bloody Red Velvet Cake Pops is easier than you might think! Follow these straightforward steps to create your own delightful treats.
Step 1 – Prep Your Workspace and Ingredients
Start by gathering all your ingredients and tools. This includes your red velvet cake, cream cheese frosting, white chocolate, lollipop sticks, and sprinkles. Make sure your workspace is clean and organized for a seamless baking experience.
Step 2 – Crumble the Red Velvet Cake
In a large mixing bowl, crumble your prepared red velvet cake. Aim for small, fine pieces to ensure an even mix with the frosting.
Step 3 – Mix in the Cream Cheese Frosting
Add the cream cheese frosting to the crumbled cake. Use your hands or a spatula to mix everything until it’s well combined. The mixture should be moist but not overly sticky, allowing it to hold its shape when formed.
Step 4 – Shape Into Balls
Once your mixture is well combined, it’s time to shape it into small balls. Take a tablespoon of the mixture, roll it between your palms, and create evenly-sized balls. Place them on a baking sheet lined with parchment paper.
Step 5 – Insert Lollipop Sticks
Insert a lollipop stick into each cake ball. Make sure to push them in about halfway to ensure they stand upright later.
Step 6 – Freeze to Set
Place your baking sheet with the cake pops in the freezer for about 30 minutes. This will help them set and hold their shape when you dip them.
Step 7 – Melt the White Chocolate
While your pops are setting, melt the white chocolate in a microwave-safe bowl. Heat it in 30-second intervals, stirring in between, until fully melted and smooth.
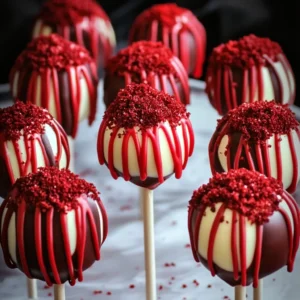
Step 8 – Add Red Food Coloring
Once the white chocolate is melted, mix in the red food coloring until you achieve your desired ‘bloody’ look. This will give your cake pops a unique and fun appearance.
Step 9 – Dip the Cake Pops
Carefully dip each cake pop into the white chocolate mixture, ensuring it’s fully coated. Allow the excess chocolate to drip off before placing it back on the baking sheet.
Step 10 – Decorate with Sprinkles
If you’d like to add a festive touch, now is the time to sprinkle on some decorations! Add sprinkles on top of your pops while the chocolate is still wet.
Final Step – Let Set Before Serving
Allow the cake pops to set completely before serving. You can place them in the refrigerator for quicker setting. Once set, they’re ready to be enjoyed!
Serving Suggestions for Bloody Red Velvet Cake Pops
Best Occasions to Serve This Dish
Bloody Red Velvet Cake Pops are perfect for a variety of occasions, including:
- Halloween parties
- Birthday celebrations
- Themed events
- Baby showers
- Holiday gatherings
What to Serve with It
Consider partnering your cake pops with these complementary treats:
- Glass of milk
- Hot cocoa
- Coffee or tea
- Ice cream
- Fruit salad
Storing Bloody Red Velvet Cake Pops Properly
Best Storage Practices
To keep your cake pops fresh, store them properly:
- Refrigerator: Store your cake pops in an airtight container in the fridge for up to one week.
- Freezer: If you want to keep them longer, freeze them in a single layer, then transfer to a freezer-safe container. They can last for up to three months.
Reheating and Freezing Tips
When it comes to reheating or thawing your cake pops, follow these tips:
- Allow frozen cake pops to thaw in the refrigerator for a few hours before serving.
- Avoid reheating in the microwave as it can melt the coating and change the texture. Enjoy them cold for the best taste!
Tips & Tricks for Bloody Red Velvet Cake Pops
Mistakes to Avoid
Here are some common pitfalls and how to avoid them:
- Overmixing: Don’t overwork the cake mixture; this can lead to tough cake pops.
- Too Much Frosting: Using too much frosting can make the cake pops too sticky. Start with a smaller amount.
- Inconsistent Size: Aim for uniform sizes to ensure even dipping and serving.
Extra Tips for Better Results
- Chill the Coating: If your chocolate becomes too thick to dip, warm it gently in the microwave.
- Add Flavors: Infuse your white chocolate with extracts like vanilla or almond for an interesting twist.
- Experiment with Toppings: Use different sprinkles or crushed biscuits to customize each pop.
Recipe Variations of Bloody Red Velvet Cake Pops
Creative Twists
If you’re feeling adventurous, try these creative variations:
- Chocolate Chip Addition: Mix in some mini chocolate chips for added texture.
- Holiday Themes: Change the colors and decoration for Valentine’s Day or Christmas.
- Nutty Surprise: Add crushed nuts for a delightful crunch.
Dietary Adjustments
Here’s how you can modify the recipe to suit various dietary needs:
- Gluten-Free: Use almond flour or a gluten-free cake mix to create a gluten-free version.
- Dairy-Free: Substitute the cream cheese frosting with a plant-based alternative.
- Vegan: Replace all ingredients with vegan-friendly options (cake mix, frosting, and chocolate).
Conclusion about Bloody Red Velvet Cake Pops
Aren’t Bloody Red Velvet Cake Pops the perfect combination of fun and flavor? These treats are incredibly easy to make and sure to delight anyone who tries them. Whether you’re celebrating a themed party or just want to indulge in a sweet treat, these cake pops will impress your guests!
I encourage you to give this recipe a try and share it with your friends and family. Don’t hesitate to experiment with your decorations or flavor variations, and have fun in the process!
Try making these Bloody Red Velvet Cake Pops soon; you won’t regret it!
FAQs about Bloody Red Velvet Cake Pops
What if it doesn’t turn out right?
It’s okay if your cake pops don’t look perfect the first time! Just remember, practice makes perfect. If they fall apart, try freezing them a little longer before dipping them in chocolate.
Can I prepare it ahead of time?
Absolutely! You can make the cake pops a day in advance and store them in the refrigerator until you’re ready to serve.
What are the best ingredient substitutions?
You can use gluten-free flour in the cake and plant-based frosting if you want to make it dairy-free or vegan.
How long can it be stored?
If stored properly in an airtight container, they can last in the fridge for about a week or up to three months in the freezer.
Can I use store-bought dough or crust?
Yes, you can certainly use store-bought red velvet cake or cake mix to save time!
Is this recipe kid-friendly or family-appropriate?
Definitely! This recipe is a fun activity to make with kids, and everyone will enjoy eating them.
Can I make this recipe allergen-free?
Yes, with a few adjustments like gluten-free flour, dairy-free frosting, and egg-free cake mix, you can make it allergen-free.
Now that you’re well-equipped with all the details, it’s time to create your Bloody Red Velvet Cake Pops! Enjoy the baking process and the delicious rewards that come after!
Bloody Red Velvet Cake Pops
Equipment
- Bol à mélange
- Cuillère ou spatule
- Bâtons de sucette / lollipop sticks
- Plaque ou plateau avec papier parchemin
- Micro-ondes ou bain-marie pour chocolat
- Congélateur ou réfrigérateur pour fixer
Ingrédients
Cake & Glaçage
- Red Velvet Cake (préparé) gâteau déjà cuit ou acheté
- Cream Cheese Frosting glaçage au fromage frais
Enrobage & Décoration
- White Chocolate (chocolat blanc) pour l’enrobage
- Red Food Coloring
- Lollipop Sticks
- Sprinkles ou décorations facultatif
Instructions
- Préparez tous les ingrédients et votre plan de travail.
- Émiettez le gâteau Red Velvet dans un grand bol jusqu’à obtenir des miettes fines.
- Ajoutez le glaçage au cream cheese, mélangez jusqu’à ce que le mélange soit humide mais maniable.
- Formez des boules de taille uniforme (avec une cuillère à soupe ou à l’aide de vos mains) et placez-les sur une plaque tapissée de papier parchemin.
- Insérez un bâton de sucette dans chaque boule, en poussant environ à mi-hauteur.
- Placez la plaque au congélateur pendant ~30 minutes pour raffermir les cake pops.
- Faites fondre le chocolat blanc, puis ajoutez du colorant rouge pour obtenir l’effet “sanglant”.
- Trempez chaque cake pop dans le mélange chocolat-rouge, laissez l’excédent s’égoutter.
- Ajoutez des sprinkles ou décorations pendant que le chocolat est encore humide.
- Laissez les cake pops reposer jusqu’à ce que l’enrobage soit complètement figé avant de servir.