
Table of Contents
Introduction to Biscoff Cookie Cheesecake: 7 Irresistible Layers of Delight
Are you on the hunt for a dessert that combines creamy indulgence with a hint of caramel goodness? Look no further! The Biscoff Cookie Cheesecake: 7 Irresistible Layers of Delight is the perfect treat to satisfy your sweet tooth. This recipe encapsulates the essence of homemade cheesecakes, pairing the rich creaminess of traditional cheesecake with the unique flavor of Biscoff cookies.
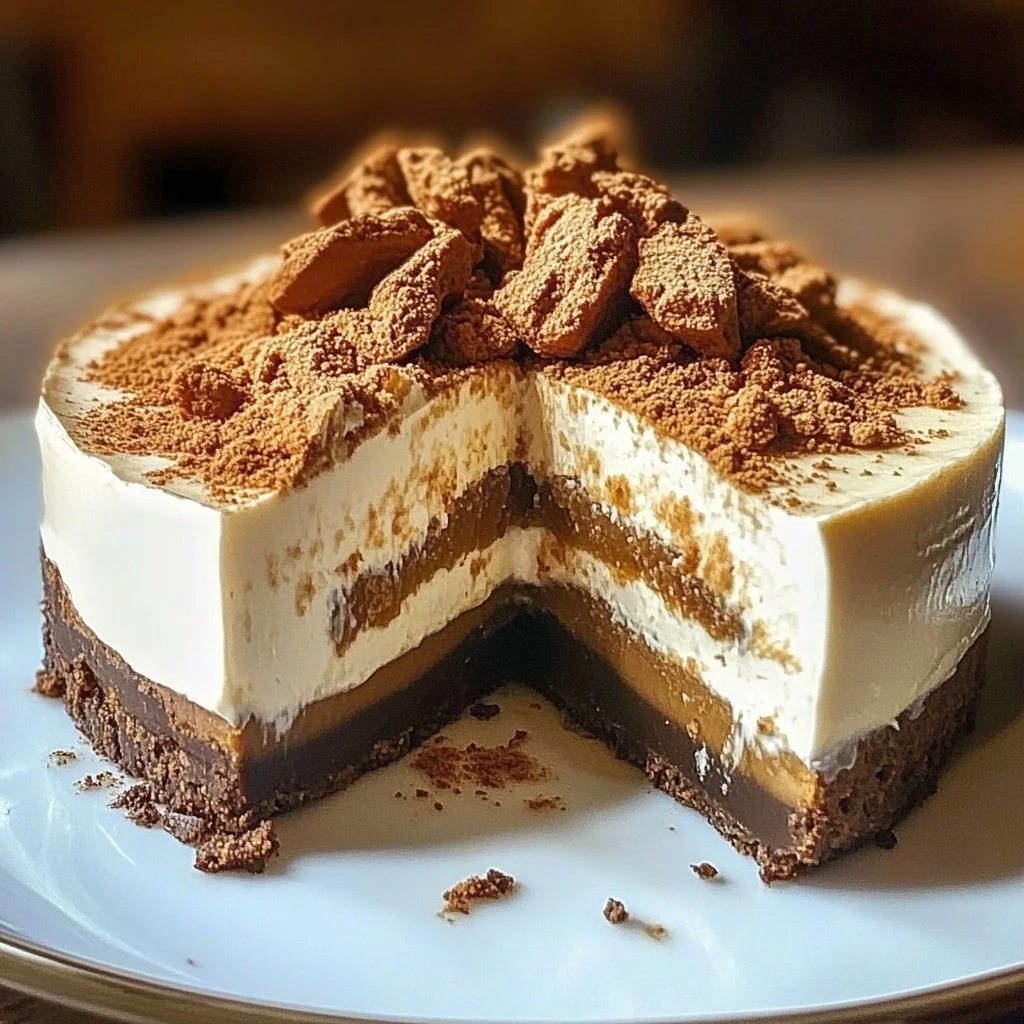
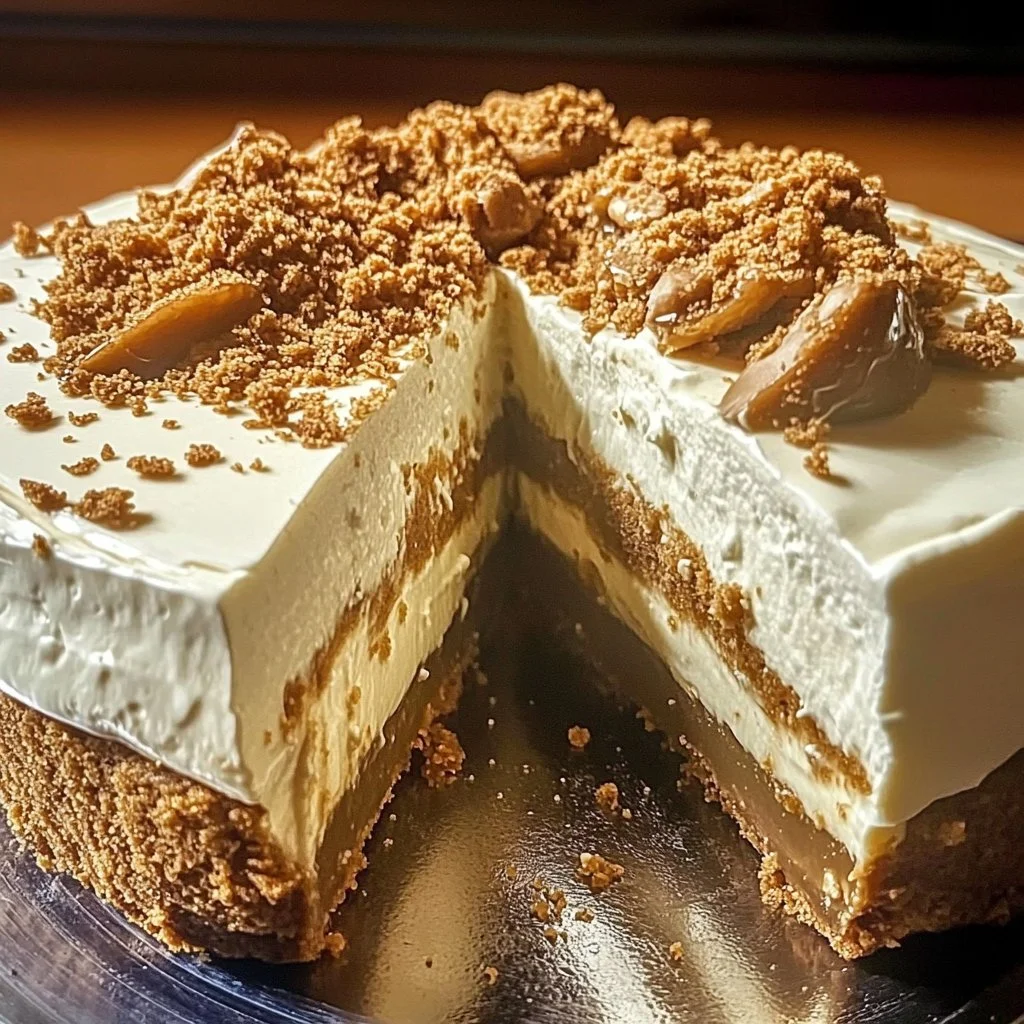
What makes this cheesecake a must-try? Imagine sinking your fork into a slice, experiencing seven layers of delightful texture and taste. From the crumbly cookie base to the glossy finish of Biscoff spread on top, every bite is an experience. The balance between the sweet, spiced cookie flavor and the rich, velvety cheesecake filling is a match made in dessert heaven!
If you’re thinking, « Can I really make a cheesecake like this at home? » The answer is a resounding yes! This recipe breaks down the steps into easy-to-follow instructions, ensuring that even novice bakers can create an impressive dessert. Plus, it allows for personalization; you can top it with your favorite fruits or extra cookie crumbs.
So, whether you’re preparing for a special occasion, a holiday get-together, or simply treating yourself, the Biscoff Cookie Cheesecake: 7 Irresistible Layers of Delight is your answer to impressing friends and family alike. Get ready to dive into a dessert that’s not just delicious but also stunningly beautiful!
Key Benefits of Biscoff Cookie Cheesecake: 7 Irresistible Layers of Delight
Why You’ll Love This Recipe
- Unforgettable Flavor: The unique blend of spiced Biscoff cookies and smooth cream cheese creates a flavor profile unlike any other.
- Easy to Make: Simple steps make this cheesecake accessible for bakers of all skill levels.
- Versatile Topping Options: Customize your cheesecake with various toppings like fresh fruit, whipped cream, or crushed cookies.
- Perfect for Any Occasion: Be it birthdays, anniversaries, or holiday parties, this cheesecake fits every celebration.
- Make-Ahead Treat: With chilling time, you can prepare it ahead of time, freeing up your day for other activities.
What Makes It Stand Out
The Biscoff Cookie Cheesecake: 7 Irresistible Layers of Delight is not your typical cheesecake. The addition of spiced Biscoff cookies sets it apart from others. These cookies bring a unique flavor that is both sweet and warm, elevating the cheesecake experience.
Customization is also a highlight. You can play around with the Biscoff spread for different marbling effects or add layers of chocolate or fruit in between. The possibilities are endless, making this dessert ideal for any occasion!
Ingredients for Biscoff Cookie Cheesecake: 7 Irresistible Layers of Delight
Complete Ingredient List with Measurements
- 1 ½ cups Biscoff cookies, crushed
- ½ cup unsalted butter, melted
- 16 oz cream cheese, softened
- 1 cup powdered sugar
- 1 tsp vanilla extract
- 1 cup heavy cream
- ½ cup Biscoff spread
- Extra Biscoff cookies for topping
Substitutes and Alternatives
Not everyone can enjoy traditional cheesecake, but worry not! If you’re looking for alternatives due to dietary restrictions, consider using:
- Cream cheese substitutes: Vegan cream cheese can offer a plant-based option, ensuring everyone can partake in the dessert.
- Dairy-free whipped cream: For those avoiding dairy, there are plenty of coconut or almond-based options available.
- Gluten-free cookies: Simply swap out the regular Biscoff cookies for gluten-free ones, which can often be found in many grocery stores.
How to Make Biscoff Cookie Cheesecake: 7 Irresistible Layers of Delight – Step-by-Step Directions
Step 1 – Prepare Ingredients
Start by gathering all your ingredients on a countertop. Ensure your Biscoff cookies are crushed into fine pieces, making them easier to combine with the melted butter for the base. Let the cream cheese sit out to soften; this step is essential for creating that creamy filling later.
Step 2 – Cook the Base
Mix the crushed Biscoff cookies with the melted butter in a bowl until it resembles damp sand. Press this mixture into the bottom of a springform pan to create your crust. Bake it at 350°F (175°C) for about 10 minutes, allowing it to firm up. Once it’s done, pull it from the oven and let it cool completely.
Step 3 – Beat the Cream Cheese
In a large mixing bowl, beat the softened cream cheese with an electric mixer on medium speed until it reaches a creamy and smooth consistency. You want to get rid of any lumps to achieve that velvety texture that everyone loves in a cheesecake.
Step 4 – Add Sugar and Vanilla
Next, incorporate the powdered sugar and vanilla extract into the cream cheese mixture. Mix on low speed until it’s well combined and fluffy. Be mindful not to overmix; otherwise, the texture can become too airy. You’re aiming for a smooth, rich mixture here.
Step 5 – Whip the Cream
In a separate bowl, whip the heavy cream until stiff peaks form. This step is crucial, as it adds the lightness and airiness that balance out the creamy cheesecake filling. Ensure your bowl and cream are chilled for the best results.
Step 6 – Fold Whipped Cream
Gently fold the whipped cream into the cream cheese mixture. Use a spatula to combine the two, being careful not to deflate the whipped cream. This gentle folding keeps the mixture light and enjoyable, which is essential for that perfect cheesecake texture.
Step 7 – Add Biscoff Spread
Now, spoon in the Biscoff spread. Fold it into the mixture carefully to create a marbled effect. This is where the magic happens—the chocolatey, spiced goodness swirls into the creamy cheesecake mixture, making it utterly tempting.
Step 8 – Pour Filling Over Crust
Take your cooled crust, and pour the cheesecake filling over it, spreading it evenly. Ensure you use a spatula to smooth the top, making it look neat. This layer will be wonderfully creamy and rich, standing out beautifully against the cookie base.
Step 9 – Chill the Cheesecake
Cover the cheesecake with plastic wrap and place it in the refrigerator. To achieve the best texture, let it chill for at least 4 hours, but overnight is even better! This waiting period allows the flavors to meld and enhances the overall taste.
Step 10 – Decorate and Serve
Once chilled, carefully remove the cheesecake from the springform pan. Top with extra Biscoff cookies and drizzle additional Biscoff spread over the top before serving. The presentation makes it a stunning centerpiece for any dessert table.
Serving Suggestions for Biscoff Cookie Cheesecake: 7 Irresistible Layers of Delight
Best Occasions to Serve This Dish
The Biscoff Cookie Cheesecake: 7 Irresistible Layers of Delight is perfect for a variety of occasions. Whether you’re celebrating a birthday, hosting a holiday gathering, or throwing a casual dinner party, this cheesecake will steal the show. Its unique flavor profile delights both children and adults alike, making it a family-friendly choice.
Personal gatherings are also an excellent time to showcase this dessert. It can serve as the perfect end to an intimate dinner, providing a satisfying and rich flavor that leaves a lasting impression on your guests.
What to Serve With It
Pair your cheesecake with a variety of toppings and drinks. A scoop of vanilla ice cream or a dollop of whipped cream can elevate the experience. You might also consider fresh berries, such as strawberries or blueberries, to add a tart contrast to the sweetness of the cheesecake.
For beverages, offer coffee, espresso, or a sweet dessert wine. These drinks complement the flavor of the cheesecake beautifully, allowing the sweet and spicy notes of the Biscoff to shine.
How to Store Biscoff Cookie Cheesecake: 7 Irresistible Layers of Delight Properly
Best Storage Practices
To enjoy your Biscoff Cookie Cheesecake: 7 Irresistible Layers of Delight for multiple days, it’s crucial to store it properly. Place leftovers in an airtight container and store in the refrigerator. It can last up to a week when stored correctly, which allows you to savor those delightful layers over several days.
If you’d like to extend its shelf life, you can freeze slices of the cheesecake. Wrap them tightly in plastic wrap and then in aluminum foil before placing them in a freezer-safe bag. Properly stored, the cheesecake can last for up to two months in the freezer.
Reheating and Freezing Tips
If you’ve frozen your cheesecake, the best way to enjoy it again is by letting it thaw in the refrigerator. This slow defrost preserves its texture and taste. Avoid microwaving it, as this can cause the cheesecake to become soggy and lose its delicious creamy feel.
If you’re serving it chilled, there’s no need to reheat. Just slice and serve straight from the refrigerator for the best taste and consistency.
Tips & Tricks for Biscoff Cookie Cheesecake: 7 Irresistible Layers of Delight
Mistakes to Avoid
- Using Cold Cream Cheese: Ensure your cream cheese is softened before mixing, as cold cream cheese can result in lumps.
- Overmixing: Too much mixing can make your filling too airy. Mix until just combined for the best texture.
- Skipping Chilling Time: Don’t rush the chilling process. Letting it sit overnight enhances the flavors and texture.
- Not Tasting Before Serving: Always taste your filling before pouring it into the crust. This allows you to adjust sweetness if needed.
- Cutting Too Soon: Wait until the cheesecake has fully set before attempting to cut it. This will prevent a mess and ensure clean slices.
Extra Tips for Better Results
- Use Quality Ingredients: Opt for high-quality cream cheese and Biscoff spread. These will result in a richer flavor that elevates the overall dessert.
- Add a Layer of Ganache: For chocolate lovers, consider creating a thin layer of chocolate ganache on top before adding the Biscoff cookies.
- Top with Whipped Cream: A light dollop of homemade whipped cream pairs beautifully with the rich texture and enhances presentation.
Recipe Variations of Biscoff Cookie Cheesecake: 7 Irresistible Layers of Delight
Creative Twists
- Chocolate Swirl: Add melted chocolate into the cheesecake mixture for a chocolatey twist. Create a beautiful marbled effect!
- Fruit Layer: Incorporate a layer of fruit preserves or fresh fruit between the cheesecake and cookie crust to add freshness.
- Nutty Flavor: Sprinkle chopped nuts, such as pecans or walnuts, into the cookie crust for added texture and flavor.
Dietary Adjustments
For those with dietary restrictions, consider these modifications:
- Vegan Version: Substitute cream cheese with a vegan alternative and use coconut cream in place of heavy cream. Ensure your cookies are vegan-friendly.
- Gluten-Free Option: Use gluten-free Biscoff cookies or consider using almond flour mixed with dairy-free butter for the crust.
Conclusion about Biscoff Cookie Cheesecake: 7 Irresistible Layers of Delight
Now you know how to create the Biscoff Cookie Cheesecake: 7 Irresistible Layers of Delight, a dessert that embodies creamy richness and unforgettable flavor. Its simplicity makes it an attractive choice for both novice bakers and seasoned cooks.
Whether you’re serving this cheesecake at a festive occasion or enjoying it as a sweet treat during a quiet evening at home, it promises to be a delightful experience. Its unique layers and flavors will surely leave a lasting impression on anyone lucky enough to have a slice. So, roll up your sleeves and enjoy the delightful journey of creating this show-stopping cheesecake!
FAQs about Biscoff Cookie Cheesecake: 7 Irresistible Layers of Delight
How long can I store leftovers?
You can store leftover cheesecake in an airtight container in the refrigerator for up to a week.
Can this cheesecake be frozen?
Yes, you can freeze the cheesecake for up to two months. Wrap slices tightly and store in a freezer-safe container.
Does this cheesecake need to be baked?
No, the Biscoff Cookie Cheesecake: 7 Irresistible Layers of Delight is a no-bake dessert. After assembling, it simply needs to chill in the fridge.
Is there a vegan substitute for cream cheese?
Absolutely! You can use a vegan cream cheese alternative made from nuts or tofu to achieve a similar texture.
What can I use instead of Biscoff cookies?
You can substitute Biscoff cookies with any spiced cookie or digestive biscuit for a similar flavor.
How do I prevent cracks on the cheesecake?
Avoid overmixing and ensure the cheesecake is chilled thoroughly. Keeping the oven temperature consistent helps as well.
Can I make it in advance?
Yes, this cheesecake is perfect for making ahead of time. It tastes even better when allowed to chill overnight.
What’s the best way to cut cheesecake?
Use a hot, dry knife to slice through the cheesecake for clean cuts, cleaning the knife between slices for best results.

Biscoff Cookie Cheesecake
Ingrédients
Crust
- 1.5 cups Biscoff cookies, crushed
- 0.5 cups unsalted butter, melted
Filling
- 16 oz cream cheese, softened
- 1 cups powdered sugar
- 1 tsp vanilla extract
- 1 cups heavy cream
- 0.5 cups Biscoff spread
Topping
- Extra pieces Biscoff cookies for topping Crushed or whole, as desired.
Instructions
Preparation
- Gather all your ingredients on a countertop.
- Crush Biscoff cookies into fine pieces.
- Allow cream cheese to soften at room temperature.
Making the Crust
- Mix crushed Biscoff cookies with melted butter until it resembles damp sand.
- Press the mixture into the bottom of a springform pan.
- Bake at 350°F (175°C) for about 10 minutes, then let cool.
Making the Filling
- Beat softened cream cheese with an electric mixer until smooth.
- Add powdered sugar and vanilla extract; mix until fluffy.
- Whip heavy cream until stiff peaks form.
- Gently fold whipped cream into the cream cheese mixture.
- Fold in Biscoff spread to create a marbled effect.
Assembling
- Pour the cheesecake filling over the cooled crust and smooth the top.
- Cover with plastic wrap and chill in the refrigerator for at least 4 hours.
Serving
- Remove from springform pan and top with extra Biscoff cookies and drizzle with Biscoff spread.
- Serve chilled and enjoy.