

Table of Contents
Introduction to Baked Italian Sub Sandwiches
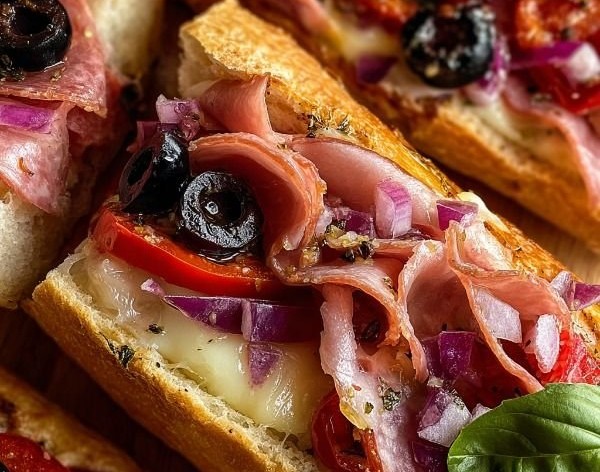
Are you craving something hearty and satisfying? Look no further than Baked Italian Sub Sandwiches! These delightful sandwiches combine various layers of rich flavors and textures, making them a favorite for any meal. Picture this: crispy, warm sub rolls stuffed with savory deli meats, gooey provolone cheese, and zesty veggies. Every bite is a burst of flavors that transports you to a bustling Italian deli.
What makes Baked Italian Sub Sandwiches truly special is their incredible versatility. Whether you’re preparing a quick weeknight dinner or hosting a casual gathering with friends and family, this recipe can adapt to any occasion. It’s an easy-to-follow recipe that allows for customization based on your preferences or dietary needs. You can add more ingredients, switch things up, or even adjust portion sizes, making it a family-friendly option that satisfies everyone’s taste buds.
Moreover, these baked sandwiches not only taste amazing, but they also fill your kitchen with an irresistible aroma as they bake in the oven. You’ll find yourself eagerly awaiting that moment when you can pull them out and enjoy them fresh and warm. Baked Italian Sub Sandwiches are not just food; they’re a delightful experience, perfect for sharing and savoring with loved ones.
Key Benefits of Baked Italian Sub Sandwiches
Why You’ll Love This Recipe
- Mouthwatering combination of meats and cheese.
- Quick preparation and easy to bake.
- Perfect for meal prep or casual get-togethers.
- Customizable based on dietary preferences.
- A crowd-pleaser for both kids and adults.
- Satisfying and filling, great for any mealtime.
What Makes It Stand Out
One of the standout features of Baked Italian Sub Sandwiches is their originality. The layering method allows for a unique blend of textures—from the crispy edges of the toasted roll to the creaminess of the melted cheese. Unlike other sandwich recipes, this one stands out because it’s baked, not just assembled cold. Baking transforms these sandwiches into a warm, gooey masterpiece that is extra comforting.
Customization is another aspect that makes Baked Italian Sub Sandwiches a winner. You can substitute meats, use different spreads, or add your favorite veggies. This recipe is excellent for experimenting. Whether you want a classic Italian flavor or want to tread into new flavor territory, Baked Italian Sub Sandwiches can handle it. They fit perfectly into any gathering, from game day to cozy family dinners, which adds to their versatility and appeal.
Ingredients for Baked Italian Sub Sandwiches
Complete Ingredient List with Measurements
- 4 small sub rolls or hoagie buns
- 8 slices of deli-style ham
- 8 slices of salami
- 8 slices of pepperoni
- 8 slices of provolone cheese
- 1/4 cup butter, melted
- 1 teaspoon garlic powder
- 1 teaspoon Italian seasoning
- 1/2 cup sliced banana peppers, drained
- 1/2 cup sliced black olives, drained
- 1/2 cup sliced red onion
- 1/4 cup mayonnaise
- 1/4 cup mustard
- Salt and pepper to taste
Substitutes and Alternatives
If you’re looking for alternatives due to dietary restrictions, there are plenty of substitutes you can make. For a gluten-free option, use gluten-free rolls. You can also swap out meats—try turkey, chicken, or even a plant-based alternative to fit vegetarian or vegan diets. Cheese can be substituted with a dairy-free option if necessary. Different spreads like pesto or hummus can add a unique twist while also accommodating various dietary choices.
How to Make Baked Italian Sub Sandwiches – Step-by-Step Directions
Step 1 – Prepare Ingredients
Start by preheating your oven to 350°F (175°C). Gather all your ingredients on a clean, flat working surface. Slice the sub rolls in half lengthwise and prepare a baking sheet lined with parchment paper to ensure easy cleanup and avoid sticking.
Step 2 – Cook the Base
Brush the inside of each roll with melted butter. This adds flavor and helps crisp up the bread once it’s baked. Sprinkle garlic powder and Italian seasoning inside each roll. You’ll want to make sure it’s evenly distributed for a consistent flavor throughout the sandwich.
Step 3 – Layer the Meats
On the bottom half of each roll, layer 2 slices of ham, followed by 2 slices of salami and 2 slices of pepperoni. Make sure to cover the entire surface to guarantee you get delicious bites in every mouthful.
Step 4 – Add Cheese
Place 2 slices of provolone cheese directly on top of the meats. This is what will melt deliciously during baking, binding everything together and adding that creamy element.
Step 5 – Add Veggies
Now it’s time to add the veggies. Evenly distribute the banana peppers, black olives, and sliced red onion over the cheese. These ingredients add a burst of flavor and freshness that balance the richness of the meats and cheese.
Step 6 – Prepare the Top Half
In a small bowl, mix together the mayonnaise and mustard. Take this mixture and spread it evenly on the inside top half of each sub roll. This adds a nice tangy flavor that complements the fillings beautifully.
Step 7 – Assemble the Sandwiches
Carefully place the top half of each roll over the fillings you’ve just layered. Press down gently to combine the ingredients but be cautious not to squish everything out. Make sure they fit snugly to lock in those delicious flavors.
Step 8 – Bake the Sandwiches
Place the assembled sandwiches in your preheated oven and bake for about 12-15 minutes. Keep an eye on them—it’s done when the cheese has melted and the edges of the rolls start to turn golden and crispy.
Step 9 – Cool and Slice
Once baked, remove the sandwiches from the oven and allow them to cool for a minute. This will make them safer to handle. Slice each sandwich in half diagonally to reveal the delicious layers inside.
Step 10 – Serve and Enjoy
Serve your Baked Italian Sub Sandwiches warm, paired with your favorite sides. Whether you like chips, a side salad, or more Italian delights, these sandwiches will be the star of the show.
Serving Suggestions for Baked Italian Sub Sandwiches
Best Occasions to Serve This Dish
Baked Italian Sub Sandwiches are perfect for casual gatherings like game days, family BBQs, or even movie nights at home. They bring a sense of joy and comfort, making them ideal for sharing with friends and family. Their ease of preparation also makes them an excellent choice for busy weeknights when you want something delicious without a complex cooking process.
What to Serve With It
Pair your Baked Italian Sub Sandwiches with crispy potato chips for a delightful crunch or a fresh green salad to keep things light. You can also serve them with a side of marinara sauce for dipping or a light vinaigrette if you need a refreshing balance to the heartiness of the sandwich. For drinks, consider iced tea, soda, or even a nice red wine to enhance the Italian flair!
How to Store Baked Italian Sub Sandwiches Properly
Best Storage Practices
To store leftover Baked Italian Sub Sandwiches, allow them to cool completely before wrapping them tightly with plastic wrap or aluminum foil. You can also place them in an airtight container to maintain their freshness. Properly stored, they can last in the refrigerator for 2-3 days.
Reheating and Freezing Tips
For reheating, preheat your oven to 350°F (175°C), unwrap the sandwiches, and place them on a baking sheet. Heat for about 10-12 minutes or until they are warmed through. If freezing, wrap them individually in plastic wrap and foil. They can be frozen for up to 3 months. To reheat from frozen, thaw in the refrigerator overnight, then follow the reheating instructions for the best results.
Tips & Tricks for Baked Italian Sub Sandwiches
Mistakes to Avoid
1 – Overstuffing: While it’s tempting to load up on fillings, overstuffing can lead to soggy sandwiches as they bake. Stick to a balanced amount for even cooking.
2 – Skipping the Butter: Don’t skip brushing the rolls with melted butter. This step is crucial for getting that crispy exterior.
3 – Not Toasting Enough: Ensure they bake long enough for the cheese to melt fully and the bread to crisp. Check for a golden color.
4 – Slicing Roll Too Deep: When slicing the rolls, avoid cutting all the way through. This keeps the fillings secure.
5 – Ignoring Flavor Balance: Be mindful of the saltiness from the meats and cheese; adjust seasoning accordingly.
Extra Tips for Better Results
To enhance the flavor, consider adding fresh basil or fresh parsley as a garnish right before serving. A drizzle of balsamic glaze can also elevate the taste, giving your sandwiches a gourmet touch. When baking, keeping an eye on the sandwich toward the end will ensure no over-browning occurs. Always let them cool a bit before cutting for best presentation.
Recipe Variations of Baked Italian Sub Sandwiches
Creative Twists
1 – Mediterranean Style: Swap out the meats for grilled chicken and add roasted red peppers, feta cheese, and fresh spinach for a Mediterranean twist. Drizzle with olive oil and lemon juice before baking for a zesty flavor.
2 – Spicy Heat: Add jalapeños or spicy Italian sausage to the mix for those who love a kick. Pair this with pepper jack cheese for extra spice.
3 – Veggie Loaded: For a vegetarian option, load the sandwiches with grilled vegetables like zucchini, bell peppers, and mushrooms paired with mozzarella cheese and pesto spread.
4 – Breakfast Sub: Transform it into a breakfast sandwich by adding scrambled eggs, crumbled sausage, and cheddar cheese. Bake until the cheese is gooey and enjoy a delightful morning treat.
Dietary Adjustments
For a vegan version, use plant-based deli slices, dairy-free cheese, and vegan mayo mixed with mustard. Gluten-free bread can ensure everyone enjoys this delightful dish without the gluten. With simple ingredient swaps, you can modify this recipe to cater to many dietary restrictions without losing the essence of Baked Italian Sub Sandwiches.
Conclusion about Baked Italian Sub Sandwiches
Incorporating Baked Italian Sub Sandwiches into your meal repertoire is a delightful way to enjoy the comforting flavors of Italian cuisine. Their ease of preparation makes them perfect for both busy weeknights and leisurely weekend gatherings, allowing you to savor each bite without stress. The combination of flavorful deli meats, creamy cheese, and zesty vegetables creates a satisfying meal that appeals to a wide range of palates.
These sandwiches are not just a culinary treat; they also provide a canvas for creativity through customization. You can easily adapt them to suit your preferences or dietary needs, ensuring that each time you make them feels fresh and exciting. Whether enjoyed at a picnic or served at a family gathering, Baked Italian Sub Sandwiches promise to leave a lasting impression. Dive into this recipe, and you will find it quickly becomes a staple that brings joy to your dining table.
FAQs about Baked Italian Sub Sandwiches
Can I make Baked Italian Sub Sandwiches ahead of time?
Yes! You can prepare the sandwiches up to the baking step and then refrigerate them. When ready to serve, bake them just before mealtime for the best results.
What can I use instead of provolone cheese?
You can substitute provolone with mozzarella or any cheese that melts well, like cheddar or gouda, depending on your preference.
Are Baked Italian Sub Sandwiches suitable for freezing?
Absolutely! You can freeze the assembled but unbaked sandwiches. Once you want to enjoy them, thaw and bake as directed.
How long do leftovers last in the fridge?
Leftover Baked Italian Sub Sandwiches will last in the fridge for 2-3 days when stored correctly.
Can I use different meats in this recipe?
Yes! Feel free to adjust the meats to your preference, including turkey, roast beef, or even a mix of cold cuts.
How do I make these sandwiches vegetarian?
Replace the meats with grilled veggies, vegan deli slices, or beans combined with plant-based cheese for a filling and satisfying vegetarian option.
What is a good side dish to have with these sandwiches?
Consider serving them with a fresh salad, chips, or a warm pasta dish for a complete meal.
Can I bake the sandwiches on foil?
Yes, you can bake them on aluminum foil, but parchment paper is preferred for easier cleanup and to prevent sticking.
Is it necessary to add mayonnaise and mustard?
While it adds flavor, you can omit them or replace them with your favorite spreads if you prefer a different flavor profile.
Are Baked Italian Sub Sandwiches kid-friendly?
Definitely! Their customizable nature and rich flavor make them a hit among kids, and you can adjust ingredients to suit their tastes.

Baked Italian Sub Sandwiches
Ingrédients
Main Ingredients
- 4 small small sub rolls or hoagie buns
- 8 slices deli-style ham
- 8 slices salami
- 8 slices pepperoni
- 8 slices provolone cheese
- 1/4 cup butter, melted
- 1 teaspoon garlic powder
- 1 teaspoon Italian seasoning
- 1/2 cup sliced banana peppers, drained
- 1/2 cup sliced black olives, drained
- 1/2 cup sliced red onion
- 1/4 cup mayonnaise
- 1/4 cup mustard
- to taste Salt and pepper
Instructions
Preparation
- Start by preheating your oven to 350°F (175°C). Gather all your ingredients on a clean, flat working surface.
- Slice the sub rolls in half lengthwise and prepare a baking sheet lined with parchment paper.
Cooking
- Brush the inside of each roll with melted butter.
- Sprinkle garlic powder and Italian seasoning inside each roll.
- On the bottom half of each roll, layer 2 slices of ham, followed by 2 slices of salami and 2 slices of pepperoni.
- Place 2 slices of provolone cheese on top of the meats.
- Evenly distribute the banana peppers, black olives, and sliced red onion over the cheese.
- In a small bowl, mix together the mayonnaise and mustard and spread it evenly on the inside top half of each sub roll.
- Carefully place the top half of each roll over the fillings.
- Place the assembled sandwiches in the preheated oven and bake for about 12-15 minutes.
- Once baked, remove the sandwiches from the oven and allow them to cool for a minute before slicing each sandwich in half diagonally.
Serving
- Serve your Baked Italian Sub Sandwiches warm, paired with your favorite sides.