
Table of Contents
Introduction about Easy Oreo Spiders for Halloween
As Halloween approaches, the excitement in the air grows palpable. Children eagerly plan their costumes, while adults brainstorm spooky decorations. But what about the treats? If you’re looking for a fun and easy dessert that will wow your friends and family, look no further than Easy Oreo Spiders for Halloween – Build Your Bite | Halloween Food Treats, Halloween Food for Party, Easy Halloween Food. This delightful recipe not only satisfies your sweet tooth but also brings the festive spirit alive in an innovative way!
Have you ever wondered how to make your Halloween party unforgettable? Or perhaps you want to impress the kids at that neighborhood trick-or-treat gathering? With just a handful of ingredients, you can create these enchanting Oreo spiders that are not only adorable but also incredibly simple to make. Plus, they offer an opportunity for creativity. Imagine your little ones getting involved in the kitchen, crafting their spooky treats while having a blast!
In this article, we’ll guide you through everything you need to know about these Easy Oreo Spiders. From benefits and ingredient lists to detailed step-by-step instructions and storage tips, we’ve got you covered. Let’s dive into the fun world of Halloween treats and explore the joy of creating something special this spooky season!
Key Benefits of Easy Oreo Spiders for Halloween
Why you’ll love this recipe
- Easy to Make: This recipe is beginner-friendly, requiring minimal baking skills.
- Quick Preparation: Whip these up in about 30 minutes, perfect for last-minute Halloween gatherings!
- Family Fun Activity: Great for children to help with, making it a bonding experience in the kitchen.
- Deliciously Sweet: Oreo cookies are always a hit, and combined with chocolate, they create a delightful treat.
- Perfect for Any Occasion: Whether it’s Halloween, a school snack, or an evening gathering, these spiders fit right in.
- Customizable: You can easily modify the recipe to suit your family’s preferences or dietary restrictions.
What makes it stand out
These Easy Oreo Spiders aren’t just another dessert; they are an experience! The creativity involved in making these little critters will engage your whole family, bringing everyone together for some festive fun. Each spider boasts a rich Oreo base, decorated with sweet coatings and delightful candy accents that make them look like they just crawled out of a Halloween tale.
Moreover, the recipe allows for customization. Want to make them gluten-free or dairy-free? You can swap out ingredients without compromising on taste! Their spooky charm and delectable flavors make these Oreo spiders a staple not only for Halloween but also for any time you want to impress your friends or bring a smile to your children’s faces.
Ingredients for Easy Oreo Spiders for Halloween
Complete ingredient list with measurements
Here’s what you’ll need to create these spooky treats:
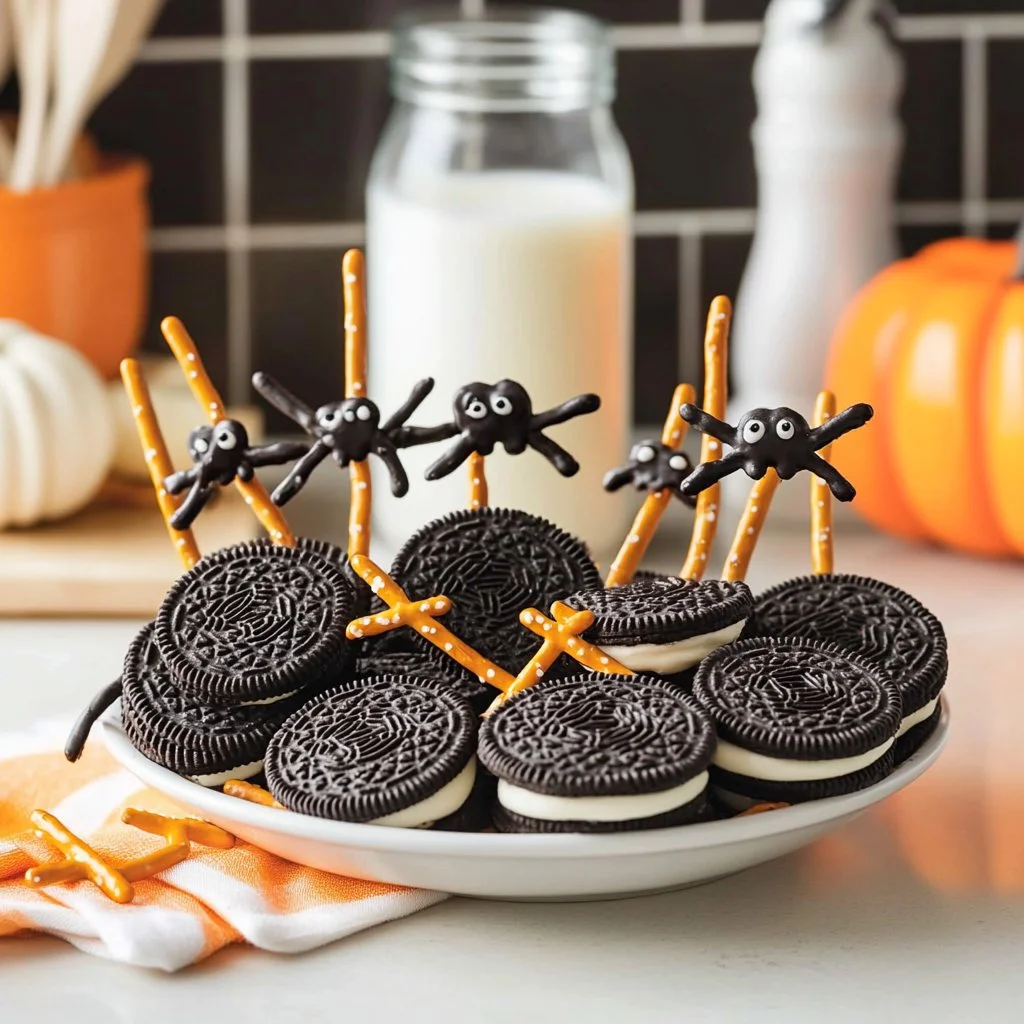
- Oreo Cookies: 1 package (standard size)
- Chocolate Melts (black): 1 cup
- Chocolate Melts (white): ½ cup (for eyes)
- Pretzel Sticks: 1 cup (for the spider legs)
- Candy Eyes: 2 to 3 dozen
- Parchment Paper: for easy cleanup
Substitutes and alternatives
If you have allergies or dietary preferences, here are some options you might consider:
- Gluten-free Oreos: Swap regular Oreos with gluten-free versions.
- Dairy-free Chocolate Melts: Use dairy-free chocolate for a vegan-friendly option.
- Alternative candies: Instead of candy eyes, you can use mini chocolate chips or fresh fruit like blueberries for a healthier twist.
How to Make Easy Oreo Spiders for Halloween– Step-by-Step Directions
Now let’s get into the fun part—making these adorable Easy Oreo Spiders!
Step 1 – Prep your workspace and ingredients
Before you start crafting these creepy crawlers, make sure your kitchen is clean and organized. Gather all your ingredients and tools. Lay out parchment paper on your counter for easy cleanup and to place your finished spooky treats.
Step 2 – Melt the chocolate
In a microwave-safe bowl, combine the black chocolate melts. Heat in the microwave in 30-second intervals, stirring in between until fully melted and smooth. This usually takes about 1–2 minutes. Be cautious not to overheat it!
Step 3 – Dip the Oreos
Once your chocolate is melted, grab an Oreo cookie and dip it entirely in the chocolate. Use a fork to remove the cookie and gently shake off any excess chocolate. Place the dipped cookie on the parchment paper and let it set. Repeat this for the rest of the Oreos.
Step 4 – Attach the legs
While the chocolate is still wet, you can start adding the pretzel legs. Take four pretzel sticks and gently press them into the side of each dipped Oreo to create spider legs. Look at your cookie and make sure they are evenly placed for a uniform spider!
Step 5 – Add eyes
Once the pretzels are securely in place, it’s time to make your spiders come to life! Melt a small amount of the white chocolate melts in a clean bowl. Use this to attach two candy eyes onto the front of the Oreo. If you don’t have white melts, you can place candy eyes directly onto the wet chocolate.
Step 6 – Let them set
Allow your Oreo spiders to sit for about 30 minutes at room temperature or until the chocolate has hardened completely. This will make sure everything holds together nicely and keeps the spooky looks intact!
Step 7 – Decorate (Optional)
If you want to get creative, you can drizzle more melted white chocolate over the finished spiders for additional decorative flair! This drizzling can simulate webs around your spooky treats.
Step 8 – Serve and enjoy
Once everything has set, carefully peel the spiders off the parchment paper. Arrange them on a festive platter and get ready to impress your guests!
Step 9 – Store leftovers
If you have any Oreos left (which is unlikely), store them in an airtight container away from direct sunlight.
Step 10 – Clean up
After the fun of making your Easy Oreo Spiders, don’t forget to clean up your workspace! Enjoy a sense of accomplishment as you look forward to the smiles that your spooky treats will bring.
Serving Suggestions for Easy Oreo Spiders for Halloween
Best occasions to serve this dish
These Easy Oreo Spiders are not just for Halloween! They can also be a fun addition to:
- Birthday parties
- School events
- Family gatherings
- Classroom treats
- Halloween-themed game nights
Their cute yet spooky design makes them a crowd-pleaser at any gathering, bringing smiles to both adults and kids alike.
What to serve with it
To create a complete Halloween treat table, consider pairing your Oreo spiders with:
- Beverages: Spooky punch, hot apple cider, or classic milk to wash it down
- Toppings: Ghost-shaped marshmallows or Halloween-themed sprinkles
- Sides: Fresh fruit skewers or a batch of pumpkin cookies
Creating a festive buffet elevates the experience and makes your gathering even more exciting!
Storing Easy Oreo Spiders for Halloween Properly
Best storage practices
To keep your lovely spider creations fresh, store them in an airtight container. If it’s particularly warm in your kitchen, placing them in the refrigerator is advisable. They can last for up to 1 week in the fridge or about 2 weeks at room temperature—just make sure they are protected from humidity.
Reheating and freezing tips
The good news is, there’s no need to reheat these treats! They are best enjoyed at room temperature. If you want to freeze them for later use, place them in a single layer in a container, separated by parchment paper to avoid sticking. When you’re ready to enjoy them again, thaw them in the fridge overnight.
Tips & Tricks for Easy Oreo Spiders for Halloween
Mistakes to avoid
- Overheating Chocolate: Keep an eye on your chocolate as you melt it; burnt chocolate can ruin your project!
- Uneven Leg Placement: Make sure to place the pretzel legs evenly to give your spiders a balanced look.
- Too Much Chocolate: Be careful not to dip the Oreos too deeply or overload them with chocolate.
Extra tips for better results
- Fun Shapes: Use Halloween-shaped cookie cutters to cut out Oreos if you want to get extra creative!
- Colorful Decorations: Get some edible glitter or colored sprinkles to add a fun touch to your Oreo spiders.
- Interactive Experience: Involve the kids by letting them customize their own Oreo spiders with toppings and decorations!
Recipe Variations of Easy Oreo Spiders for Halloween
Creative twists
Looking to jazz things up? Here are some extra ideas:
- Nutty Addition: Add crushed nuts or toffee bits during the dipping phase for a crunch.
- Seasonal Flavors: Incorporate pumpkin spice extract into your melted chocolate for a seasonal twist.
- Holiday Spins: Instead of candy eyes, decorate with holiday-themed candies for other occasions.
Dietary adjustments
If you need to accommodate special diets, consider these swaps:
- Gluten-Free: Opt for gluten-free Oreos and ensure that your chocolate melts are also gluten-free.
- Vegan Options: Choose dairy-free chocolate and replace the candy eyes with fruit or other plant-based options.
- Sugar-Free: Use sugar-free Oreos and chocolate for a guilt-free treat.
Conclusion about Easy Oreo Spiders for Halloween
To wrap things up, the Easy Oreo Spiders for Halloween – Build Your Bite | Halloween Food Treats, Halloween Food for Party, Easy Halloween Food offer not just a fantastic flavor but also an opportunity for creativity and family fun. They are simple to make, perfect for all occasions, and guarantee to bring joy to your Halloween gatherings.
Don’t hesitate to try this recipe—your kids will love getting involved, and your guests will be thrilled to bite into these adorable treats. So gather your ingredients, call the family, and make some unforgettable memories in the kitchen. We encourage you to give these spooky spiders a try, and don’t forget to share your experience!
FAQs about Easy Oreo Spiders for Halloween
What if it doesn’t turn out right?
No need to panic! If your chocolate seized or your spiders fell apart, they can still be delicious! Just re-melt the chocolate and try dipping again. A little creativity can result in a fun mishap—think of it as your halloween “monster” experiment!
Can I prepare it ahead of time?
Absolutely! These Oreo spiders can be made a day or two in advance. Just store them in an airtight container to keep them fresh and tasty.
What are the best ingredient substitutions?
If you’re looking for swaps, gluten-free Oreos and dairy-free chocolate melts work wonders! You can also use fruit instead of candy eyes for a healthier alternative.
How long can it be stored?
They can last about a week in the fridge or up to two weeks when kept at room temperature in an airtight container.
Can I use store-bought dough or crust?
While this recipe specifically uses Oreos, if you’re inspired, you can create your own critters with sugar cookie dough instead!
Is this recipe kid-friendly or family-appropriate?
Definitely! It’s a fantastic family project, engaging kids in a fun and creative activity while also treating their taste buds.
Can I make this recipe allergen-free?
Yes! By selecting the right products like gluten-free Oreos and dairy-free chocolate, you can create a delicious allergen-free version suitable for various dietary needs.

Easy Oreo Spiders
Ingrédients
Main Ingredients
- 1 package Oreo Cookies Standard size
- 1 cup Chocolate Melts (black) For dipping the Oreos
- 0.5 cup Chocolate Melts (white) For eyes
- 1 cup Pretzel Sticks For the spider legs
- 2 to 3 dozen Candy Eyes For decoration
- Parchment Paper For easy cleanup
Instructions
Preparation
- Prep your workspace and ingredients by laying out parchment paper for easy cleanup and gathering all ingredients.
- In a microwave-safe bowl, melt the black chocolate melts in 30-second intervals, stirring until fully melted and smooth (about 1-2 minutes).
- Dip each Oreo cookie into the melted chocolate, shake off excess, and place on parchment paper to set.
- While the chocolate is still wet, press four pretzel sticks into each dipped Oreo to create spider legs.
- Melt the white chocolate melts and use it to attach two candy eyes onto each Oreo.
- Let the spiders sit for about 30 minutes or until the chocolate hardens completely.
- Optionally, drizzle additional white chocolate for decorative flair.
- Serve the finished spiders on a platter and enjoy!
- Store leftovers in an airtight container.
- Clean up your workspace after making the treats.