
Table of Contents
Introduction about Easy Mini Halloween Pizzas
As the leaves begin to fall and the air grows crisp, many of us start thinking about Halloween. What better way to get into the spooky spirit than with some Easy Mini Halloween Pizzas? Picture this: a fun, pumpkin-shaped pizza topped with gooey cheese and your favorite toppings, all served at a Halloween gathering or as a special treat for your little monsters at home. Have you ever thought about how satisfying it can be to bring everyone together over such a delightful dish?
Not only are these mini pizzas fun to make, but they are also incredibly easy and customizable to fit your family’s tastes. Whether you want to go for a classic design or get creative with ghostly shapes, this recipe makes it simple. So gather your family in the kitchen, and let’s make some memorable treats that are not just delicious but also a hit at any Halloween party!
Why This Recipe?
- Simplicity: With only a few steps involved, even kitchen novices can whip this up quickly.
- Creativity: Let your imagination run wild as you decorate your pizzas with fun Halloween toppings.
- Family-Friendly: Kids will love getting their hands dirty, and everyone can customize their pizzas with their preferred toppings.
- Speedy: Ready in under 20 minutes, these mini pizzas are perfect for last-minute gatherings.
- Versatility: From pizza sauce to cheese, feel free to swap out ingredients based on what you have at home.
Key Benefits of Easy Mini Halloween Pizzas
Why you’ll love this recipe
- Taste: The combination of fresh toppings and melted cheese will make your taste buds sing!
- Ease: This recipe is straightforward; it requires no complicated preparations.
- Speed: Bake them in just 10-12 minutes, making this a perfect option for busy schedules.
- Family-Friendly: Ideal for kids, they can help with making and decorating the pizzas.
- Customizable: Create unique designs based on personal tastes or dietary needs.
What makes it stand out
These Easy Mini Halloween Pizzas aren’t just a seasonal delight; they’re a fun culinary project for families. Not only do you get a delicious meal, but the imaginative designs also provide a memorable experience. Help your children channel their inner chefs while they create spooky faces and decorations with toppings.
Moreover, Halloween is more than just candy; it’s about making enjoyable memories. This recipe taps into the excitement of the season while also offering a platform for family bonding and creativity. With so many possibilities, you can keep this recipe lively and fresh year after year.
Ingredients for Easy Mini Halloween Pizzas
Complete ingredient list with measurements
To whip up these delightful mini pizzas, you’ll need the following:
- Mini pizza crusts: 4-6 (store-bought or homemade)
- Pizza sauce: 1 cup
- Shredded mozzarella cheese: 2 cups
- Black olives: 1/2 cup (sliced)
- Pepperoni: 1 cup (cut into fun shapes if desired)
- Bell peppers: 1/2 cup (sliced into shapes or strips)
- Olive oil: 1 tablespoon (for drizzling)
- Italian seasoning: 1 teaspoon (optional)
Substitutes and alternatives
Don’t have all the ingredients? Here are some easy swaps:
- Dough: Use pita bread or naan instead of mini pizza crusts for a quick base.
- Cheese: Swap mozzarella for cheddar or a dairy-free cheese alternative if needed.
- Toppings: Use veggie toppings like mushrooms, spinach, or cherry tomatoes for a healthier option.
- Sauce: If you don’t have pizza sauce, marinara or pesto can work well too.
- Seasoning: Omit Italian seasoning if you prefer or replace it with dried oregano or basil.
How to Make Easy Mini Halloween Pizzas – Step-by-Step Directions
Step 1 – Prep your workspace and ingredients
Start by clearing your kitchen counter and gathering all your ingredients. Preheat your oven to 400°F (200°C) to get it nice and hot for baking. A tidy workspace will help keep everything organized as you build your mini pizzas.
Step 2 – Place mini pizza crusts on a baking sheet
Grab a baking sheet and arrange the mini pizza crusts evenly on it, ensuring they aren’t touching. This allows them to bake evenly and get that perfect crispiness.
Step 3 – Spread pizza sauce
Take your pizza sauce and spread a generous layer over each mini crust. Use a spoon or a spatula for even coverage. The sauce not only adds flavor but also acts as the base for your toppings.
Step 4 – Sprinkle shredded mozzarella cheese
Go ahead and sprinkle a mountain of shredded mozzarella cheese over the sauce. This is where the magic happens as the cheese melts to a gooey, bubbly goodness.
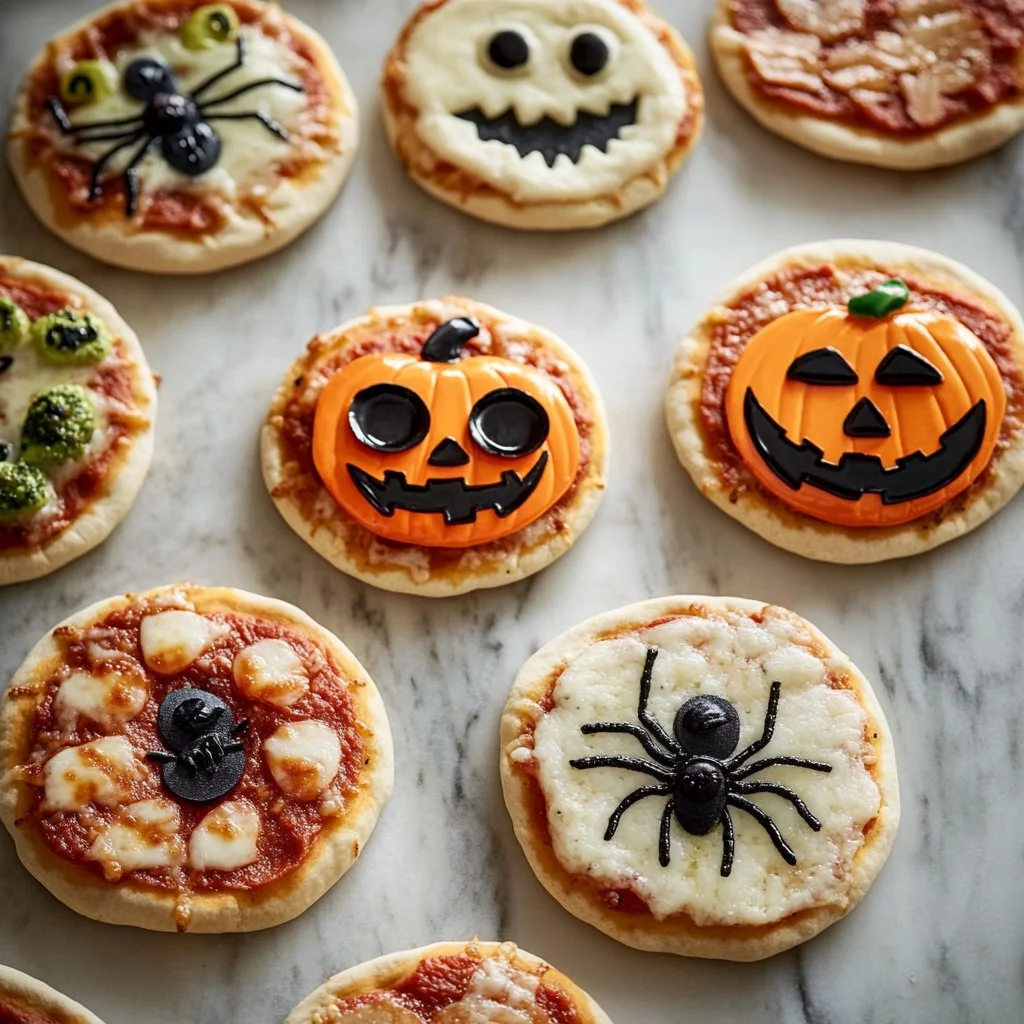
Step 5 – Create your spooky designs
Unleash your creativity! Use black olives for spooky eyes, cut pieces of pepperoni to resemble a spider or mummy, or shape bell peppers to form ghostly figures. This is a fun way to make dinner festive, and your kids will love joining in!
Step 6 – Drizzle with olive oil
For an extra touch of flavor, lightly drizzle olive oil over the pizzas. This will help the crust to turn a lovely golden brown while adding a bit of richness to the dish.
Step 7 – Add Italian seasoning
If you wish, sprinkle Italian seasoning over your mini pizzas. Just a pinch can elevate the flavors and make your pizza experience even more delightful.
Step 8 – Bake for 10-12 minutes
Pop the baking sheet into your preheated oven and let the magic happen! Keep an eye on them; they should bake for about 10-12 minutes until the cheese is melted and bubbly, and the crust is slightly golden.
Step 9 – Cool slightly before serving
Once out of the oven, let your spooky mini pizzas cool for a few moments. This ensures no one burns their mouths rushing to devour these delightful treats.
Step 10 – Serve and enjoy!
Serve these Easy Mini Halloween Pizzas warm for maximum gooeyness! Let your family dig in and enjoy the creations you’ve all made together. Don’t forget to celebrate the fun designs and flavors!
Serving Suggestions for Easy Mini Halloween Pizzas
Best occasions to serve this dish
These mini pizzas are perfect for:
- Halloween parties: A fun centerpiece for any gathering.
- Movie nights: Pair them with a spooky film for an exciting evening.
- School lunches: Twist it into a fun lunch option by using themed designs.
- Playdates: Kids will love crafting their own spooky creations together.
What to serve with it
Pair your mini pizzas with:
Drinks:
- Apple cider
- Spooky punch
- Soda or sparkling water
Sides:
- Fresh veggie sticks
- Fruit skewers
- A festive salad
Each of these pairings adds to the experience and ensures a balanced meal that your family will enjoy.
Storing Easy Mini Halloween Pizzas Properly
Best storage practices
To keep your pizzas fresh:
- Refrigerator: Store leftover mini pizzas in an airtight container. They’ll last for about 3-4 days.
- Freezer: For longer storage, place the pizzas in a freezer-safe container. They can be frozen for up to 2 months.
Reheating and freezing tips
- Reheating: To reheat, pop the pizzas in the oven at 350°F (175°C) for about 5-7 minutes until heated through.
- Freezing tips: If freezing, ensure the pizzas are completely cooled before wrapping them tightly in plastic wrap or aluminum foil to prevent freezer burn.
- Thawing: When ready to enjoy, simply thaw in the fridge overnight before reheating.
Tips & Tricks for Easy Mini Halloween Pizzas
Mistakes to avoid
- Overloading toppings: Less is often more—adding too many toppings can make the pizza soggy.
- Skipping the preheat step: Always preheat your oven for best results; it helps in achieving that crispy crust.
Extra tips for better results
- Experiment with shapes: Use cookie cutters to create fun shapes out of your toppings for added fun.
- Add a theme: For a cohesive Halloween meal, use colors related to the season, like orange bell peppers or black olives.
- Encourage creativity: Allow everyone to design their own pizza. It creates a fun atmosphere and makes the meal more engaging!
Recipe Variations of Easy Mini Halloween Pizzas
Creative twists
- Sweet variations: Swap out pizza sauce for a light layer of pumpkin puree and top with cream cheese for a sweet twist.
- Explore flavors: Try different cheeses like goat cheese or feta for a new taste experience.
- Seasonal flavors: Combine seasonal ingredients like roasted butternut squash or caramelized onions for a gourmet touch.
Dietary adjustments
- Gluten-free: Use gluten-free pizza crusts or even cauliflower crust for a healthier option.
- Dairy-free: Opt for dairy-free cheese alternatives to suit dietary restrictions.
- Vegan: Use vegan cheese and ensure that other ingredients (like the crust) are free from animal products.
Conclusion about Easy Mini Halloween Pizzas
In wrapping up, Easy Mini Halloween Pizzas are a delightful way to celebrate the season while indulging in a delicious meal with family and friends. They are simple to make, loaded with flavors, and offer an engaging experience for everyone involved in the kitchen. With just a bit of creativity, you can transform these pizzas into spooky masterpieces that will impress at any gathering.
So why not give it a try this Halloween? We encourage you to embark on this culinary adventure and create lasting memories that you and your loved ones will cherish for years to come. Feel free to share your creations and experiences; we can’t wait to hear how you made this recipe your own!
FAQs about Easy Mini Halloween Pizzas
What if it doesn’t turn out right?
Not to worry! Cooking is all about experimentation. If your first batch doesn’t come out as expected, think about what might have gone wrong—too many toppings, not enough cheese, or oven temperature issues. Adjust and try again; practice makes perfect!
Can I prepare it ahead of time?
Yes! You can prep the mini pizzas a few hours in advance and store them in the fridge until you’re ready to bake. Just wait to add the pizza sauce and toppings until just before baking for the best results.
What are the best ingredient substitutions?
You can easily swap out ingredients based on your pantry. For instance, use naan bread instead of mini crusts or marinara sauce instead of pizza sauce to adapt the recipe to your needs.
How long can it be stored?
If you have leftovers, they can chill in the fridge for about 3-4 days. If you freeze them, they should be good for about 2 months.
Can I use store-bought dough or crust?
Absolutely! Using store-bought dough or crust can save you time and effort, making this recipe a quick meal option.
Is this recipe kid-friendly or family-appropriate?
Definitely! The fun shapes and toppings make it incredibly appealing to kids, and it’s an excellent way to involve them in cooking.
Can I make this recipe allergen-free?
Yes! By carefully selecting your ingredients—such as gluten-free crusts or dairy-free cheese—you can easily adapt this recipe to be allergen-friendly for your family and guests.
By incorporating these sections, your article will provide a detailed overview of the Easy Mini Halloween Pizzas while appealing to a broad audience. Happy cooking!

Easy Mini Halloween Pizzas
Ingrédients
For the pizzas
- 4-6 pieces Mini pizza crusts (store-bought or homemade)
- 1 cup Pizza sauce Can be substituted with marinara or pesto.
- 2 cups Shredded mozzarella cheese Can use cheddar or dairy-free cheese as alternatives.
- 1/2 cup Black olives (sliced) Use for decoration.
- 1 cup Pepperoni (cut into fun shapes) Optional for decoration.
- 1/2 cup Bell peppers (sliced into shapes) Use for decoration.
- 1 tablespoon Olive oil For drizzling.
- 1 teaspoon Italian seasoning Optional.
Instructions
Preparation
- Clear your kitchen counter and gather all your ingredients. Preheat your oven to 400°F (200°C).
- Arrange the mini pizza crusts on a baking sheet, ensuring they aren’t touching.
- Spread a generous layer of pizza sauce over each mini crust.
- Sprinkle shredded mozzarella cheese over the sauce.
- Use black olives, pepperoni, and bell peppers to create spooky designs on top of the cheese.
- Drizzle with olive oil for extra flavor.
- If desired, sprinkle Italian seasoning over the pizzas.
Baking
- Bake the pizzas in the preheated oven for 10-12 minutes until the cheese is melted and bubbly.
- Remove from the oven and allow to cool slightly before serving.
- Serve warm and enjoy your spooky creations!