

Table of Contents
Introduction about Mummy Chocolate Covered Pretzels
Have you ever wondered how to combine the fun of a classic pretzel with the sweetness of chocolate? Well, let me introduce you to the delightful world of Mummy Chocolate Covered Pretzels! These adorable treats are not just delicious; they are also a playful and spooky touch to your dessert table. Perfect for Halloween parties or any festive gathering, they’re sure to put smiles on everyone’s faces.
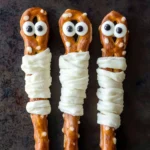
Imagine biting into a crunchy pretzel that’s perfectly coated in rich chocolate and drizzled with white chocolate to create an adorable mummy appearance. Sound tempting? The best part is how simple and quick the recipe is, making it an excellent choice for both beginner and experienced bakers!
Let’s dive into this delightful recipe that combines taste and creativity. Trust me; after trying these Mummy Chocolate Covered Pretzels, they will quickly become a favorite in your household.
Key Benefits of Mummy Chocolate Covered Pretzels
Why You’ll Love This Recipe
- Delicious Flavor: The combination of salty pretzels and sweet chocolate is simply irresistible.
- Easy to Make: With just a few steps, you can whip these up in no time.
- Perfect for All Ages: Kids and adults alike love these fun treats.
- Customizable: You can personalize them with different toppings and decorations.
- Great for Events: They’re a perfect addition to Halloween parties, school events, or family gatherings.
What Makes It Stand Out
Mummy Chocolate Covered Pretzels are not just a creative delight for the eyes; they offer a unique blend of flavors and textures. The salty crunch of the pretzel, paired with the sweetness of chocolate, creates an unforgettable experience.
Moreover, their spooky presentation is perfect for seasonal celebrations, especially around Halloween. They allow for endless customization—whether you want to add colorful sprinkles or change up the chocolate flavors, the possibilities are truly endless. Making these treats is a fun bonding activity with family, especially when involving kids in the decorating process.
Ingredients for Mummy Chocolate Covered Pretzels
Complete Ingredient List with Measurements
To make your own Mummy Chocolate Covered Pretzels, gather the following ingredients:
- 1 dozen pretzels
- 1 cup chocolate chips (milk, dark, or semi-sweet)
- 1 cup white chocolate or vanilla candy melts
- Candy eyes
- Sprinkles (optional)
Substitutes and Alternatives
Not a fan of chocolate? No problem! Here are some substitutes you can consider:
- Pretzels: Use gluten-free pretzels to cater to dietary needs.
- Chocolate Chips: Dark chocolate or salted caramel chips can add a different flavor profile.
- White Chocolate/Candy Melts: If you prefer a dairy-free option, look for vegan chocolate alternatives.
- Candy Eyes: For a healthier option, you could use small pieces of fruit, like sliced almonds or raisins, to create “eyes.”
How to Make Mummy Chocolate Covered Pretzels – Step-by-Step Directions
Creating these Mummy Chocolate Covered Pretzels is an enjoyable process that anyone can master. Follow these easy steps:
Step 1: Prep Your Workspace and Ingredients
Before you start, make sure your workspace is clean and organized. Gather all your ingredients and have everything within easy reach. You’ll need:
- A microwave-safe bowl for melting chocolate
- Parchment paper for lining your baking sheet
- A fork for drizzling chocolate
Step 2: Melt the Chocolate Chips
In your microwave-safe bowl, add 1 cup of chocolate chips. Microwave them at medium power, stirring every 30 seconds. This helps prevent the chocolate from burning. Once melted and smooth, set it aside.
Step 3: Dip Each Pretzel in Chocolate
Grab your pretzels one at a time and dip them into the melted chocolate. Use a fork to lift them out, allowing the excess chocolate to drip back into the bowl. Ensure each pretzel is entirely coated for the best taste.
Step 4: Place on Parchment-Lined Baking Sheet
After coating, lay the chocolate-covered pretzels on a parchment-lined baking sheet. This will help prevent sticking and make clean-up a breeze.
Step 5: Melt the White Chocolate or Candy Melts
In a separate bowl, melt your white chocolate or vanilla candy melts in the same manner as before. Stir every 30 seconds until completely smooth.
Step 6: Drizzle White Chocolate for the Mummy Effect
Using a fork, drizzle the melted white chocolate over the chocolate pretzels, creating a « mummy » effect. Don’t worry about perfection—an imperfect look adds to the spooky charm!
Step 7: Add Candy Eyes While Wet
Before the white chocolate sets, place two candy eyes on each pretzel. This is what brings your mummy pretzels to life!
Step 8: Optional Decorations
If you’d like, sprinkle additional toppings on your pretzels while the chocolate is still wet. It could be colored sprinkles, edible glitter, or crushed nuts for some extra flair.
Step 9: Allow Them to Set
Let the pretzels cool and harden at room temperature. You can speed up this process by placing them in the refrigerator for around 10-15 minutes.
Step 10: Serve and Enjoy!
Once the chocolate has fully set, your Mummy Chocolate Covered Pretzels are ready to be enjoyed! Serve them as a delightful treat at your next gathering.
Serving Suggestions for Mummy Chocolate Covered Pretzels
Best Occasions to Serve This Dish
Mummy Chocolate Covered Pretzels are incredibly versatile. Here are a few occasions where they shine:
- Halloween Parties: They’re a fun addition to any spooky celebration.
- School Events: Easy to share and delightful for kids.
- Family Gatherings: A treat that everyone will love, regardless of age.
What to Serve with It
Pair these pretzels with a few delightful accompaniments:
- Milk or hot chocolate
- Candied apples
- Caramel or chocolate dipping sauces
- A cup of coffee for the adults
Storing Mummy Chocolate Covered Pretzels Properly
Best Storage Practices
To keep your Mummy Chocolate Covered Pretzels fresh, store them in an airtight container. They can last up to a week when kept at room temperature.
However, for longer-lasting freshness, consider refrigerating them. If you do, make sure to place a piece of parchment paper between layers to avoid sticking.
Reheating and Freezing Tips
If you need to freeze them, place them in a single layer on a parchment-lined baking sheet until frozen, then transfer them to an airtight container or freezer bag. To thaw, simply remove them from the freezer and let them sit at room temperature for about 30 minutes.
Avoid reheating chocolate-covered pretzels, as it can alter their texture and make them lose their delightful crunch.
Tips & Tricks for Mummy Chocolate Covered Pretzels
Mistakes to Avoid
- Overheating Chocolate: Make sure to heat your chocolate at lower power to avoid burning.
- Not Drizzling Correctly: The drizzle is part of the charm! Don’t stress about getting it perfect—embrace the spooky, messy look.
- Skipping the Eyes: Adding the candy eyes immediately is crucial; otherwise, they won’t stick.
Extra Tips for Better Results
- If your chocolate is too thick when melting, add a tiny bit of vegetable oil to make it smoother.
- Experiment with different types of pretzels—try using pretzel sticks or even chocolate-covered pretzels for a double dose of chocolate.
- Get creative with colors! Use colored melting chocolate or candy melts to match your event’s theme.
Recipe Variations of Mummy Chocolate Covered Pretzels
Creative Twists
- Pumpkin Spice Mummy Pretzels: Add pumpkin pie spice to your melted chocolate for a festive flavor.
- Nutty Pretzels: Roll your chocolate-covered pretzels in crushed nuts before drizzling with white chocolate for added texture.
- Seasonal Variations: Swap out Halloween decorations for pastel colors and candy shapes for spring events.
Dietary Adjustments
- Gluten-Free: Use gluten-free pretzels to cater to dietary restrictions.
- Dairy-Free/Vegan: Choose dairy-free chocolate and candy melts to meet these dietary needs.
Conclusion about Mummy Chocolate Covered Pretzels
In summary, Mummy Chocolate Covered Pretzels are not only easy and fun to make but are also a delightful way to add some festive flair to any gathering. With their unique flavor and charming appearance, they’re sure to be a hit at your next event.
I encourage you to give this recipe a try. You’ll love the simple process and the joy these treats bring to both you and your guests. Don’t forget—creating and sharing your Mummy Chocolate Covered Pretzels can become a cherished tradition!
FAQs about Mummy Chocolate Covered Pretzels
What if it doesn’t turn out right?
Don’t worry! If the chocolate doesn’t coat evenly, just dip them again. You can sprinkle with decorations to disguise any imperfections.
Can I prepare it ahead of time?
Absolutely! These pretzels can be made in advance and stored properly. They’re perfect for prepping a few days ahead of an event.
What are the best ingredient substitutions?
You can use gluten-free pretzels, dairy-free chocolate, or even different types of candy melts based on your preferences.
How long can it be stored?
When stored in an airtight container, these pretzels can last for up to a week at room temperature or longer in the fridge.
Can I use store-bought dough or crust?
Although this recipe doesn’t use dough, feel free to get creative and pair these pretzels with other bases or create a pretzel dough version!
Is this recipe kid-friendly or family-appropriate?
Definitely! Kids adore these Mummy Chocolate Covered Pretzels, and they make a great activity to do together.
Can I make this recipe allergen-free?
Yes! Just opt for gluten-free pretzels, dairy-free chocolate, and ensure all other ingredients are allergen-free, depending on your needs.
Now, you’re all set to enjoy an exciting adventure in baking with Mummy Chocolate Covered Pretzels. Happy pretzel making!
Mummy Chocolate Covered Pretzels
Ingrédients
Main Ingredients
- 12 pieces pretzels Can use gluten-free pretzels if needed.
- 1 cup chocolate chips (milk, dark, or semi-sweet) Choose according to preference.
- 1 cup white chocolate or vanilla candy melts For the mummy effect.
- Optional candy eyes Use for decorating.
- Optional sprinkles For additional decoration.
Instructions
Preparation
- Prep your workspace and ingredients by gathering all your items and ensuring your workspace is clean.
- In a microwave-safe bowl, add 1 cup of chocolate chips and microwave at medium power, stirring every 30 seconds until melted and smooth.
- Dip each pretzel one at a time into the melted chocolate, using a fork to lift them out and allowing excess chocolate to drip back into the bowl.
- Lay the chocolate-covered pretzels on a parchment-lined baking sheet.
- In a separate bowl, melt the white chocolate or vanilla candy melts using the same method as the chocolate.
- Drizzle the melted white chocolate over the chocolate pretzels to create the mummy effect.
- Place two candy eyes on each pretzel while the white chocolate is still wet.
- Sprinkle additional toppings on the pretzels if desired.
- Allow the pretzels to cool and harden at room temperature or refrigerate for 10-15 minutes to speed up the process.
- Serve and enjoy the delightful Mummy Chocolate Covered Pretzels!