
Table of Contents
Introduction about Thumbprint Ghost Cookies
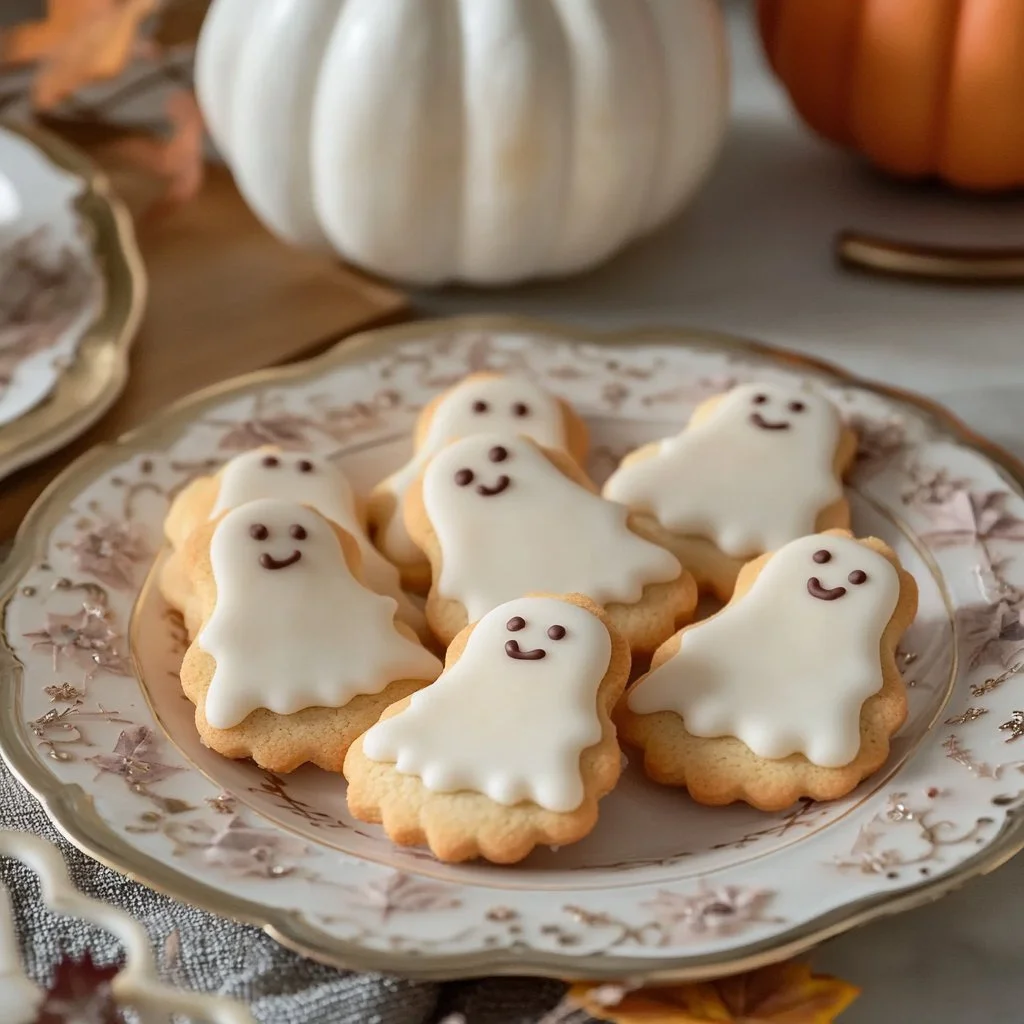
Have you ever wished for a recipe that perfectly balances fun, flavor, and festivity? Look no further than Thumbprint Ghost Cookies! This delightful treat captures the essence of Halloween while being simple enough to whip up anytime. Picture this: rich, buttery cookies adorned with a ghostly white chocolate drizzle and spooky little eyes peering out at you. Who wouldn’t want to dig into these?
The beauty of Thumbprint Ghost Cookies lies not only in their eye-catching design but also in their ease of preparation. Whether you are baking with kids, preparing for a Halloween party, or simply indulging in a sweet treat at home, these cookies come together quickly and leave a lasting impression. Imagine the joy of crafting these whimsical cookies and sharing them with friends and family!
Are you ready to add a touch of magic to your baking? Let’s dive in and explore why you’ll love this charming recipe!
Key Benefits of Thumbprint Ghost Cookies
Why You’ll Love This Recipe
Delicious Flavor: The combination of buttery cookies with chocolate or fruit jam creates an irresistible sweetness.
Easy to Make: With straightforward steps, even novice bakers can succeed!
Perfect for Kids: Enjoy a family baking activity that’s fun and engaging.
Quick to Prepare: From dough to oven in less than an hour, getting these cookies ready is a breeze.
Visually Appealing: Your friends and family will be impressed by the spooky design that’s perfect for Halloween.
Customizable: With various filling options available, you’ll never run out of ways to enjoy these treats.
What Makes it Stand Out
Thumbprint Ghost Cookies are more than just a dessert; they are a statement piece. The unique thumbprint design not only adds character but also provides a canvas for creativity. You can fill these cookies with anything from luscious chocolate chips to homemade fruit jams, tailoring the flavor to your preference.
Seasonally, these cookies shine during Halloween but can be adjusted for any occasion. Change the toppings to suit the theme—pastel colors for springtime or rich spices for the fall. Their playful nature keeps things joyful in the kitchen, making it a memorable experience for all involved.
Ingredients for Thumbprint Ghost Cookies
Complete Ingredient List with Measurements
Here’s what you’ll need to whip up your batch of delicious Thumbprint Ghost Cookies:
- 1 cup unsalted butter, softened
- 3/4 cup granulated sugar
- 1 teaspoon vanilla extract
- 2 1/4 cups all-purpose flour
- 1/2 teaspoon salt
- 1/2 teaspoon baking powder
- 1 cup chocolate chips or fruit jam of your choice (like raspberry or strawberry)
- White chocolate melts (for ghostly coating)
- Black icing or chocolate chips (for eyes)
Substitutes and Alternatives
If you have dietary restrictions or just want to customize your cookies, fear not! Here are some common substitutions:
- Butter: Use coconut oil or vegan butter for a dairy-free version.
- Granulated Sugar: Swap it with coconut sugar or a sweetener of your choice for a healthier alternative.
- All-Purpose Flour: Use gluten-free flour for a gluten-free option.
- Filling: Rather than chocolate chips or traditional jams, consider nut butter or dairy-free chocolate to cater to other tastes.
How to Make Thumbprint Ghost Cookies – Step-by-Step Directions
Step 1 – Prep Your Workspace and Ingredients
Before you dive into mixing, make sure your workspace is ready. Gather all your ingredients and measuring tools. It helps to preheat your oven to 350°F (175°C) now, so it’s ready when you finish mixing!
Step 2 – Cream Butter and Sugar
In a mixing bowl, add the softened unsalted butter and granulated sugar. Using a hand mixer or a stand mixer, cream them together until the mixture is light and fluffy. This usually takes about 2-3 minutes. Pay attention to ensure it gets airy, as this will give your cookies a lovely texture!
Step 3 – Add Vanilla and Dry Ingredients
Once the butter and sugar are perfectly creamed, pour in the vanilla extract. Mix well. Then, gradually add the all-purpose flour, salt, and baking powder. Stir until everything is thoroughly combined. You might want to use a spatula to fold in the flour gently, ensuring you don’t overmix.
Step 4 – Chill the Dough
After mixing, it’s important to chill the dough for about 30 minutes. Cover the bowl with plastic wrap and place it in the refrigerator. This step firms up the dough, making it easier to shape later.
Step 5 – Shape the Cookies
Once your dough has chilled, take it out of the refrigerator. Scoop tablespoon-sized portions and roll them into balls using your hands. Place the balls on a baking sheet lined with parchment paper, ensuring they’re spaced out. Press down in the center of each ball to create a thumbprint indentation.
Step 6 – Bake the Cookies
Pop these into your preheated oven and bake for 12-15 minutes or until they are lightly golden on the edges. Keep an eye on them, as ovens can vary! When done, let them cool for a few minutes before moving them to a wire rack.
Step 7 – Fill with Chocolate or Jam
Once cooled slightly, take your fill of chocolate chips or fruit jam and fill each thumbprint. Now, return the cookies to the oven for an additional 2-3 minutes to make the filling gooey and delightful.
Step 8 – Prepare the Ghostly Coating
While your cookies are finishing in the oven, melt your white chocolate melts in a microwave-safe bowl. Heat them in 30-second intervals, stirring in between until they’re smooth.
Step 9 – Coat the Cookies
After the cookies have cooled completely, gently drizzle the melted white chocolate over the top of each cookie. This is what gives them their ghostly appearance!
Step 10 – Add the Eyes
Finally, use the black icing or chocolate chips to create little eyes on your ghost cookies. You can be creative with this part—make wide-eyed ghosts or sleepy ones!
Serving Suggestions for Thumbprint Ghost Cookies
Best Occasions to Serve This Dish
Thumbprint Ghost Cookies are not only fantastic for Halloween parties but also make for a spooky addition to:
- School bake sales
- Halloween gatherings
- Kids’ birthday parties
- Autumn picnics
- Family get-togethers
Their fun design will surely be a hit!
What to Serve with It
Pair your tasty cookies with delightful accompaniments. Here are some great ideas:
- Milk
- Pumpkin spice lattes
- Hot cocoa
- Coffee
- Ice cream (vanilla or pumpkin flavor)
Storing Thumbprint Ghost Cookies Properly
Best Storage Practices
To keep your Thumbprint Ghost Cookies fresh, store them in an airtight container. They can last up to one week at room temperature. If you live in a warm area, you may want to keep them in the fridge to maintain their texture and flavor.
Reheating and Freezing Tips
If you want to savor them later, you can freeze these cookies. Freeze them in a single layer on a baking sheet until firm, then transfer them to a freezer-safe container for up to 3 months. When ready to enjoy, simply let them thaw at room temperature, and they’ll be just as tasty!
Tips & Tricks for Thumbprint Ghost Cookies
Mistakes to Avoid
- Overbaking: Keep a close eye on baking time; cookies should be lightly golden.
- Skipping the chill: Chilling the dough helps in shaping and prevents spreading.
Extra Tips for Better Results
- Use a cookie scoop: This ensures uniform cookie sizes, which leads to even baking.
- Experiment with fillings: Try different jams or chocolate flavors for varied tastes.
- Cool completely: Allow cookies to cool adequately before drizzling white chocolate to prevent it from melting.
Recipe Variations for Thumbprint Ghost Cookies
Creative Twists
Do you want to mix up the flavor game? Here are some creative twists you can try:
- Add spices: Incorporate a dash of cinnamon or nutmeg for a cozy flavor.
- Nuts: Add chopped nuts for texture and a nutty flavor.
- Seasonal spins: Use pumpkin spice during fall or peppermint extract during the holidays.
Dietary Adjustments
If you’re looking to cater to various dietary needs, consider these adjustments:
- Gluten-Free: Use a gluten-free flour blend.
- Vegan: Substitute vegan butter and use a flax egg instead of regular egg if desired.
- Nut-Free: Opt for sunflower seed butter as a filling or skip nuts altogether.
Conclusion about Thumbprint Ghost Cookies
In summary, Thumbprint Ghost Cookies are not just delicious; they are a fun way to get creative in the kitchen. From their delightful appearance to their rich flavor, they are perfect for any occasion. With their easy-to-follow steps, you’ll find baking them a joy!
So why not try making these delightful Thumbprint Ghost Cookies today? Unleash your inner baker and share these spooky treats with friends and family. Don’t forget to come back and share your experience—we’d love to hear how they turned out!
FAQs about Thumbprint Ghost Cookies
What if it doesn’t turn out right?
If your cookies don’t come out as expected, don’t worry! Sometimes slight variations happen due to oven temperature changes. If they spread too much, check your chilling time next time!
Can I prepare it ahead of time?
Absolutely! You can prepare the dough a day in advance. Just chill it in the refrigerator and scoop out the cookies when ready to bake.
What are the best ingredient substitutions?
Some great substitutions include coconut oil for butter, almond flour for all-purpose flour, or agave syrup for granulated sugar. Adjust to your dietary needs!
How long can it be stored?
Thumbprint Ghost Cookies can last for up to one week at room temperature in an airtight container or up to three months in the freezer.
Can I use store-bought dough or crust?
While it’s best to follow the homemade recipe for optimal flavor, you can use store-bought dough in a pinch—just be mindful of the baking instructions.
Is this recipe kid-friendly or family-appropriate?
Yes! This recipe is perfect for kids and families. It’s simple enough for little ones to help with, creating a fun bonding activity.
Can I make this recipe allergen-free?
Definitely! By using gluten-free flour, dairy-free butter, and nut-free fillings, you can create a delightful treat that everyone can enjoy.
With these cheerful cookies, you’re all set to bake, create, and enjoy this spooky Halloween season! Happy baking!

Thumbprint Ghost Cookies
Ingrédients
Main Ingredients
- 1 cup unsalted butter, softened
- 3/4 cup granulated sugar
- 1 teaspoon vanilla extract
- 2 1/4 cups all-purpose flour
- 1/2 teaspoon salt
- 1/2 teaspoon baking powder
- 1 cup chocolate chips or fruit jam of your choice (like raspberry or strawberry)
- white chocolate melts (for ghostly coating)
- black icing or chocolate chips (for eyes)
Instructions
Preparation
- Gather all your ingredients and measuring tools. Preheat your oven to 350°F (175°C).
- In a mixing bowl, cream together the softened unsalted butter and granulated sugar until light and fluffy (2-3 minutes).
- Add the vanilla extract and mix. Gradually incorporate the all-purpose flour, salt, and baking powder until combined.
- Chill the dough for about 30 minutes covered with plastic wrap in the refrigerator.
- Scoop tablespoon-sized portions of dough, roll them into balls, and place them on a lined baking sheet. Press down in the center for thumbprint indentations.
- Bake for 12-15 minutes until lightly golden. Cool slightly before transferring to a wire rack.
- Fill the thumbprints with chocolate chips or fruit jam and bake for an additional 2-3 minutes.
- Melt white chocolate melts in the microwave and drizzle over the cooled cookies.
- Use black icing or chocolate chips to create eyes on the cookies.