
Table of Contents
Introduction about Spider Cookies Recipe
Are you looking for a fun and delightful treat to share with family and friends? Why not try making Spider Cookies? This whimsical recipe combines delicious flavors with an adorable spider design that’s perfect for any occasion. Whether you’re celebrating Halloween, a birthday party, or just an ordinary day that deserves a little sweetness, this Spider Cookies Recipe is sure to charm everyone.
Imagine opening your cookie jar and finding delightful treats that not only taste fantastic but also look incredible! Have you ever thought about how fun it would be to decorate your cookies creatively? With this Spider Cookies Recipe, you can enjoy both the process of baking and the joy of decorating!
The beauty of baking lies in its simplicity and the warmth it brings to our homes. With just a handful of ingredients and straightforward steps, you can create cookies that are not only delicious but are also a work of art. Let’s dive into the delightful world of Spider Cookies!
Key Benefits of Spider Cookies Recipe
Why you’ll love this recipe
- Delicious Taste: With the perfect blend of soft and chewy texture, these cookies are irresistible.
- Easy Preparation: Simple techniques make this recipe beginner-friendly.
- Quick Baking Time: Bake in just 12-15 minutes, perfect for last-minute cravings.
- Family Fun: Great for baking with kids or entertaining friends.
- Customizable: You can easily adjust ingredients for allergies or personal preferences.
- Impressive Presentation: The spider design turns ordinary cookies into festive treats.
What makes it stand out
What sets this Spider Cookies Recipe apart is its potential for creativity. Not only do these cookies taste incredible, but their decoration allows for endless possibilities. Whether you want to make them spooky for Halloween or fun for a party, the cookie base is versatile enough to support your creative vision.
Moreover, these cookies make a memorable centerpiece for gatherings. A plate of adorable spider cookies can spark joy and laughter, making them the perfect conversation starter at any event. Plus, they’re an excellent way to bring together children and adults in the kitchen, sparking a love for baking in the younger generation!
Ingredients for Spider Cookies Recipe
Complete ingredient list with measurements
- 150g butter, melted
- 1/2 cup (100g) brown sugar
- 1/2 cup (110g) white sugar
- 1 egg
- 1 tsp vanilla essence
- 2 cups (300g) plain flour
- 1/4 tsp salt
- 1 tsp baking soda
- 2 Tbsp cornflour
- 140g Maltesers (for spider bodies)
- 100g dark chocolate, melted (for legs)
- White icing tube (for eyes)
Substitutes and alternatives
If you’re wondering about substitutions for any of these ingredients, here are some common alternatives:
- Butter: You can use coconut oil or a dairy-free butter alternative for a vegan option.
- Sugar: Substitute brown and white sugar with coconut sugar or maple syrup, adjusting the amount accordingly.
- Egg: A flax egg (1 Tbsp flaxseed meal + 2.5 Tbsp water) or applesauce (1/4 cup) can replace eggs for a vegan version.
- Flour: Gluten-free flour blends work well for those with gluten sensitivities.
- Maltesers: You could use any chocolate candies or even homemade chocolate balls.
How to Make Spider Cookies Recipe – Step-by-Step Directions
Step 1 – Prep your workspace and ingredients
Before you start baking, gather all your ingredients and tools to make the process smoother. Preheat your oven to 170°C (340°F) so it’s ready to go when your cookie dough is ready. Grease or line your baking trays with parchment paper.
Step 2 – Mix wet ingredients
In a large mixing bowl, combine the melted butter with brown sugar and white sugar. Use a whisk or a hand mixer to blend them together until smooth and creamy. Next, add the egg and vanilla essence, mixing until everything is well incorporated.
Step 3 – Sift dry ingredients
In another bowl, sift together the plain flour, salt, baking soda, and cornflour. Sifting helps to aerate the ingredients and ensures there are no lumps, making for a consistent cookie texture.
Step 4 – Combine wet and dry mixes
Gradually fold the dry ingredients into the wet mixture. Use a spatula to ensure you don’t overmix; you want to combine just until you can’t see any flour. This will help keep your cookies soft.
Step 5 – Shape the cookies
Using your hands or a cookie scoop, roll the dough into balls about the size of a golf ball. Place them on the prepared baking tray, leaving enough space for spreading. If you prefer a more uniform shape, refrigerate the dough for about 30 minutes before rolling.
Step 6 – Bake the cookies
Pop the tray into your preheated oven and bake for 12-15 minutes. Keep an eye on them; you want them to be lightly golden around the edges but still soft in the middle. They will continue to firm up as they cool.
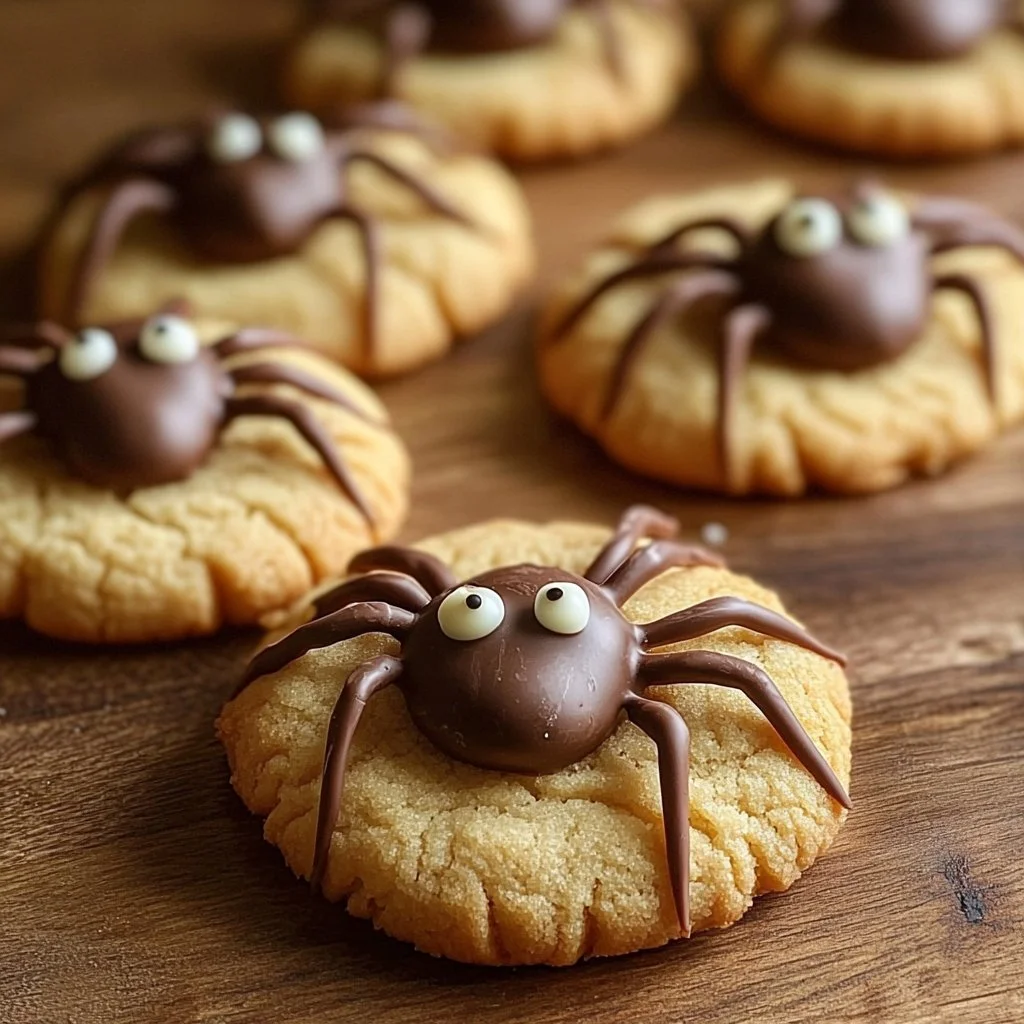
Step 7 – Add the spider bodies
As soon as the cookies come out of the oven, press a Malteser gently into the center of each cookie. This not only looks adorable but ensures the candies stick well as the cookies cool.
Step 8 – Make the chocolate legs
While the cookies are cooling, melt the dark chocolate in a microwave-safe bowl or using a double boiler. Once melted, fill a piping bag or a ziplock bag with the melted chocolate, cutting a tiny hole in the corner. Pipe out legs extending from the Malteser, creating the spider look.
Step 9 – Add the eyes
Using the white icing tube, add two small dots on top of the Maltesers for the spider’s eyes. This small detail will make your cookies come alive and look even more appealing!
Step 10 – Show off your creation!
Let the cookies cool completely on a wire rack before serving. Once they’re ready, display them on a platter or in a cookie jar, and watch everyone’s eyes light up with excitement!
Serving Suggestions for Spider Cookies Recipe
Best occasions to serve this dish
- Halloween Parties: These cookies will be a highlight at any spooky gathering!
- Kids’ Birthdays: Children will love the fun spider design as a unique treat.
- School Events: Perfect for bake sales or school celebrations.
- Family Gatherings: Share them during family dinners or picnics to spread joy.
- Seasonal Festivities: Adapt them for other holidays by changing the decorations.
What to serve with it
Pair your Spider Cookies with any of these delightful beverages for a complete treat experience:
- Milk: The classic pairing for cookies!
- Hot Chocolate: A cozy complement on cold days.
- Coffee or Tea: Perfect for adults looking for a sweet afternoon break.
- Ice Cream: Serve with a scoop of vanilla or chocolate ice cream for a decadent dessert.
Storing Spider Cookies Recipe Properly
Best storage practices
To keep your Spider Cookies fresh, store them in an airtight container at room temperature. They can last up to a week if kept properly. For longer storage, place them in the refrigerator, where they can last up to two weeks.
Reheating and freezing tips
If you need to freeze your cookies, place them in a single layer on a baking tray until frozen solid. Then, transfer them to a freezer-safe container or bag. They can be kept in the freezer for up to three months.
When you’re ready to enjoy them, simply thaw at room temperature or warm them briefly in the microwave to regain that fresh-baked softness.
Tips & Tricks for Spider Cookies Recipe
Mistakes to avoid
- Overmixing Dough: This can lead to tough cookies. Mix just until combined.
- Skip Refrigerating: If your dough is too soft, chilling it can help shape better cookies.
- Overbaking: Keep an eye on the time; remove them when edges are slightly golden.
Extra tips for better results
- Use a Cookie Scoop: It ensures uniform size for even baking.
- Add Mix-Ins: Consider adding chocolate chips or nuts for extra flavor.
- Experiment with Flavors: Add spices like cinnamon or nutmeg for a seasonal twist.
Recipe Variations of Spider Cookies Recipe
Creative twists
- Chocolate Variations: Use milk chocolate or white chocolate for the legs to change up the flavors.
- Nutty Add-ins: Consider mixing in some crushed nuts like walnuts or pecans for a crunchy texture.
- Seasonal Decor: Change the decoration theme for other holidays, like a Christmas version with red and green icing.
Dietary adjustments
- Gluten-Free: Use a gluten-free flour blend for those with wheat allergies.
- Dairy-Free: Opt for vegan butter and dairy-free chocolate.
- Vegan Cookies: Replace eggs with flax eggs and ensure all other ingredients are vegan-friendly.
Conclusion about Spider Cookies Recipe
In summary, the Spider Cookies Recipe is an enchanting creation that combines delicious flavors with eye-catching designs. The simple preparation makes it accessible for bakers of all skill levels, while the fun decoration process brings families together in the kitchen. Whether for a festive occasion or simply to brighten up an ordinary day, these delightful cookies are sure to impress.
Now it’s your turn to bring this delightful recipe into your kitchen. Try it out, and you’ll see how rewarding and enjoyable it is to create these charming spider cookies. Don’t forget to share your experience and feedback with family and friends. Happy baking!
FAQs about Spider Cookies Recipe
What if it doesn’t turn out right?
Baking can be tricky! If your cookies spread too much, try chilling the dough before baking. If they turn out too dry, consider shortening the baking time next time.
Can I prepare it ahead of time?
Absolutely! You can make the dough ahead of time and refrigerate it for a couple of days or freeze it for longer. Just ensure you let it come to room temperature before baking.
What are the best ingredient substitutions?
Common substitutes include using coconut oil for butter, a flax egg in place of a real egg, or using gluten-free flour blends for a gluten-free option.
How long can it be stored?
Your Spider Cookies can be stored at room temperature in an airtight container for up to a week or in the fridge for up to two weeks.
Can I use store-bought dough or crust?
Yes! You can use store-bought cookie dough to save time, just follow the same decorating steps to achieve that fun spider look.
Is this recipe kid-friendly or family-appropriate?
Definitely! This recipe is perfect for families and children. It’s a fun baking activity that everyone can enjoy together.
Can I make this recipe allergen-free?
Yes! With substitutions like replacing butter with dairy-free alternatives and using gluten-free flour, you can customize this recipe to cater to various dietary needs.
Now you have everything you need to dive into your very own Spider Cookies Recipe! Enjoy the process of baking and the joy that comes from sharing these delightful treats. Happy baking!

Spider Cookies
Ingrédients
Wet Ingredients
- 150 g butter, melted
- 100 g brown sugar 1/2 cup
- 110 g white sugar 1/2 cup
- 1 piece egg
- 1 tsp vanilla essence
Dry Ingredients
- 300 g plain flour 2 cups
- 1/4 tsp salt
- 1 tsp baking soda
- 2 Tbsp cornflour
Decorative Ingredients
- 140 g Maltesers for spider bodies
- 100 g dark chocolate, melted for legs
- 1 tube white icing for eyes
Instructions
Preparation
- Gather all your ingredients and tools, and preheat your oven to 170°C (340°F). Grease or line your baking trays with parchment paper.
- In a large mixing bowl, combine melted butter, brown sugar, and white sugar. Blend until smooth and creamy, then add the egg and vanilla essence, mixing well.
- In another bowl, sift together plain flour, salt, baking soda, and cornflour.
- Gradually fold the dry ingredients into the wet mixture until just combined.
- Roll the dough into golf ball-sized balls and place them on the prepared baking tray.
- Refrigerate the dough for about 30 minutes if it’s too soft.
Baking
- Bake in the preheated oven for 12-15 minutes until lightly golden around the edges but still soft in the middle.
- Press a Malteser gently into the center of each cookie immediately after taking them out of the oven.
Decoration
- Melt dark chocolate and fill a piping bag. Pipe legs extending from the Malteser.
- Add two small dots of white icing on top of the Maltesers for the spider’s eyes.
Serving
- Let the cookies cool completely on a wire rack before serving. Display them on a platter or in a cookie jar.