

Table of Contents
Introduction about Rice Krispies Brains
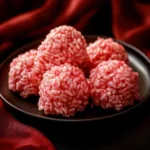
Have you ever found yourself yearning for a delicious, fun treat that’s as cute as it is tasty? Meet the Rice Krispies Brains! This whimsical dessert is perfect for any occasion and offers a delightful twist on a classic favorite. With its playful design and sweet flavor, who wouldn’t want to indulge in these creative little goodies?
Can you imagine the smiles on your friends’ and family’s faces when you present them with a tray of these charming treats? Made from simple ingredients and incredibly easy to prepare, Rice Krispies Brains are sure to be a hit at parties, celebrations, or just as a fun snack to brighten up your day. Let’s dive into what makes this recipe special and why you’ll love it!
Key Benefits of Rice Krispies Brains
Why You’ll Love This Recipe
- Delicious Flavor: The classic combination of marshmallows and crispy rice cereal creates a flavor that everyone loves.
- Quick and Easy: This recipe takes less than 30 minutes to make from start to finish, making it a great last-minute treat.
- Fun for All Ages: Kids and adults alike will enjoy both the making and eating of these playful snacks.
- Creative Customization: You can easily change the color and design to match any occasion.
- No Baking Required: Just melt, mix, and shape—no oven needed!
What Makes It Stand Out
What truly sets Rice Krispies Brains apart is how you can mold them into a brain shape, making them a perfect treat for Halloween or any themed party. The addition of vibrant food coloring and the optional « blood » accents help elevate this treat, giving it a unique character that can engage anyone from picky eaters to adventurous snackers. Plus, there’s plenty of room to customize these treats, whether you want to add a touch of Halloween spirit or keep it simple for everyday enjoyment.
Ingredients for Rice Krispies Brains
Complete Ingredient List with Measurements
To make your Rice Krispies Brains, you’ll need the following ingredients:
- 5 cups (132g) Rice Krispies (or any crispy rice cereal)
- ¼ cup (57g) unsalted butter
- 1 bag (10 oz) (283g) mini marshmallows (about 8 cups)
- Red food coloring (to your desired shade)
Substitutes and Alternatives
If you have allergies or specific dietary preferences, don’t worry! Here are some common substitutes:
- Butter: You can use margarine or coconut oil as a dairy-free alternative.
- Marshmallows: Use vegan marshmallows for a dairy-free option.
- Crispy Rice Cereal: Quinoa puffs or gluten-free cereals make excellent substitutes for a gluten-free treat.
How to Make Rice Krispies Brains – Step-by-Step Directions
Step 1 – Prep Your Workspace and Ingredients
Start by gathering all your ingredients and tools. This includes bowls, saucepan, spatula, parchment paper, and your measuring cups. Preparation is key to making the process smooth and enjoyable!
Step 2 – Line the Baking Sheet
Take a large baking sheet and line it with parchment paper or a silicone baking mat. This will help prevent your treats from sticking and make cleanup easier later.
Step 3 – Measure the Rice Krispies
In a large bowl, measure out 5 cups of Rice Krispies. This will be the base of your treats. Set it aside for later.
Step 4 – Melt the Butter
In a large saucepan, melt ¼ cup of unsalted butter over low heat. Keep an eye on it to ensure it doesn’t brown.
Step 5 – Add the Marshmallows
Once the butter has melted, add the 10 oz of mini marshmallows to the saucepan. Stir constantly until the marshmallows are fully melted and the mixture is smooth.
Step 6 – Add Food Coloring
Now comes the fun part! Remove the saucepan from the heat and add a few drops of red food coloring. Stir it in until the marshmallow mixture is evenly tinted to the shade you like. Remember, the color will become lighter once mixed with the Rice Krispies.
Step 7 – Combine the Mixture
Return the saucepan to the heat briefly if needed, and then add the Rice Krispies into the melted marshmallow mixture. Stir well until all the cereal is thoroughly coated.
Step 8 – Shape the Brains
Using an ice cream scoop or a ¼ cup measure sprayed with non-stick spray, scoop the mixture and drop it onto your prepared baking sheet. With your hands, gently shape each mound into a slightly oblong circle.
Step 9 – Create Brain Details
To make them look even more like brains, use the handle of a butter knife to create an indent on the top of each mound. Use the non-blade side of the knife and your fingers to shape the halves of the brain closer together for a more realistic look.
Step 10 – Add “Blood” Design (Optional)
If you wish to add a spooky touch, put a few drops of red food coloring in a small bowl and use a paintbrush to streak some « blood » on top of the brains. This step is completely optional but certainly adds a fun flair!
After all these steps, allow your Rice Krispies Brains to cool and set completely before serving. Enjoy!
Serving Suggestions for Rice Krispies Brains
Best Occasions to Serve This Dish
Rice Krispies Brains are perfect for various occasions! Consider serving them at:
- Halloween parties
- Birthday celebrations
- Movie nights with friends
- School bake sales
- Themed events
What to Serve With It
To enhance your treat experience, you can consider pairing these Rice Krispies Brains with:
- Milk or chocolate milk
- Hot cocoa
- Fruit juices
- Toppings like sprinkles or drizzled chocolate
Storing Rice Krispies Brains Properly
Best Storage Practices
Store your delicious Rice Krispies Brains in an airtight container to keep them fresh. They can be kept at room temperature for about a week. If you need to keep them longer, consider refrigerating them.
Reheating and Freezing Tips
While these treats are best enjoyed fresh, if you need to freeze them, here’s what to do:
- Freezing: Layer the treats between parchment paper before placing them in a freezer-safe container. They can last up to 2 months frozen.
- Thawing: When you’re ready to enjoy them, let them thaw at room temperature. Avoid reheating, as it may alter the texture.
Tips & Tricks for Rice Krispies Brains
Mistakes to Avoid
- Overheating Marshmallows: Be cautious while melting the marshmallows. Heat them just enough to melt without browning.
- Too Much Coloring: Don’t overdo the food coloring, as it might affect the taste and texture.
- Not Greasing Tools: Make sure to spray measuring cups or ice cream scoops with non-stick spray to make shaping easier.
Extra Tips for Better Results
- Allow the marshmallow mixture to cool slightly before mixing it with the Rice Krispies if you want to control how easily it shapes.
- If you desire a softer texture, use fewer Rice Krispies, while for a crunchier bite, use the full amount.
Recipe Variations of Rice Krispies Brains
Creative Twists
Get creative with your Rice Krispies Brains by trying out some of these exciting twists:
- Nut Additions: Incorporate crushed nuts for a crunchy surprise inside.
- Seasonal Flavors: Experiment with flavors like pumpkin spice during the fall or peppermint extract during winter festivities.
Dietary Adjustments
If you have specific dietary needs, you can adjust the recipe as follows:
- Gluten-Free: Use gluten-free crispy rice cereal.
- Dairy-Free: Choose dairy-free butter and marshmallows for a complete dairy-free version.
Conclusion about Rice Krispies Brains
In summary, Rice Krispies Brains are not only easy to make but also incredibly delicious and visually appealing! Whether it’s for a festive gathering or a simple treat at home, these little creations add a fun touch to any occasion. The combination of crispy, sweet, and colorful elements is sure to delight everyone.
So why not gather the ingredients today and give this delightful recipe a try? We guarantee it will be a hit among family and friends. Let us know how your Rice Krispies Brains turn out, and don’t hesitate to share your creative variations!
FAQs about Rice Krispies Brains
What if it doesn’t turn out right?
If your Rice Krispies Brains don’t hold their shape, it may be due to not mixing quickly enough after adding the cereal. Simply remelt the marshmallow mixture, add more cereal if needed, and reshape.
Can I prepare it ahead of time?
You can definitely prepare Rice Krispies Brains in advance! Store them in an airtight container at room temperature for about a week.
What are the best ingredient substitutions?
If you’re concerned about allergies, you can substitute unsalted butter with coconut oil or dairy-free margarine and use vegan marshmallows instead.
How long can it be stored?
When stored properly in an airtight container, Rice Krispies Brains can last for up to a week at room temperature. For longer storage, you can freeze them.
Can I use store-bought dough or crust?
This recipe relies on the unique texture provided by the marshmallows and Rice Krispies, so using store-bought dough wouldn’t yield the same result.
Is this recipe kid-friendly or family-appropriate?
Absolutely! This treat is easy enough for kids to help with and is generally loved by all ages thanks to its sweet flavors and fun design.
Can I make this recipe allergen-free?
You can easily make Rice Krispies Brains allergen-free by opting for gluten-free crisp rice cereal and dairy-free ingredients as mentioned previously.
Get ready to enjoy a delightful treat that brings smiles to all!
Rice Krispies Brains
Ingrédients
Main Ingredients
- 5 cups Rice Krispies (or any crispy rice cereal) Can be substituted with quinoa puffs for gluten-free.
- 1/4 cup unsalted butter Can use margarine or coconut oil for dairy-free.
- 1 bag (10 oz) mini marshmallows Approximately 8 cups. Use vegan marshmallows for dairy-free.
- to taste Red food coloring Add to achieve your desired shade.
Instructions
Preparation
- Gather all your ingredients and tools, including bowls, saucepan, spatula, parchment paper, and measuring cups.
- Line a large baking sheet with parchment paper or a silicone baking mat.
- Measure out 5 cups of Rice Krispies and set aside.
- Melt 1/4 cup of unsalted butter in a large saucepan over low heat.
- Once melted, add the mini marshmallows to the saucepan, stirring constantly until fully melted and smooth.
- Remove from heat and add red food coloring, mixing until evenly tinted.
Combining and Shaping
- Add the Rice Krispies into the melted marshmallow mixture and stir until all cereal is coated.
- With a non-stick sprayed ice cream scoop or 1/4 cup measure, drop mounds onto the prepared baking sheet and shape them into slightly oblong circles.
- Use the handle of a butter knife to create indents on the top of each mound to resemble brains.
Optional Decoration
- For a spooky touch, apply red food coloring with a paintbrush to simulate ‘blood’ on top of the brains.
Cool and Serve
- Allow the Rice Krispies Brains to cool and set completely before serving.