
Table of Contents
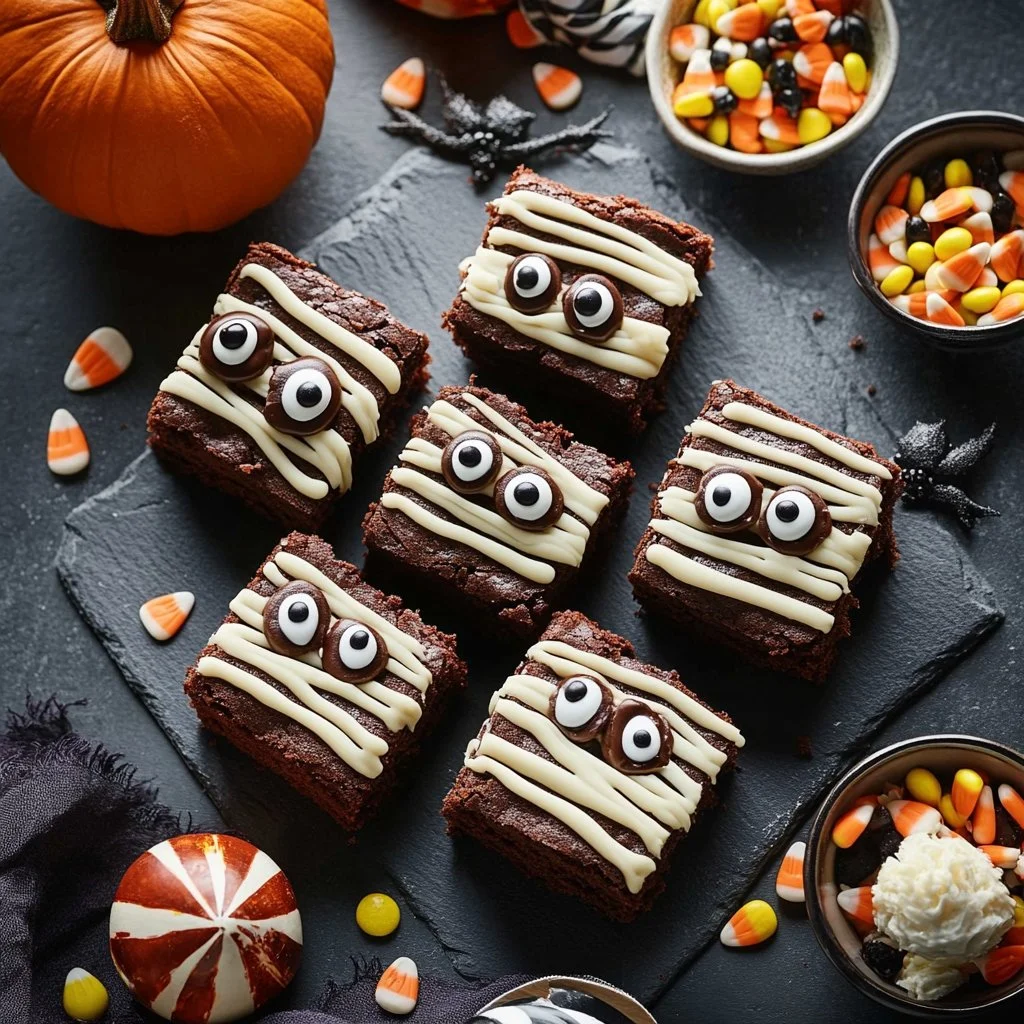
As Halloween approaches, the excitement in the air is palpable. Spooky decorations, costumed kids, and the alluring aroma of baked goods fill the senses. There’s something simply magical about this season, isn’t there? When it comes to festive treats, nothing quite captures the spirit like Halloween Brownies!
Have you ever craved a chocolatey delight that’s both delicious and visually appealing? Look no further! These Halloween Brownies are rich, fudgy, and can easily be decorated to match the spooky theme of the holiday. Whether you’re hosting a Halloween party, looking for a fun baking activity with the kids, or simply wanting a tasty treat, this recipe fits the bill perfectly. It’s quick, easy, and offers a delightful combination of flavors that everyone will love.
Let’s dive into why these brownies are such a hit and how you can whip them up in no time!
Key Benefits of Halloween Brownies
Why You’ll Love This Recipe
These Halloween Brownies are more than just a dessert; they are a celebration of the season! Here are some key benefits of making them:
- Deliciously Chocolatey: With both cocoa powder and icing, every bite is a rich, chocolatey experience.
- Simplicity: No complicated steps here! This is a straightforward recipe that even beginners can handle.
- Family-Friendly: Kids love both eating and decorating these brownies, making it a fantastic family activity.
- Quick Prep Time: You can have them ready to serve in under an hour from start to finish!
- Versatile Decor: The opportunity to customize decorations makes each batch special and unique.
- Perfect for Sharing: Whether at a party or for trick-or-treaters, these brownies are easy to cut and serve.
What Makes It Stand Out
Halloween Brownies are a great way to bring a festive touch to your baking. The combination of moist brownie texture topped with a creamy chocolate icing creates a dessert that’s indulgent yet approachable.
What sets this recipe apart is its flexibility. You can easily customize the decoration according to your personal taste or what you have in your pantry. Think candy eyeballs, colorful sprinkles, or even themed stencils. This makes it an excellent option for parties, classroom treats, or family gatherings.
Let’s not forget the seasonal aspect! These brownies aren’t just for Halloween; they can be adjusted slightly to fit any holiday, ensuring they are always a welcome addition to your dessert table.
Ingredients for Halloween Brownies
Complete Ingredient List with Measurements
For making these delicious Halloween Brownies, you will need:
- 1 cup unsalted butter
- 2 cups granulated sugar
- 4 large eggs
- 1 teaspoon vanilla extract
- 1 cup all-purpose flour
- 1 cup cocoa powder
- 1/2 teaspoon salt
- 1/2 teaspoon baking powder
- Chocolate icing (store-bought or homemade)
- Candy eyeballs for decoration
- Pumpkin-shaped sprinkles for that extra festive touch
Substitutes and Alternatives
If you have dietary restrictions or preferences, here are some substitutes you can use:
- Butter: Can be replaced with coconut oil or margarine for a dairy-free option.
- Sugar: Use coconut sugar or a sugar substitute to reduce calories.
- Eggs: Applesauce or flaxseed meal (1 tablespoon of flaxseed meal mixed with 2.5 tablespoons of water) can replace eggs for a vegan version.
- Flour: Gluten-free all-purpose flour can be substituted to make the brownies gluten-free.
- Icing: Whipped coconut cream can be an alternative for a lighter topping.
How to Make Halloween Brownies – Step-by-Step Directions
Making Halloween Brownies is simple and fun. Follow these easy steps to create your spook-tacular treat:
Step 1 – Prep Your Workspace and Ingredients
Start by gathering all your ingredients and tools. You will need:
- A 9×13 inch baking pan, greased
- Mixing bowls
- A whisk or electric mixer
- Measuring cups and spoons
- A spatula for smooth mixing
Make sure your oven is preheated to 350°F (175°C).
Step 2 – Melt the Butter and Mix in Sugar
In a large bowl, melt the 1 cup of unsalted butter in the microwave or on the stovetop until fully liquefied. Once melted, stir in the 2 cups of granulated sugar until well combined and slightly cooled.
Step 3 – Add Your Eggs
Add the 4 large eggs to the butter-sugar mixture, one at a time. Mix well after each addition to ensure they are fully incorporated. Follow up with the 1 teaspoon of vanilla extract for that wonderful flavor kick.
Step 4 – Whisk Together Dry Ingredients
In a separate bowl, whisk together the 1 cup of all-purpose flour, 1 cup of cocoa powder, 1/2 teaspoon of salt, and 1/2 teaspoon of baking powder. Ensure there are no lumps for a smooth batter.
Step 5 – Combine Wet and Dry Ingredients
Gradually, add the dry mixture to your wet ingredients. Gently stir with a spatula until just combined. Be careful not to overmix; it should be smooth and thick.
Step 6 – Pour the Batter into the Pan
Pour the brownie batter into your prepared 9×13 inch baking pan. Use your spatula to spread the mixture evenly and smooth out the top.
Step 7 – Bake the Brownies
Place the pan in the preheated oven. Bake for 25-30 minutes. Keep an eye on them, and use a toothpick to test. It’s done when the toothpick comes out with a few moist crumbs but is not wet with batter.
Step 8 – Let Cool Completely
Once baked, remove from the oven and let them cool in the pan on a wire rack. It’s essential to let the brownies cool completely before icing to avoid melting the decoration.
Step 9 – Ice the Brownies
Once cooled, generously spread chocolate icing over the top of the brownies. This is where you can have a lot of fun!
Step 10 – Decorate with Candy Eyeballs and Sprinkles
Finish your Halloween Brownies by adorning them with candy eyeballs and pumpkin-shaped sprinkles. Get creative! You can create little monster faces or spooky scenes.
Serving Suggestions for Halloween Brownies
Best Occasions to Serve This Dish
Halloween Brownies are incredibly versatile and perfect for various occasions:
- Halloween Parties: They’re a festive addition to any Halloween gathering.
- Trick-or-Treating: Cut them into bite-sized pieces for handing out to friends and neighbors.
- School Events: Great for classroom treats (just check for allergies beforehand!).
- Family Celebrations: Enjoy them during family gatherings or cozy movie nights.
What to Serve With It
Pair these brownies with delicious accompaniments for an enhanced dessert experience:
- Glass of Milk: Chocolate and milk are a classic combination.
- Coffee or Tea: Perfect for adults who want a pick-me-up alongside their treat.
- Ice Cream Scoop: A scoop of vanilla or pumpkin ice cream can add an extra flair.
- Chocolate Sauce Drizzle: For the chocolate lovers, a drizzle of chocolate sauce will enhance the flavor.
Storing Halloween Brownies Properly
Best Storage Practices
To maintain freshness, here are some best practices for storing your Halloween Brownies:
- Room Temperature: Store baked brownies in an airtight container at room temperature for up to 3-4 days.
- Refrigerator Storage: They can last longer in the fridge, up to a week. But ensure they’re in a sealed container to avoid drying out.
Reheating and Freezing Tips
- Freezing: You can freeze brownies! Cut them into squares, wrap tightly in foil, and place them in a freezer bag. They can last up to 3 months in the freezer.
- Thawing: To thaw, place them in the fridge overnight or leave at room temperature for a few hours.
- Reheating: To reheat, pop them in the microwave for a few seconds or quickly in the oven at low heat. Avoid overheating to prevent them from becoming dry.
Tips & Tricks for Halloween Brownies
Mistakes to Avoid
- Overmixing: Mixing too much can result in dense brownies. Mix just until combined!
- Skipping Cooling Time: Decorating warm brownies can cause the icing to melt. Always let them cool completely.
- Using Expired Ingredients: Always check expiration dates on baking items like baking powder and cocoa powder for optimal results.
Extra Tips for Better Results
- Perfect Texture: Under-baking slightly will give you fudgy brownies, while ensuring a toothpick comes out with moist crumbs gives the ideal texture.
- Add Flavor: A pinch of espresso powder can intensify the chocolate flavor if you like espresso.
- Be Creative with Decoration: Use leftover Halloween candy to decorate, making your brownies uniquely yours!
Recipe Variations of Halloween Brownies
Creative Twists
Want to make your Halloween Brownies even more exciting? Consider these variations:
- Nutty Brownies: Add 1 cup of finely chopped nuts for added crunch and richness.
- Minty Madness: Add 1 teaspoon of mint extract for a refreshing twist.
- Spicy Pumpkin Brownies: Mix in 1 teaspoon of pumpkin spice for that perfect fall flavor.
Dietary Adjustments
If you need to cater to specific dietary needs, here’s how to adjust the classic recipe:
- Gluten-Free: Substitute regular flour with almond flour or a gluten-free blend.
- Dairy-Free: Use coconut oil and dairy-free chocolate icing.
- Vegan: Opt for flax eggs and ensure all ingredients, including chocolate, are vegan-friendly.
Conclusion about Halloween Brownies
In summary, Halloween Brownies are a delightful treat that captures the spirit of the season. With their rich chocolate flavor and customizable decorations, they’re perfect for various occasions—making you the star baker of the festivities!
Not only are they easy to prepare, but they also fill your home with tantalizing aromas and bring smiles to those who indulge. So, roll up your sleeves, gather the ingredients, and start creating these delectable Halloween Brownies.
We invite you to dive into this holiday joy, try this recipe, and impress your family and friends. Let the fun of baking overwhelm you—and don’t forget to share your experiences with us!
FAQs about Halloween Brownies
What if it doesn’t turn out right?
Baking mishaps can happen, but don’t worry! If the texture is off, it’s usually because of overmixing or incorrect baking time. Don’t be afraid to experiment a bit and learn for next time!
Can I prepare it ahead of time?
Absolutely! You can make these brownies a day or two ahead. Just store them in an airtight container until you’re ready to decorate and serve.
What are the best ingredient substitutions?
Common substitutions include applesauce for eggs, gluten-free flour for all-purpose, and coconut oil for butter. Be sure to choose options that fit your dietary needs.
How long can it be stored?
Properly stored brownies can last about 3-4 days at room temperature, a week in the fridge, or up to 3 months in the freezer.
Can I use store-bought dough or crust?
While this recipe is designed for homemade brownies, store-bought options can work in a pinch! Just ensure they fit the flavor profile you want.
Is this recipe kid-friendly or family-appropriate?
Definitely! With simple ingredients and no sharp tools involved, this recipe is perfect for kids to help with under supervision.
Can I make this recipe allergen-free?
Yes! With substitutions like gluten-free flour, dairy-free chocolate, and flax eggs, you can easily cater to various allergies.
Now you’re all set to dive into making those irresistible Halloween Brownies! Enjoy crafting these tasty delights as you celebrate the spooky season!
Halloween Brownies
Ingrédients
Main ingredients
- 1 cup unsalted butter Can be replaced with coconut oil or margarine for a dairy-free option.
- 2 cups granulated sugar Can use coconut sugar or a sugar substitute to reduce calories.
- 4 large eggs Applesauce or flaxseed meal can be used as a replacement for vegan.
- 1 teaspoon vanilla extract
- 1 cup all-purpose flour Gluten-free flour can be substituted.
- 1 cup cocoa powder
- 1/2 teaspoon salt
- 1/2 teaspoon baking powder
Topping and decoration
- 1 cup chocolate icing Store-bought or homemade.
- as needed candy eyeballs For decoration.
- as needed pumpkin-shaped sprinkles For decoration.
Instructions
Preparation
- Gather all your ingredients and tools. Preheat your oven to 350°F (175°C) and prepare a greased 9×13 inch baking pan.
- Melt the unsalted butter in a large bowl, then stir in the granulated sugar until combined and slightly cooled.
- Add the eggs one at a time to the butter-sugar mixture, mixing well after each addition. Stir in the vanilla extract.
- In a separate bowl, whisk together the flour, cocoa powder, salt, and baking powder.
- Gradually add the dry ingredients to the wet mixture, stirring gently until just combined.
Baking
- Pour the brownie batter into the prepared baking pan and smooth out the top.
- Bake for 25-30 minutes. Check with a toothpick; it should come out with a few moist crumbs.
- Once done, let the brownies cool completely in the pan on a wire rack.
Decorating
- Once cooled, generously spread chocolate icing over the top.
- Decorate with candy eyeballs and sprinkles to create fun designs.