
Table of Contents
Introduction to Vegan Twix Bars (No-Bake, Nut-Free!)
Have you ever craved something sweet yet guilt-free, something that tickles your taste buds while aligning with your dietary preferences? Look no further! Vegan Twix Bars (No-Bake, Nut-Free!) are the perfect solution to satisfy your sweet tooth without compromising on health or taste. Whether you follow a vegan lifestyle or simply wish to explore plant-based alternatives, this recipe is an exciting option.
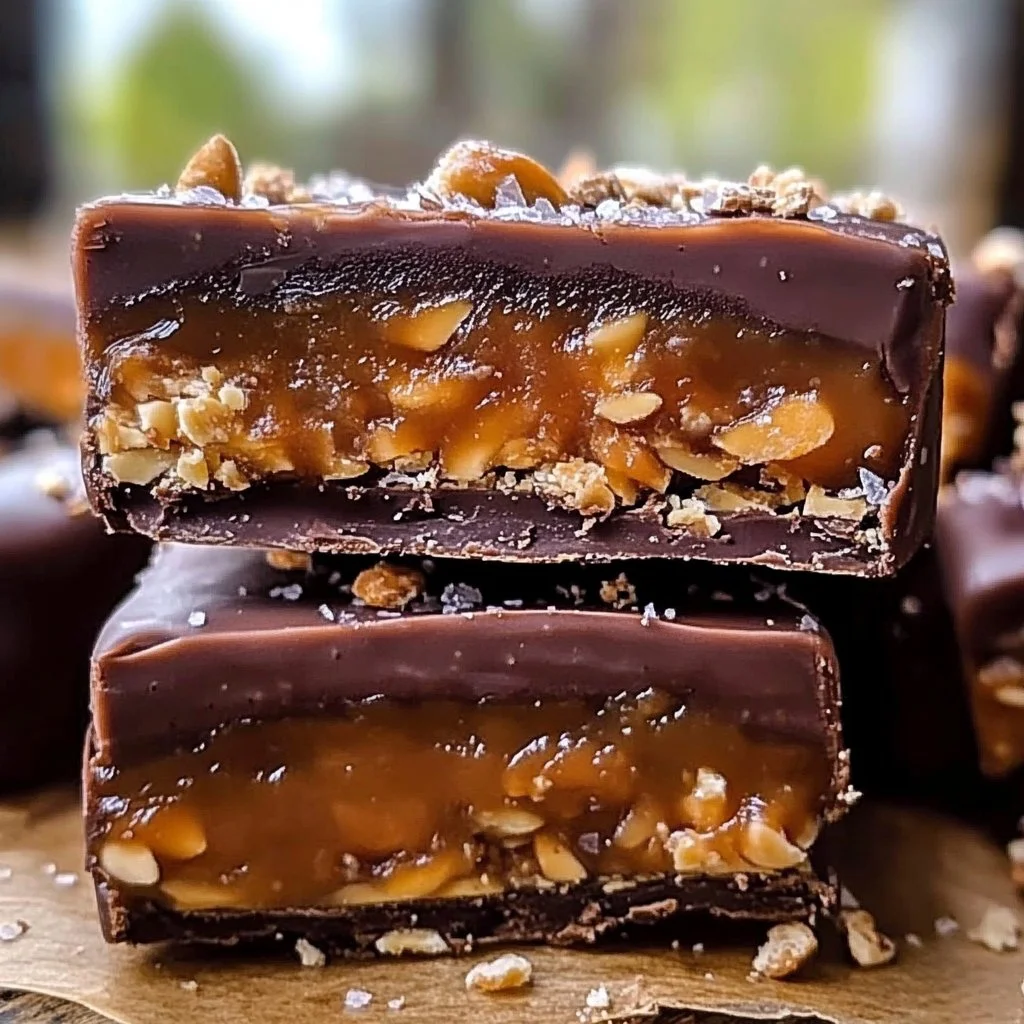
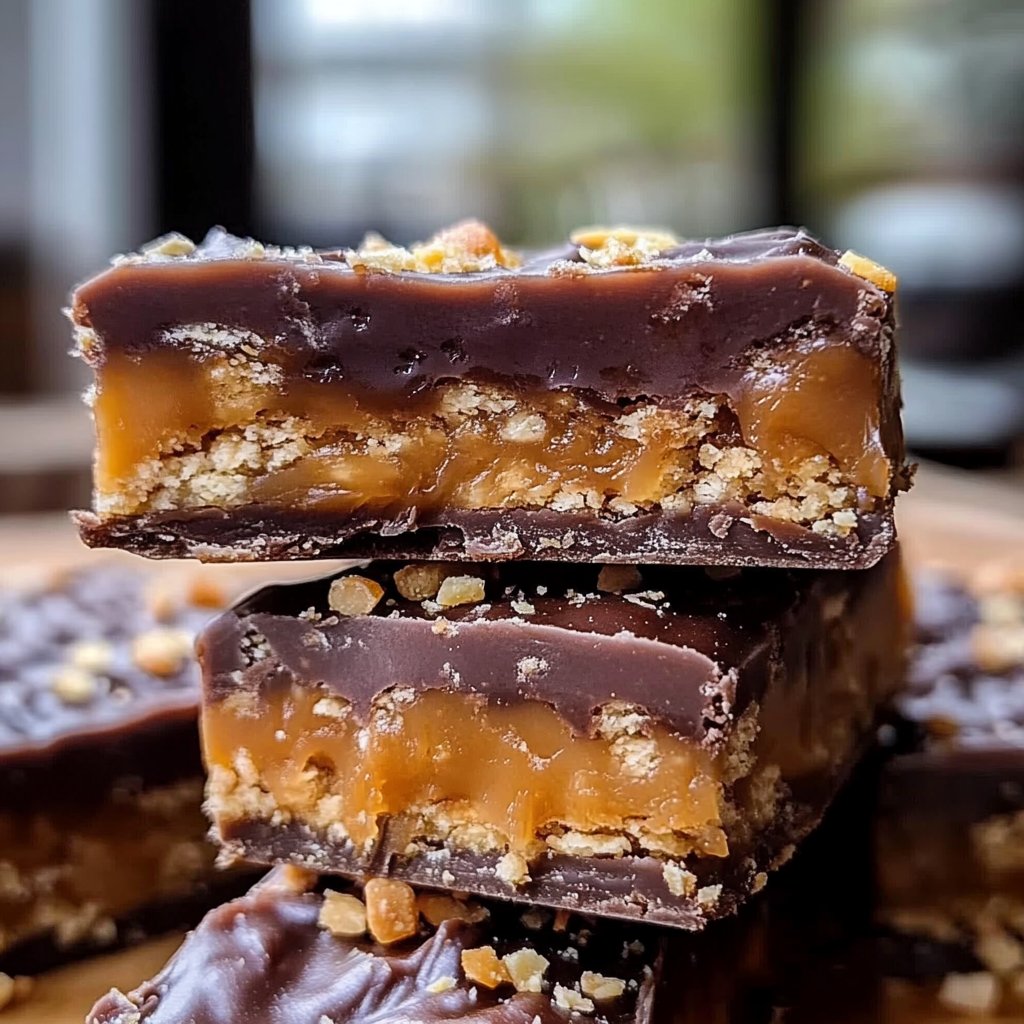
These bars are not only easy to make but also require no baking, making them an excellent dessert for those who might feel intimidated in the kitchen. They boast a deliciously rich flavor, with the delightful crunch of shortbread, the gooey sweetness of caramel, and the decadent layer of dark chocolate on top. What more could you ask for in a treat? These Vegan Twix Bars (No-Bake, Nut-Free!) are sure to impress everyone from the most discerning dessert lover to the casual snacker.
What makes this recipe unique lies in its simplicity and versatility. Using wholesome ingredients like tigernut flour and medjool dates, these bars are packed with nutrients while still delivering the indulgent flavors we all love. Can you imagine having a treat that fits seamlessly into your lifestyle and satisfies those cravings at the same time? Yes, it’s entirely possible with Vegan Twix Bars (No-Bake, Nut-Free!)!
Key Benefits of Vegan Twix Bars (No-Bake, Nut-Free!)
Why You’ll Love This Recipe
- Easy no-bake preparation; quick to assemble.
- Nut-free, making it safe for those with allergies.
- Rich in wholesome ingredients; no processed sugars.
- Versatile; easily customizable to your preferences.
- Perfect for various occasions, from picnics to parties.
- Guilt-free indulgence; satisfying without the excess calories.
What Makes It Stand Out
Vegan Twix Bars (No-Bake, Nut-Free!) stand out for their originality. The combination of tigernut flour and medjool dates creates a luscious, textured experience that sets these bars apart from other standard recipes. Moreover, these bars are an incredible canvas for customization—whether you want to add a pinch of sea salt or mix in a few coconut flakes, each bar can reflect your individual taste.
These treats are ideal for any occasion, be it a casual gathering or a more formal event. They resonate with health-conscious individuals, families looking for wholesome snacks, and anyone who enjoys robust flavors in their desserts. It’s all about bringing joy and satisfaction to your palate while allowing you to indulge in a healthier manner.
Ingredients for Vegan Twix Bars (No-Bake, Nut-Free!)
Complete Ingredient List with Measurements
- Shortbread Cookie:
- 112g tigernut flour (about 1 cup)*
- 1/4 cup coconut oil (room temp)
- 1 Tbsp maple syrup
- 1 tsp vanilla extract
- 1/8 tsp salt
- Caramel:
- 14 medjool dates (225g pitted)
- 2 Tbsp coconut oil
- 1/2 tsp vanilla
- 1/8 tsp salt
- 2-3 Tbsp coconut flour
- Chocolate Coating:
- 6 oz dark chocolate
- 1 tsp coconut oil
*Note: If tigernut flour is unavailable, you may substitute with almond flour, but be mindful of the nut-free requirement.
Substitutes and Alternatives
If you need swaps due to allergies or dietary restrictions, there are several options to cater to various needs. For instance, if coconut oil is a concern, you can use other plant-based fats such as vegan butter or vegetable oil. If you wish to replace tigernut flour, almond flour can work in a pinch, though it will no longer be nut-free.
For added sweetness without using maple syrup, agave nectar or rice syrup can be suitable alternatives. Keeping these substitutions in mind ensures that everyone can enjoy Vegan Twix Bars (No-Bake, Nut-Free!) without worries.
How to Make Vegan Twix Bars (No-Bake, Nut-Free!) – Step-by-Step Directions
Step 1 – Prepare Ingredients
Begin by gathering all your ingredients. Measure out the tigernut flour, coconut oil, maple syrup, vanilla extract, salt, medjool dates, and other necessary components. Having everything ready will streamline the process and make it more enjoyable.
Step 2 – Cook the Base
In a medium-sized mixing bowl, combine the tigernut flour, coconut oil, maple syrup, vanilla extract, and salt. Use a fork to mix everything together at first; this will help break down the coconut oil. Once somewhat incorporated, use your hands to bring the dough together. Roll it into a ball and then press it evenly into the lined baking pan. Aim for a consistent layer, as this will create a sturdy base for your bars.
Step 3 – Make the Caramel
For the caramel layer, place the pitted medjool dates in a microwaveable bowl, cover them with water, and microwave for about 2 minutes. After microwaving, drain the water, and add the softened dates to a food processor with coconut oil, vanilla, and salt. Blend until smooth, stopping occasionally to scrape down the sides for an even consistency.
Step 4 – Thicken the Caramel
Once you’re satisfied with the texture, add in a couple of tablespoons of coconut flour. This will help thicken the caramel. Blend again until everything is well mixed and achieves a rich, thick consistency. It should be smooth enough to spread but thick enough to stay in place when applied to the base.
Step 5 – Assemble the Bars
Scoop the caramel mixture out and spread it evenly over the shortbread base in the baking pan. To ensure an even layer, place a sheet of parchment paper on top and use your hands to gently push the caramel to the edges. This will help smooth out the surface.
Step 6 – Freeze
Once assembled, cover the baking dish with plastic wrap or a lid and place it in the freezer. Let it chill for a minimum of 2 hours to firm up. This step is crucial, as it helps the layers adhere to one another better.
Step 7 – Melt the Chocolate
After the bars have set in the freezer, prepare the chocolate coating. In a small saucepan, melt the dark chocolate and coconut oil over low heat. Stir frequently to ensure the chocolate melts evenly and does not burn.
Step 8 – Cut the Bars
Remove the bars from the freezer and carefully lift them out of the baking pan using the foil as a handle. Use a sharp knife to cut them into 16 equally sized pieces. Don’t worry if some edges break; they’ll be covered in chocolate!
Step 9 – Dip in Chocolate
Individually dip each piece into the melted chocolate, ensuring that they are fully coated. Once dipped, place them on a lined baking sheet. This is where you can get creative; if desired, drizzle any remaining melted chocolate over the tops for added flair.
Step 10 – Set and Serve
Allow the coated bars to set at room temperature or place them back in the freezer for a quicker firming time. Once set, they’re ready to enjoy!
Serving Suggestions for Vegan Twix Bars (No-Bake, Nut-Free!)
Best Occasions to Serve This Dish
These Vegan Twix Bars (No-Bake, Nut-Free!) make a fantastic treat for various occasions. They are ideal for family gatherings, movie nights, birthday parties, or as an afternoon snack. Their sweet and nutty flavor appeals to everyone, making them a crowd-pleaser.
What to Serve With It
Consider serving these bars alongside a glass of plant-based milk or a cup of herbal tea for a wholesome afternoon snack. You can also pair them with fresh fruits like strawberries or raspberries to add a touch of natural acidity that balances the sweetness.
How to Store Vegan Twix Bars (No-Bake, Nut-Free!) Properly
Best Storage Practices
To keep your Vegan Twix Bars (No-Bake, Nut-Free!) fresh, store them in an airtight container in the refrigerator. This keeps them firm and maintains their delightful texture. If you’d like to store them for a longer period, consider freezing them.
Reheating and Freezing Tips
When frozen, simply take out the desired pieces and allow them to thaw at room temperature for about 10-15 minutes. If you’ve stored them in the fridge, you can enjoy them cold, but allow them a few minutes to soften slightly for better texture and flavor.
Tips & Tricks for Vegan Twix Bars (No-Bake, Nut-Free!)
Mistakes to Avoid
1 – Overmixing the dough can create a dense base; mix just until combined.
2 – Not chilling the layers long enough may lead to bars falling apart; patience is key!
3 – Cutting the bars too soon can cause them to crumble; ensure they’re firm.
4 – Using dry dates affects texture; ensure your medjool dates are soft and fresh.
5 – Skipping the chocolate coating makes it less indulgent; don’t skip this step!
Extra Tips for Better Results
Consider sprinkling a touch of flaky sea salt on top of the chocolate coating for added flavor depth. If you’d like a twist, add a little espresso powder to the chocolate for a mocha kick. Experiment with flavored extracts such as almond or hazelnut for more character.
Recipe Variations of Vegan Twix Bars (No-Bake, Nut-Free!)
Creative Twists
1 – Nutty Flavor: Add a tablespoon of almond butter to the caramel layer for an added depth of flavor. Just ensure to check for allergies!
2 – Chocolate Swirl: Incorporate a coconut swirl between layers; it lends a tropical touch.
3 – Fruit Bars: Mix dried fruits like cranberries or raisins into the shortbread for enhanced flavor and texture.
4 – Granola Bars: Fold some granola into the chocolate coating for an added crunch.
Dietary Adjustments
For a gluten-free option, ensure all ingredients, especially chocolate, are certified gluten-free. This recipe is naturally dairy-free and provides a delicious alternative to those who may avoid dairy products.
Conclusion about Vegan Twix Bars (No-Bake, Nut-Free!)
In conclusion, Vegan Twix Bars (No-Bake, Nut-Free!) are an irresistibly delicious treat perfect for those who seek out plant-based desserts. This recipe essentially combines wholesome ingredients with delightful flavors to create something truly enjoyable. Not only are these bars easy to prepare, but they also allow for customization based on your personal preferences and dietary needs. So gather your ingredients, follow the easy steps, and treat yourself and your loved ones to these delightful bars. They’re not just a dessert; they’re an experience waiting to unfold in your home.
FAQs about Vegan Twix Bars (No-Bake, Nut-Free!)
How long can I store Vegan Twix Bars (No-Bake, Nut-Free!)?
The bars can be stored in the fridge for about a week. If frozen, they last for a few months.
Can I make these Vegan Twix Bars (No-Bake, Nut-Free!) ahead of time?
Absolutely! You can prepare the bars up to a week in advance and store them in the fridge or freezer for convenience.
What can I use instead of tigernut flour?
You can substitute tigernut flour with almond flour, but note that this will alter the nut-free aspect of the recipe.
Can I add nuts to this recipe?
While this particular recipe is nut-free, if not constrained by allergies, you can sprinkle some crushed nuts atop the caramel for added texture.
Do I need to soak the dates?
Soaking is recommended to soften the dates for easier blending, which results in a smoother caramel.
What type of dark chocolate is best for coating?
Look for dark chocolate with at least 70% cocoa for a richer flavor and better health benefits.
Can I use another sweetener instead of maple syrup?
Yes, agave nectar or brown rice syrup can work as good substitutes for maple syrup.
Is there a way to make these bars lower in sugar?
You can reduce the amount of dates used and supplement it with unsweetened cocoa powder mixed into the caramel for extra depth without added sugar.
What to do if my caramel is too thick?
If your caramel mixture is overly thick, add a splash of water or more coconut oil to reach the desired consistency before layering onto the shortbread base.
Can I make these Vegan Twix Bars (No-Bake, Nut-Free!) gluten-free?
Yes, by ensuring that all the ingredients used are gluten-free, this recipe can easily be made suitable for those with gluten sensitivities.

Vegan Twix Bars (No-Bake, Nut-Free!)
Ingrédients
Shortbread Cookie
- 112 g tigernut flour (about 1 cup) Substitutable with almond flour, but will no longer be nut-free.
- 1/4 cup coconut oil (room temp)
- 1 Tbsp maple syrup Can be substituted with agave nectar or rice syrup.
- 1 tsp vanilla extract
- 1/8 tsp salt
Caramel
- 14 pieces medjool dates (pitted) 225g
- 2 Tbsp coconut oil
- 1/2 tsp vanilla
- 1/8 tsp salt
- 2-3 Tbsp coconut flour
Chocolate Coating
- 6 oz dark chocolate Look for at least 70% cocoa.
- 1 tsp coconut oil
Instructions
Preparation
- Gather all your ingredients, measuring out the tigernut flour, coconut oil, maple syrup, vanilla extract, salt, medjool dates, and other necessary components.
Cook the Base
- In a medium-sized mixing bowl, combine the tigernut flour, coconut oil, maple syrup, vanilla extract, and salt. Mix using a fork and then bring the dough together with your hands. Roll it into a ball and press it evenly into a lined baking pan.
Make the Caramel
- Microwave the pitted medjool dates in a covered bowl with water for about 2 minutes. Drain the water, place the dates in a food processor with coconut oil, vanilla, and salt, and blend until smooth.
Thicken the Caramel
- Add coconut flour to the blended dates and mix until achieving a rich, thick consistency.
Assemble the Bars
- Spread the caramel mixture evenly over the shortbread base in the baking pan.
Freeze
- Cover the baking dish and freeze for at least 2 hours to firm up.
Melt the Chocolate
- Melt dark chocolate and coconut oil over low heat in a small saucepan, stirring frequently.
Cut the Bars
- Remove the bars from the freezer and cut them into 16 pieces using a sharp knife.
Dip in Chocolate
- Dip each piece into the melted chocolate and place them on a lined baking sheet.
Set and Serve
- Allow the coated bars to set at room temperature or back in the freezer until firm.